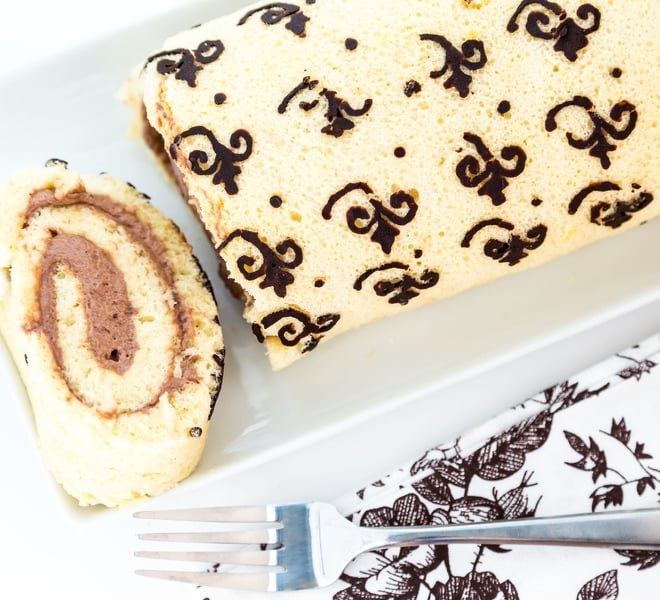
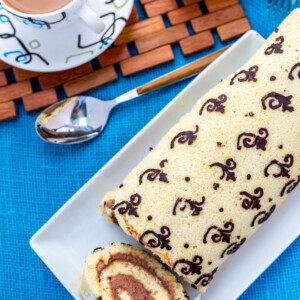
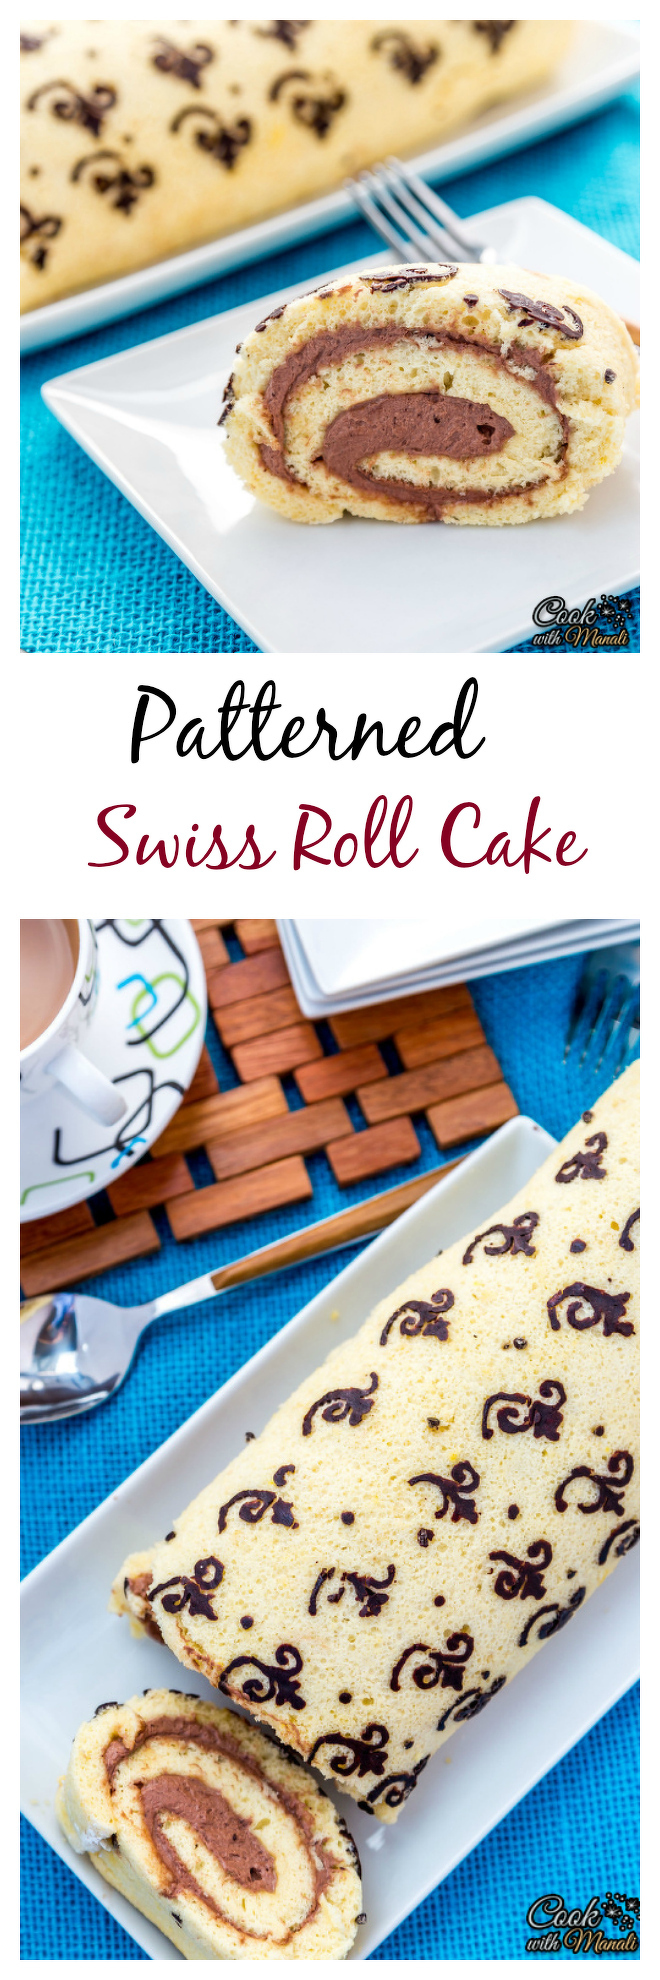
May 17, 2014, Updated May 07, 2023 First things first, this is my 100th post on the blog. Wohooo! : D I honestly never thought that I would be writing my 100th post one day. Big thanks to all those who read and comment on my blog, it means so much to me. I am really excited and hope to continue here for a long long time. So to celebrate my 100th post, I have a cake recipe for you today and that too a very pretty cake recipe – patterned swiss roll cake. Swiss roll cakes remind me of my days in Scotland. It was there that I first saw these roll cakes filled with chocolate filling and strawberry jams. They were quite popular there and I would often buy them whenever I would go for grocery shopping. No wonder I gained so many pounds munching on these cakes all the time!
So making them has been on my “to bake list” for long now. I wanted to bake not the regular swiss roll but the patterned one. I knew it would be a challenge but when it comes to baking I’m always up for it. The pattern just makes the cake look prettier. You can either use print outs to trace the pattern on parchment paper or draw free hand. I used a printed pattern because I am not really good at art : ( Honestly this was not my first attempt, I did try this cake before and it didn’t turn out the way I expected it to be. Swiss roll [English] or Jelly roll [American] or Roulade [French] is basically a sponge cake which is baked in a sheet pan and then filled with jams, frosting etc. The tricky part lies in rolling the cake perfectly and making sure that it doesn’t crack. When I made it the first time, the cake tore apart. After few trials and errors I have figured out few important things that one should keep in mind while making this swiss roll cake.
It is important to know what size of sheet pan you are using. Please refer to the whatever size the recipe mentions and use ONLY that pan for baking. This is important else the batter will be too much [if using a small pan] or too less [if using a bigger pan] and will cause problems in rolling the cake. This recipe uses a 18 x 13 inch sheet pan.
Using parchment paper is a must. There’s no way you can do without it.
You have to bake the cake at high temperature so that it bakes before it dries out.
Do not over-bake this cake, else it will become dry and crack and be difficult to roll. 5. Rolling the cake with a tea towel immediately after coming out of the oven helps in giving the cake its desired shape.
You have to put a lot of powdered sugar on the tea towel before you flip the cake over it. If the sugar isn’t enough, your cake will stick to the towel and break apart.
It’s a very soft cake so do not overfill it else you will have problems while rolling it.
Like always with egg whites, don’t mix them vigorously into the batter. If you do that you deflate the egg whites and that spongy, light texture that you look for in a sponge cake will be gone. So mix the egg whites into the batter using slow gentle strokes. 9. Don’t over-beat the egg whites, they should hold on their own but not form a stiff peak. They should form a curl, like a crooked finger.
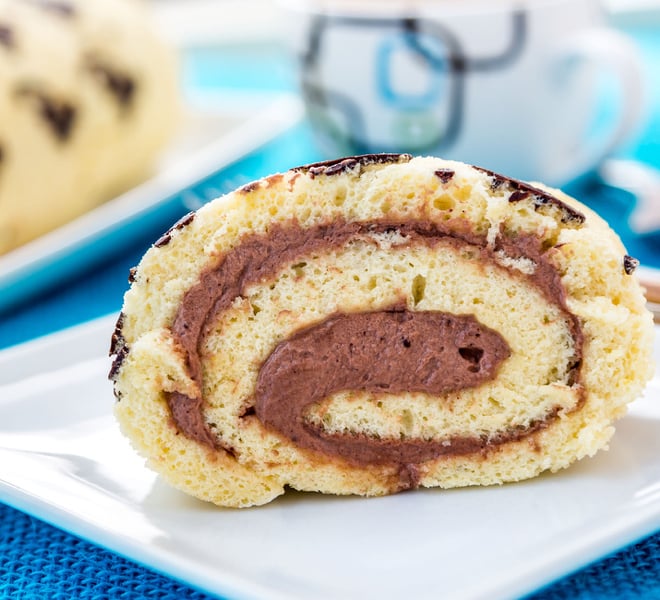
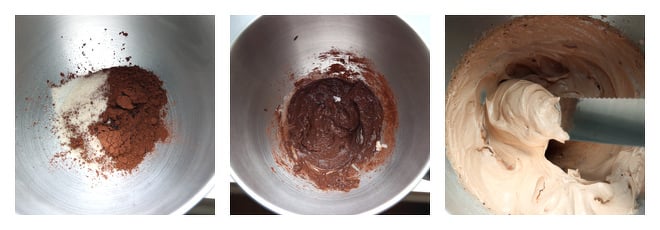
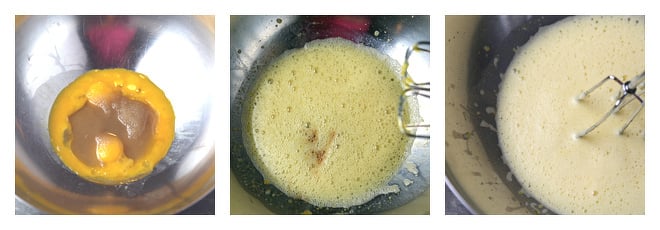
And last but not the least, have patience while baking the cake. If you are not successful the first time around don’t give up. Try till you succeed. There are a lot of steps in this recipe and I have tried my best to explain them through pictures. So let’s start! Filling Before making the filling place the bowl and the whisk attachment in the refrigerator for 30 minutes. Let’s make the filling first because it can be made in advance. Take sugar, cocoa powder, vanilla extract and 4 tablespoon of heavy cream in a bowl. Mix to form a smooth mixture. Add the remaining 3/4 cup of heavy cream and using the wire whisk attachment of your stand mixer, beat till it forms stiff peaks. Cover and keep the filling in the refrigerator till you need to use it.
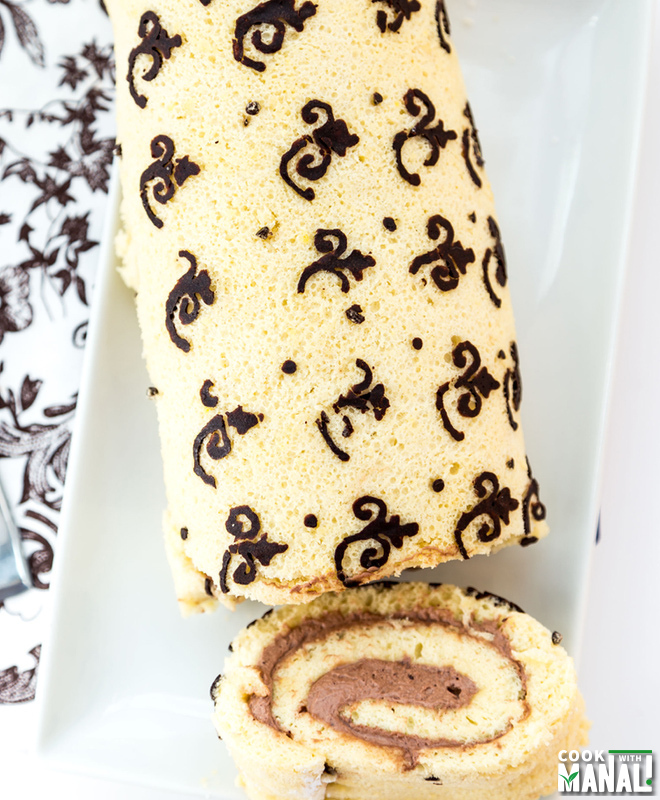
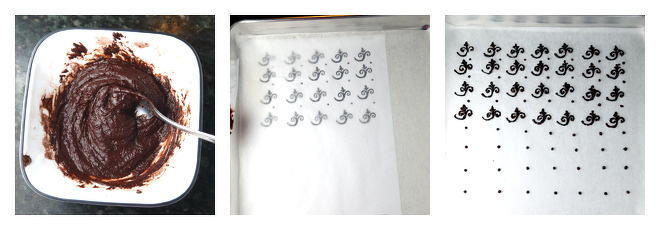
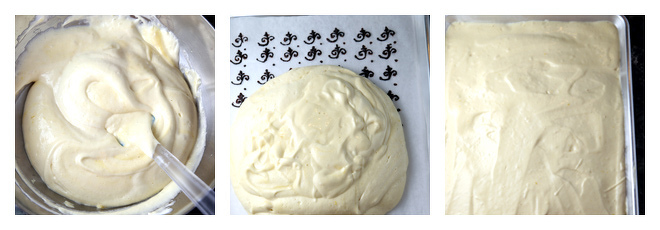
Pattern To make the pattern, mix together 1 egg white with sugar. Add flour, cocoa powder and room temperature butter and whisk to a smooth paste. You can add a tablespoon of water if you feel the mixture is too thick. I did add the water. Take the baking sheet [I used this 18 x 13 inch pan] and line it with parchment paper. Take the print out of your pattern and place it beneath the parchment paper. Pipe the mixture into a piping bag and trace the pattern over the parchment paper. I used wilton tip 2, you can use a smaller or a bigger tip as per your wish. If you don’t have a piping bag, simply use a ziplock bag. Make a small cut in it and draw the pattern. You can also draw the pattern free hand, but as you can see art is clearly not my forte and so in spite of the pattern being there, I wasn’t able to trace it properly, oh well! So once the pattern is done, place the tray in the freezer for around 30 minutes. This will give the pattern enough time to set.
Cake Start working on the cake once the pattern is in the freezer. Preheat the oven to 400 F degrees. Sift together flour, salt and baking powder. Set aside [sorry no picture of this step]. Separate the eggs. This is done best when eggs are cold, so take the eggs out of the fridge separate them and then let them sit at room temperature for around 30-40 minutes. The egg whites need to be at room temperature for the meringue. Take the egg yolks and add 1/4 cup +2 tablespoons of sugar, water, oil and beat till thoroughly combined. Add in the vanilla and beat till the mixture turns pale. This will take 6-7 minutes. Set aside.
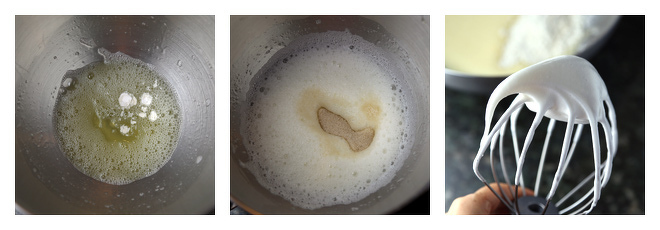
Start beating the egg whites and when they start foaming up add cream of tartar. Continue to beat till they become more foamy and then add the remaining 1/4 cup sugar. Beat till the egg whites form “medium peaks”. They should hold their own form but not point straight up. They should appear like a crooked finger. It is not essential to add cream of tartar but it gives stability to the egg whites.
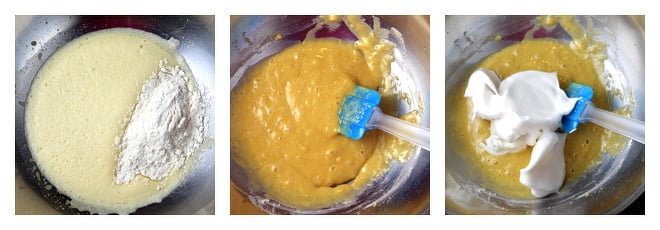
Take the egg yolk mixture and add the flour mixture to it in 2 parts. Mix to form a smooth batter. Start adding the egg whites, gently mixing them with the batter. Add the egg whites in 3 parts but be very gentle while folding them in the batter else you will deflate them.
Once all the egg whites are combined your cake batter is ready. Take out the baking sheet from the freezer and pour the batter over it. Using a spatula spread the batter evenly through the pan. Work quickly here because the set pattern can melt if you are not quick. Smooth the top using a spatula. Bake the cake in a preheated oven at 400 F degrees for 8-10 minutes or till it springs back on poking. Mine was done in 8 minutes.
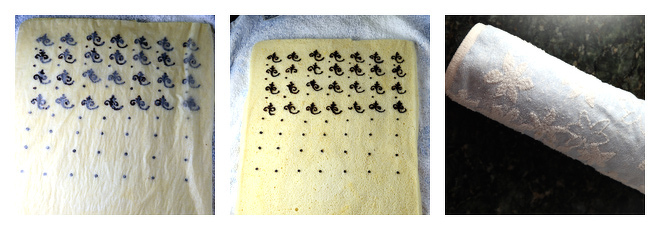
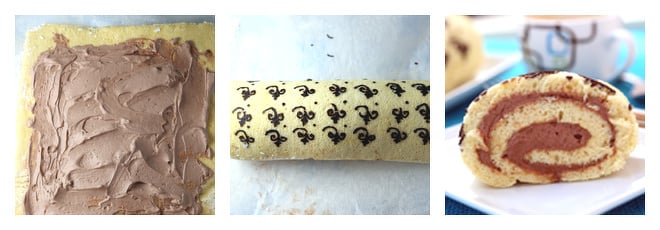
Place a clean tea towel on your counter-top and dust it with powdered sugar [around 1/4 cup]. Make sure it’s entirely covered with powdered/confectioners sugar else the cake will stick to it. Take out the cake from the oven and immediately flip it on the towel with the pattern side facing up. Remove the parchment paper immediately. Be careful not to break the cake as you peel the parchment paper. Take another parchment paper and place in on top of cake and flip it again so that the pattern now faces downward [sorry no picture of this step]. Roll the cake with the towel and let it sit for around 30-40 minutes. By rolling the cake with the towel, it gets it desired shape. So when you unroll the cake, you won’t have any difficulty in rolling it back again. Unroll the cake and take out the filling from the refrigerator. Fill the cake with the filling taking care not to overfill. Start rolling the cake with the help of the towel, peeling away the towel as you roll. Try to roll as tightly as you can but at the same time be careful not to break it. The cake is really soft and you have to be careful here. Place the cake roll in the refrigerator for 2-3 hours before slicing into pieces.
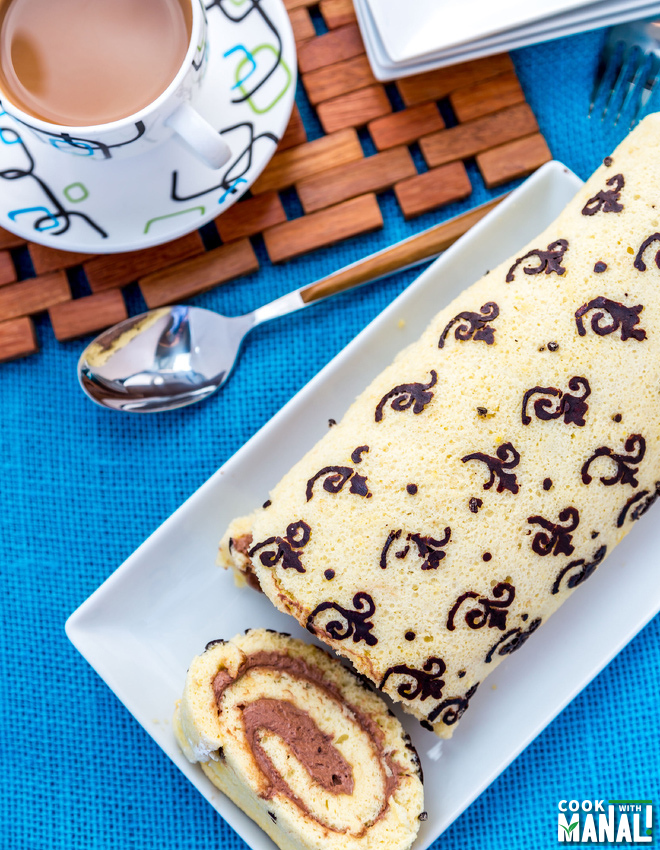
Enjoy a light and spongy cake with whipped chocolate frosting inside it!
- You can fill these cakes with anything you like. The easiest options would be nutella or any jam of your choice.
- Don’t try to slice the cake as soon as you roll it. Keeping it in the refrigerator for 2-3 hours gives it time to set and then you will be able to cut clean slices.
- If you want to make a chocolate swiss roll cake, just replace 1/4 cup of flour with cocoa powder and proceed in the same way.
- You can write, draw whatever you want in place of the pattern. You can color your mixture and make it colorful. I wanted a simple cake and hence used just cocoa powder.
- A lot of sponge cake recipes do not use butter/oil. I would encourage you to use oil like I did, my cake had no crack and it was super soft and moist. Patterned Swiss Roll Cake

title: “Patterned Swiss Roll Cake " ShowToc: true date: “2024-09-28” author: “Elliott Cormier”
May 17, 2014, Updated May 07, 2023 First things first, this is my 100th post on the blog. Wohooo! : D I honestly never thought that I would be writing my 100th post one day. Big thanks to all those who read and comment on my blog, it means so much to me. I am really excited and hope to continue here for a long long time. So to celebrate my 100th post, I have a cake recipe for you today and that too a very pretty cake recipe – patterned swiss roll cake. Swiss roll cakes remind me of my days in Scotland. It was there that I first saw these roll cakes filled with chocolate filling and strawberry jams. They were quite popular there and I would often buy them whenever I would go for grocery shopping. No wonder I gained so many pounds munching on these cakes all the time!
So making them has been on my “to bake list” for long now. I wanted to bake not the regular swiss roll but the patterned one. I knew it would be a challenge but when it comes to baking I’m always up for it. The pattern just makes the cake look prettier. You can either use print outs to trace the pattern on parchment paper or draw free hand. I used a printed pattern because I am not really good at art : ( Honestly this was not my first attempt, I did try this cake before and it didn’t turn out the way I expected it to be. Swiss roll [English] or Jelly roll [American] or Roulade [French] is basically a sponge cake which is baked in a sheet pan and then filled with jams, frosting etc. The tricky part lies in rolling the cake perfectly and making sure that it doesn’t crack. When I made it the first time, the cake tore apart. After few trials and errors I have figured out few important things that one should keep in mind while making this swiss roll cake.
It is important to know what size of sheet pan you are using. Please refer to the whatever size the recipe mentions and use ONLY that pan for baking. This is important else the batter will be too much [if using a small pan] or too less [if using a bigger pan] and will cause problems in rolling the cake. This recipe uses a 18 x 13 inch sheet pan.
Using parchment paper is a must. There’s no way you can do without it.
You have to bake the cake at high temperature so that it bakes before it dries out.
Do not over-bake this cake, else it will become dry and crack and be difficult to roll. 5. Rolling the cake with a tea towel immediately after coming out of the oven helps in giving the cake its desired shape.
You have to put a lot of powdered sugar on the tea towel before you flip the cake over it. If the sugar isn’t enough, your cake will stick to the towel and break apart.
It’s a very soft cake so do not overfill it else you will have problems while rolling it.
Like always with egg whites, don’t mix them vigorously into the batter. If you do that you deflate the egg whites and that spongy, light texture that you look for in a sponge cake will be gone. So mix the egg whites into the batter using slow gentle strokes. 9. Don’t over-beat the egg whites, they should hold on their own but not form a stiff peak. They should form a curl, like a crooked finger.
And last but not the least, have patience while baking the cake. If you are not successful the first time around don’t give up. Try till you succeed. There are a lot of steps in this recipe and I have tried my best to explain them through pictures. So let’s start! Filling Before making the filling place the bowl and the whisk attachment in the refrigerator for 30 minutes. Let’s make the filling first because it can be made in advance. Take sugar, cocoa powder, vanilla extract and 4 tablespoon of heavy cream in a bowl. Mix to form a smooth mixture. Add the remaining 3/4 cup of heavy cream and using the wire whisk attachment of your stand mixer, beat till it forms stiff peaks. Cover and keep the filling in the refrigerator till you need to use it.
Pattern To make the pattern, mix together 1 egg white with sugar. Add flour, cocoa powder and room temperature butter and whisk to a smooth paste. You can add a tablespoon of water if you feel the mixture is too thick. I did add the water. Take the baking sheet [I used this 18 x 13 inch pan] and line it with parchment paper. Take the print out of your pattern and place it beneath the parchment paper. Pipe the mixture into a piping bag and trace the pattern over the parchment paper. I used wilton tip 2, you can use a smaller or a bigger tip as per your wish. If you don’t have a piping bag, simply use a ziplock bag. Make a small cut in it and draw the pattern. You can also draw the pattern free hand, but as you can see art is clearly not my forte and so in spite of the pattern being there, I wasn’t able to trace it properly, oh well! So once the pattern is done, place the tray in the freezer for around 30 minutes. This will give the pattern enough time to set.
Cake Start working on the cake once the pattern is in the freezer. Preheat the oven to 400 F degrees. Sift together flour, salt and baking powder. Set aside [sorry no picture of this step]. Separate the eggs. This is done best when eggs are cold, so take the eggs out of the fridge separate them and then let them sit at room temperature for around 30-40 minutes. The egg whites need to be at room temperature for the meringue. Take the egg yolks and add 1/4 cup +2 tablespoons of sugar, water, oil and beat till thoroughly combined. Add in the vanilla and beat till the mixture turns pale. This will take 6-7 minutes. Set aside.
Start beating the egg whites and when they start foaming up add cream of tartar. Continue to beat till they become more foamy and then add the remaining 1/4 cup sugar. Beat till the egg whites form “medium peaks”. They should hold their own form but not point straight up. They should appear like a crooked finger. It is not essential to add cream of tartar but it gives stability to the egg whites.
Take the egg yolk mixture and add the flour mixture to it in 2 parts. Mix to form a smooth batter. Start adding the egg whites, gently mixing them with the batter. Add the egg whites in 3 parts but be very gentle while folding them in the batter else you will deflate them.
Once all the egg whites are combined your cake batter is ready. Take out the baking sheet from the freezer and pour the batter over it. Using a spatula spread the batter evenly through the pan. Work quickly here because the set pattern can melt if you are not quick. Smooth the top using a spatula. Bake the cake in a preheated oven at 400 F degrees for 8-10 minutes or till it springs back on poking. Mine was done in 8 minutes.
Place a clean tea towel on your counter-top and dust it with powdered sugar [around 1/4 cup]. Make sure it’s entirely covered with powdered/confectioners sugar else the cake will stick to it. Take out the cake from the oven and immediately flip it on the towel with the pattern side facing up. Remove the parchment paper immediately. Be careful not to break the cake as you peel the parchment paper. Take another parchment paper and place in on top of cake and flip it again so that the pattern now faces downward [sorry no picture of this step]. Roll the cake with the towel and let it sit for around 30-40 minutes. By rolling the cake with the towel, it gets it desired shape. So when you unroll the cake, you won’t have any difficulty in rolling it back again. Unroll the cake and take out the filling from the refrigerator. Fill the cake with the filling taking care not to overfill. Start rolling the cake with the help of the towel, peeling away the towel as you roll. Try to roll as tightly as you can but at the same time be careful not to break it. The cake is really soft and you have to be careful here. Place the cake roll in the refrigerator for 2-3 hours before slicing into pieces.
Enjoy a light and spongy cake with whipped chocolate frosting inside it!
- You can fill these cakes with anything you like. The easiest options would be nutella or any jam of your choice.
- Don’t try to slice the cake as soon as you roll it. Keeping it in the refrigerator for 2-3 hours gives it time to set and then you will be able to cut clean slices.
- If you want to make a chocolate swiss roll cake, just replace 1/4 cup of flour with cocoa powder and proceed in the same way.
- You can write, draw whatever you want in place of the pattern. You can color your mixture and make it colorful. I wanted a simple cake and hence used just cocoa powder.
- A lot of sponge cake recipes do not use butter/oil. I would encourage you to use oil like I did, my cake had no crack and it was super soft and moist. Patterned Swiss Roll Cake
