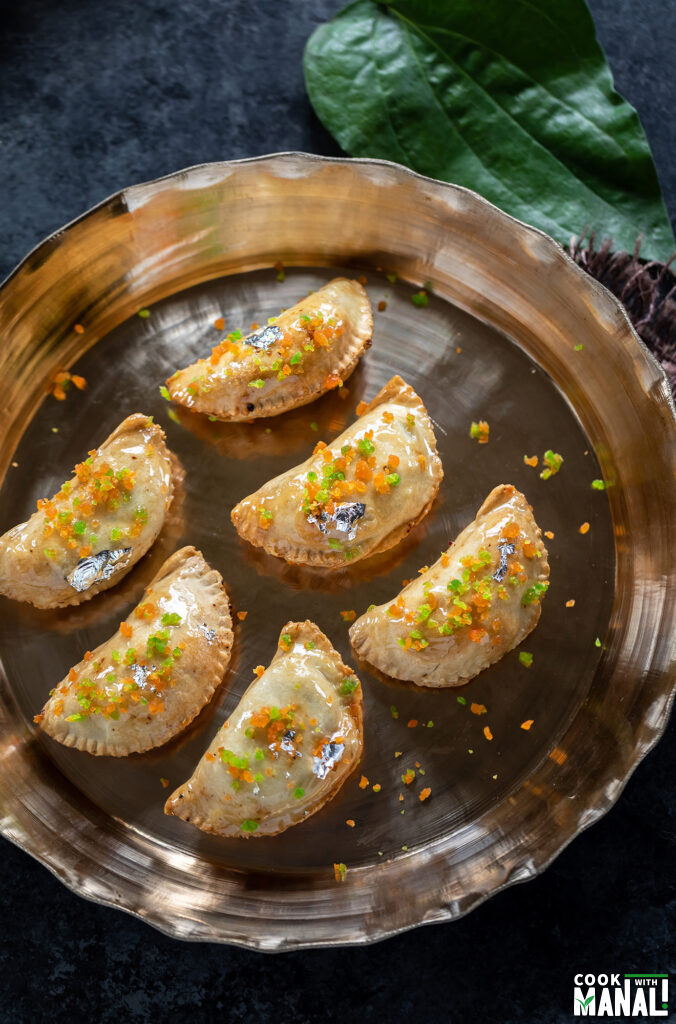
Mar 02, 2023 All my memories of holi start with me making gujiya with mom. It’s such a core memory that I can’t think of anything else when it comes to Holi. We would sit a few days before holi and make so many gujiyas, probably 100 and would serve them to anyone who visited us during Holi. It was such a fun activity and while I don’t have the fortune of doing that anymore with my mom, I still always make gujiya for Holi. Whether it’s air fryer gujiya or a chocolate cinnamon gujiya but there’s always gujiya on my Holi menu. This time around, I made Paan Gujiya. Considering my love for paan desserts, this is not surprising. You guys have always loved my paan desserts from paan ladoo to paan cheesecake and paan peda, and I am quite sure that these Paan Gujiyas will become your new favorite! I air fried this gujiya but you can also drrp fry them like they are done traditionally.
Filling for Paan Gujiya
The filling is honestly the best part about this paan gujiya, I couldn’t stop eating these. It’s made with mawa, paan leaves, desiccated coconut powder, gulkand, paan masala, fennel seeds, tutti frutti and a drop of peppermint extract. You can find all these ingredients at Indian grocery stores. The paan masala that I used was a dry Kolkata paan masala that I got from India but you can use any masala you like. If you don’t have it, that’s okay too. Just increase the amount of paan leaves, gulkand and fennel in the filling. You can even add nuts to the filling if you like. My mom always added chironji (it’s like a nut) to the gujiya filling and that will go well here too.
How to Make Paan Gujiya- Step by Step
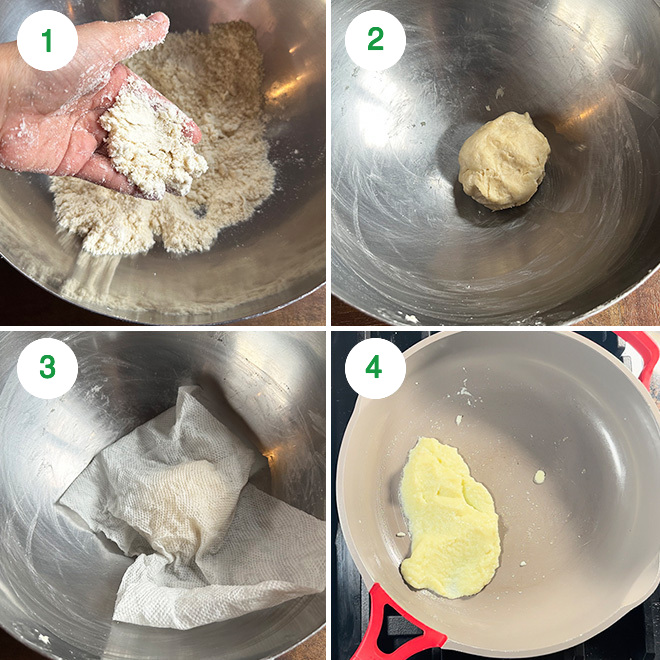
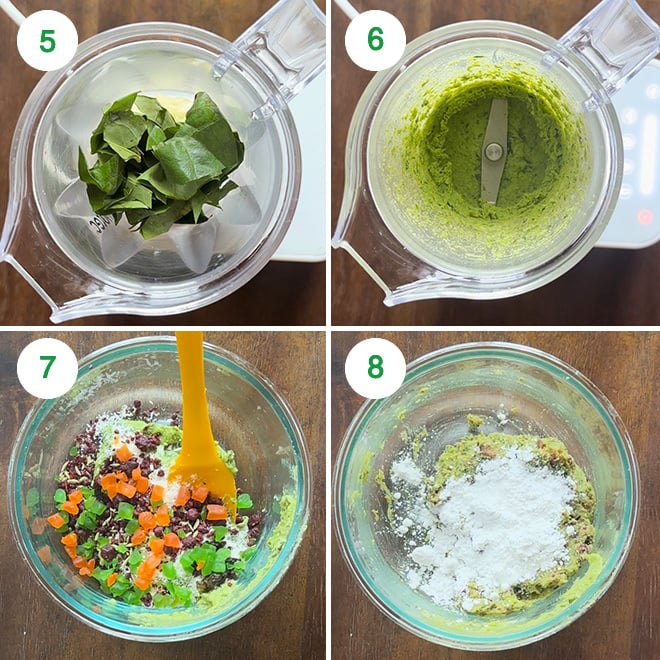
1- To a large bowl, add 1 cup flour (130 grams) along with a pinch of salt. Then add 2 tablespoons of melted ghee to the flour and start mixing it with your hands. Mix the ghee into the flour by rubbing it between your palms. Do this a few times until the mixture looks like crumbs. This is important so that the ghee is well incorporated into the flour. If you press some flour between your palm it should hold its shape and not crumble. This means the ghee was enough and was also well combined with the flour 2- Start adding water little by little and knead to form a relatively tight dough. I used around 1/4 cup (60 ml) water plus a little more to knead this but the amount of water may vary depending the the quality of flour being used. 3- Now, cover the dough with a damp cloth or paper towel and let it rest for 20 to 30 minutes. I wet a paper towel, squeezed all the water from it and used that to cover the dough. 4- Start working on the filling. First, roast around 125 grams of mawa in a pan on medium heat for 3 to 4 minutes until it turns very light golden brown in color. 5- Transfer the roasted mawa to a blender along with 4 chopped paan leaves. The leaves that I used were pretty big, if you are using smaller paan leaves, add more of them. 6- Pulse the mawa and paan leaves together to a paste using your blender. 7- Transfer the paste to a bowl and to that add the following:
2 to 3 tablespoons desiccated coconut powder1/4 teaspoon fennel seeds1 & 1/2 tablespoon paan masala1 tablespoon tutti frutti1 tablespoon gulkand
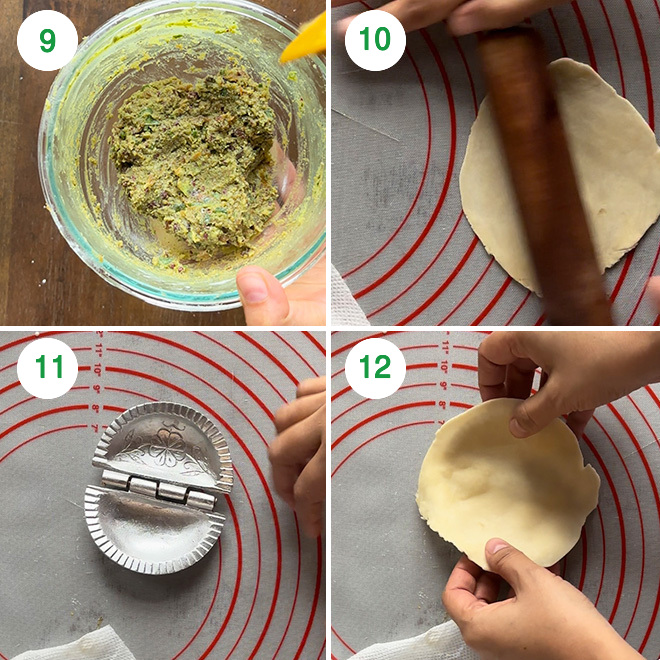
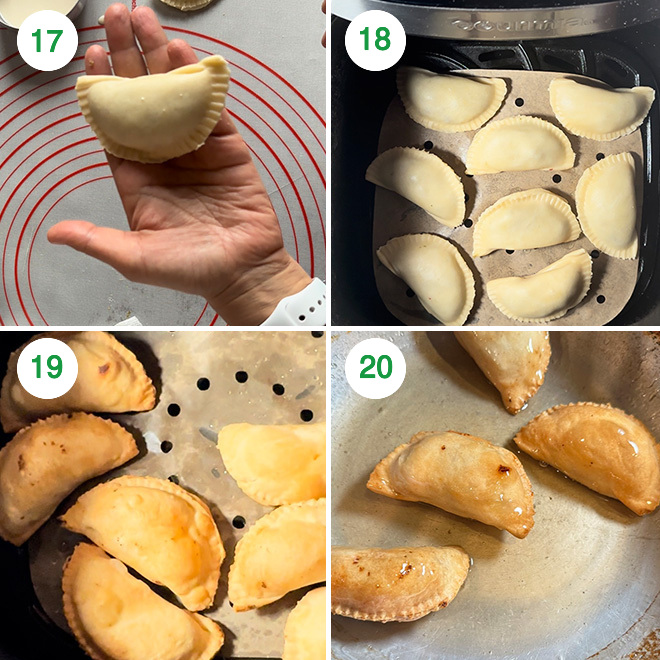
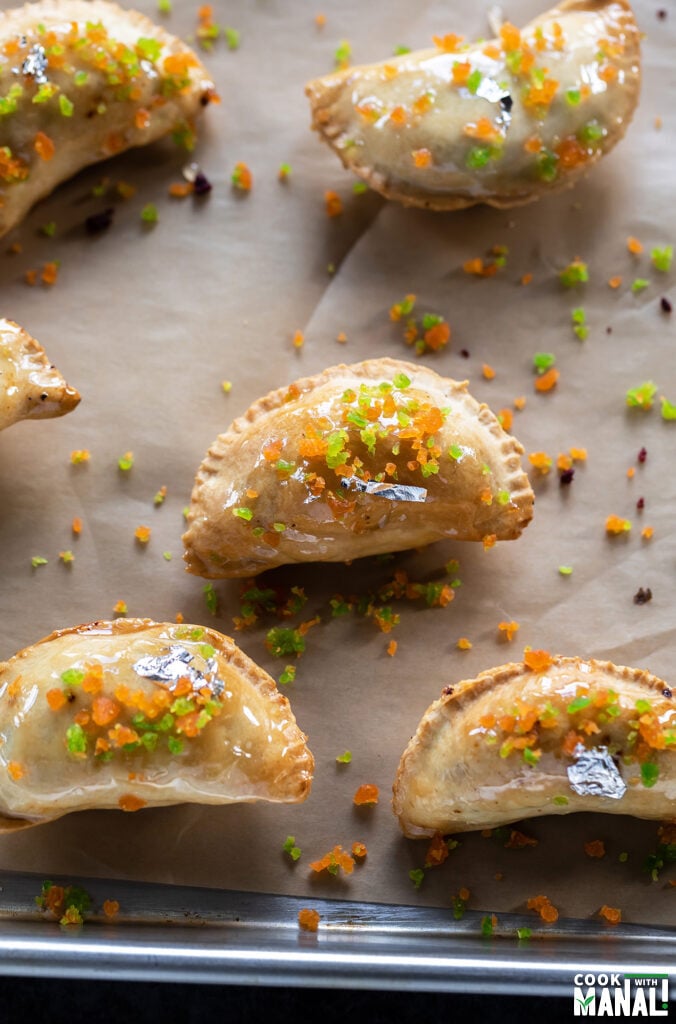
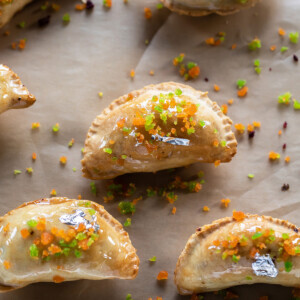
Mix everything until combined. 8- Then add 1 to 2 tablespoons of powdered sugar and 2 drops of peppermint extract. Gulkand, paan masala, tutti frutti already have sugar in them so taste test and add the powdered sugar accordingly. Start with 1 tablespoon and add more as needed. Also, the peppermint extract is very strong so be careful to not add too much of it else the filling will taste like toothpaste. 9- Mix until the sugar is well combined and now your filling is ready. You can also add a few drops of green food color if you want the filling to look bright green. I didn’t add any food color. 10- Once the dough has rested, divide it into small balls, around 20 to 25 grams each. Meanwhile, mix 2 tablespoons of flour with 3 tablespoons of water. This paste will be used to seal the gujiya. Take 1 of the dough balls and roll it (using a rolling pin) into a circle or around 5 to 6 inches diameter. Remember to keep the remaining dough balls covered with a damp cloth/paper towel while you roll one to prevent them from drying. 11- I have used a gujiya press/mold to shape the gujiyas. You can also use your hands to shape them or use a fork to make a design. 12- Place the rolled dough on top of the gujiya mold. You may apply a little oil or ghee on the mold before placing the dough. 13- Apply the prepared water-flour paste around the edges. This is important else the gujiya will not seal properly. 14- Add around 1 tablespoon of the paan filling. 15- Close the mold to seal the paan gujiya. Remove the excess dough from the sides and add it to the bowl and keep it covered. You will use this excess dough from all gujiyas to make more gujiyas later on. 16- Carefully remove the gujiya from the mold. 17- Make all gujiyas similarly. Remember to keep the shaped gujiya also covered with a damp cloth at all times else they will dry out. 18- Preheat the air fryer according to the manufacturer’s instructions. Place the gujiyas into the air fryer and spray them with an oil spray. I was able to air fry 8 gujiyas in one batch. 19- Air fry at 360 F degrees for 14 to 17 minutes or until golden brown in color. Each air fryer is different so adjust the timings accordingly. Air fry the remaining gujiyas similarly. 20- To dip them in sugar syrup, first make the sugar syrup by boiling together 1/2 cup water with 1/2 cup sugar. Once the sugar dissolves and the mixture starts to boil, add 2 drops of paan essence (optional) and let this mixture boil for around 4 minutes until it is a little sticky (not looking for any string consistency here). Turn off the heat. Drop the air fried gujiyas into the sugar syrup, 30 seconds on each side and then remove using a pair of tongs and place them on parchment paper. Garnish with crushed tutti frutti (which I crushed using a food processor) and decorate with edible silver leaves. Once they dry off, store them in an airtight container.
Air Fry or Deep Fry
Both options are totally fine. I just air fried them because it was convenient and I didn’t feel like heating a big pot of oil. But you can definitely deep fry. If you want to deep fry these paan gujiya, heat oil in a kadai over low heat and fry these gujiya on medium-low heat until light golden brown in color. It might take 10 to 12 minutes for the first batch to fry, so be patient and fry on low heat only. Additional batches will fry quicker since the oil will be a little hotter after you have fried the first batch.
Tips & Notes
Store these gujiyas in an airtight container. I place them on parchment paper after dipping them in sugar syrup so that they don’t stick to the surface. Once they have cooled down, I store them in an airtight container at room temperature. They taste best when consumed within 5 days although freshly made warm gujiya is the best.
The gulkand, tutti frutti and paan masala in the filling already have sugar in them. So, be careful about adding extra sugar in the filling. Start with 1 tablespoon and more as needed.
Chopped nuts like almonds, cashews and pistachios will be a great addition to the filling.
If you don’t want to, you can skip the step of dipping the fried gujiya in the sugar syrup. It is optional but recommended. Since there’s no sugar in the dough, I like dipping them in sugar syrup to make them sweeter.
If you don’t have paan essence, you can add a tablespoon of rose water in the sugar syrup. The paan essence that I have is very strong so I just added 2 drops of it and that was enough.
If you’ve tried this Recipe then don’t forget to rate the recipe! You can also follow me on Facebook, Instagram to see what’s latest in my kitchen and on YouTube to watch my latest videos.

title: “Paan Gujiya " ShowToc: true date: “2024-09-11” author: “Diane Grooms”
Mar 02, 2023 All my memories of holi start with me making gujiya with mom. It’s such a core memory that I can’t think of anything else when it comes to Holi. We would sit a few days before holi and make so many gujiyas, probably 100 and would serve them to anyone who visited us during Holi. It was such a fun activity and while I don’t have the fortune of doing that anymore with my mom, I still always make gujiya for Holi. Whether it’s air fryer gujiya or a chocolate cinnamon gujiya but there’s always gujiya on my Holi menu. This time around, I made Paan Gujiya. Considering my love for paan desserts, this is not surprising. You guys have always loved my paan desserts from paan ladoo to paan cheesecake and paan peda, and I am quite sure that these Paan Gujiyas will become your new favorite! I air fried this gujiya but you can also drrp fry them like they are done traditionally.
Filling for Paan Gujiya
The filling is honestly the best part about this paan gujiya, I couldn’t stop eating these. It’s made with mawa, paan leaves, desiccated coconut powder, gulkand, paan masala, fennel seeds, tutti frutti and a drop of peppermint extract. You can find all these ingredients at Indian grocery stores. The paan masala that I used was a dry Kolkata paan masala that I got from India but you can use any masala you like. If you don’t have it, that’s okay too. Just increase the amount of paan leaves, gulkand and fennel in the filling. You can even add nuts to the filling if you like. My mom always added chironji (it’s like a nut) to the gujiya filling and that will go well here too.
How to Make Paan Gujiya- Step by Step
1- To a large bowl, add 1 cup flour (130 grams) along with a pinch of salt. Then add 2 tablespoons of melted ghee to the flour and start mixing it with your hands. Mix the ghee into the flour by rubbing it between your palms. Do this a few times until the mixture looks like crumbs. This is important so that the ghee is well incorporated into the flour. If you press some flour between your palm it should hold its shape and not crumble. This means the ghee was enough and was also well combined with the flour 2- Start adding water little by little and knead to form a relatively tight dough. I used around 1/4 cup (60 ml) water plus a little more to knead this but the amount of water may vary depending the the quality of flour being used. 3- Now, cover the dough with a damp cloth or paper towel and let it rest for 20 to 30 minutes. I wet a paper towel, squeezed all the water from it and used that to cover the dough. 4- Start working on the filling. First, roast around 125 grams of mawa in a pan on medium heat for 3 to 4 minutes until it turns very light golden brown in color. 5- Transfer the roasted mawa to a blender along with 4 chopped paan leaves. The leaves that I used were pretty big, if you are using smaller paan leaves, add more of them. 6- Pulse the mawa and paan leaves together to a paste using your blender. 7- Transfer the paste to a bowl and to that add the following:
2 to 3 tablespoons desiccated coconut powder1/4 teaspoon fennel seeds1 & 1/2 tablespoon paan masala1 tablespoon tutti frutti1 tablespoon gulkand
Mix everything until combined. 8- Then add 1 to 2 tablespoons of powdered sugar and 2 drops of peppermint extract. Gulkand, paan masala, tutti frutti already have sugar in them so taste test and add the powdered sugar accordingly. Start with 1 tablespoon and add more as needed. Also, the peppermint extract is very strong so be careful to not add too much of it else the filling will taste like toothpaste. 9- Mix until the sugar is well combined and now your filling is ready. You can also add a few drops of green food color if you want the filling to look bright green. I didn’t add any food color. 10- Once the dough has rested, divide it into small balls, around 20 to 25 grams each. Meanwhile, mix 2 tablespoons of flour with 3 tablespoons of water. This paste will be used to seal the gujiya. Take 1 of the dough balls and roll it (using a rolling pin) into a circle or around 5 to 6 inches diameter. Remember to keep the remaining dough balls covered with a damp cloth/paper towel while you roll one to prevent them from drying. 11- I have used a gujiya press/mold to shape the gujiyas. You can also use your hands to shape them or use a fork to make a design. 12- Place the rolled dough on top of the gujiya mold. You may apply a little oil or ghee on the mold before placing the dough. 13- Apply the prepared water-flour paste around the edges. This is important else the gujiya will not seal properly. 14- Add around 1 tablespoon of the paan filling. 15- Close the mold to seal the paan gujiya. Remove the excess dough from the sides and add it to the bowl and keep it covered. You will use this excess dough from all gujiyas to make more gujiyas later on. 16- Carefully remove the gujiya from the mold. 17- Make all gujiyas similarly. Remember to keep the shaped gujiya also covered with a damp cloth at all times else they will dry out. 18- Preheat the air fryer according to the manufacturer’s instructions. Place the gujiyas into the air fryer and spray them with an oil spray. I was able to air fry 8 gujiyas in one batch. 19- Air fry at 360 F degrees for 14 to 17 minutes or until golden brown in color. Each air fryer is different so adjust the timings accordingly. Air fry the remaining gujiyas similarly. 20- To dip them in sugar syrup, first make the sugar syrup by boiling together 1/2 cup water with 1/2 cup sugar. Once the sugar dissolves and the mixture starts to boil, add 2 drops of paan essence (optional) and let this mixture boil for around 4 minutes until it is a little sticky (not looking for any string consistency here). Turn off the heat. Drop the air fried gujiyas into the sugar syrup, 30 seconds on each side and then remove using a pair of tongs and place them on parchment paper. Garnish with crushed tutti frutti (which I crushed using a food processor) and decorate with edible silver leaves. Once they dry off, store them in an airtight container.
Air Fry or Deep Fry
Both options are totally fine. I just air fried them because it was convenient and I didn’t feel like heating a big pot of oil. But you can definitely deep fry. If you want to deep fry these paan gujiya, heat oil in a kadai over low heat and fry these gujiya on medium-low heat until light golden brown in color. It might take 10 to 12 minutes for the first batch to fry, so be patient and fry on low heat only. Additional batches will fry quicker since the oil will be a little hotter after you have fried the first batch.
Tips & Notes
Store these gujiyas in an airtight container. I place them on parchment paper after dipping them in sugar syrup so that they don’t stick to the surface. Once they have cooled down, I store them in an airtight container at room temperature. They taste best when consumed within 5 days although freshly made warm gujiya is the best.
The gulkand, tutti frutti and paan masala in the filling already have sugar in them. So, be careful about adding extra sugar in the filling. Start with 1 tablespoon and more as needed.
Chopped nuts like almonds, cashews and pistachios will be a great addition to the filling.
If you don’t want to, you can skip the step of dipping the fried gujiya in the sugar syrup. It is optional but recommended. Since there’s no sugar in the dough, I like dipping them in sugar syrup to make them sweeter.
If you don’t have paan essence, you can add a tablespoon of rose water in the sugar syrup. The paan essence that I have is very strong so I just added 2 drops of it and that was enough.
If you’ve tried this Recipe then don’t forget to rate the recipe! You can also follow me on Facebook, Instagram to see what’s latest in my kitchen and on YouTube to watch my latest videos.
