Sep 19, 2019, Updated Jan 15, 2020 The batter is made in a high speed blender like blendtec and fermented in the Instant Pot.
I have been meaning to share this post for so long, like really long. Few weeks back, I shared the entire process of making Idli Dosa batter on my Instagram stories and it received an overwhelming response. I got so many requests to write a blog post about it and well here I am. Sorry for the delay but better late than never I guess? This is my go to Idli Dosa Batter and I make it all the time. I grew up in north India where Idli and Dosa are not a everyday thing. Indian food is very versatile and what people in the north eat is very different from what people in south eat which is again very different from what people in east eat. You get the drift? In the western world, Indian food = curry + naan. That’s so far from reality. Like really really far. Anyway, so because I grew up in north India, my mom did not make idli and dosa at home. For those who don’t know, idli is a steamed cake made with a rice and lentil fermented batter. The same batter is also used to make a crepe called dosa which is often filled with spicy potato filling among many other things. For us, eating South Indian food was mostly restricted to restaurants. And once in a while when dosa was made at a home, it was always from store bought batter. I don’t ever remember mom making the batter at home. Of course this is not to say that every North Indian house must be same. But I would say it would hold true for majority. So when I started cooking, I had zero knowledge about south Indian cooking. At least I had seen mom make all the parathas and dals etc. all the time. But I had no clue how idli and dosa were made. After reading so many tutorials online, I started experimenting. And this was around 3 to 4 years ago. I can’t tell you the number of times I failed. I would follow the recipe to the “T” but my batter won’t ferment. Because I failed so much, I learnt a lot too. Isn’t that’s how it always is? You always learn from your failures. Slowly, I started getting a hang of it and also realized the mistakes that I was making. And once I started using my Instant Pot to ferment the batter, there was no looking back!
How to Make the Perfect Idli Dosa Batter
I am going to share with you guys all that I have learnt through trials and errors all these years in getting my Idli Dosa batter right. And I will also try and answer all the frequently asked questions! So let’s go! Ratio of Dal to Rice Ahh, the most important question. What should be the ratio of dal to rice for making idlis and dosa. I have tried a lot. I have done 1:2, 1:1, 1:3 (dal to rice) but the one that works the best for me is 1:4! So, for every 1 cup of dal, I use 4 cups of rice. This ratio works for both idli and dosa.
Which Rice to use I highly recommend using Idli Rice here, which is a variety of short-grain parboiled rice. You can find it at any Indian grocery store. Short to medium grain rice work best for this recipe. I wouldn’t recommend using long grain basmati rice for this recipe. You can use par boiled sona masoori or ponni rice too. Which Dal to use Black gram or urad dal is what is used in making this batter. Dehusked Whole urad dal works best here (urad dal gota). You can also use split urad dal (urad dal dhuli). Adding fenugreek (methi) I always add some fenugreek seeds (methi seeds) to the batter. It helps in fermentation. And it also helps in giving the dosa a nice brown color. How much water to use to grind the batter? Okay, when I didn’t know how to make the batter, I read several recipes online and a lot of them asked to add little water while grinding. The result was that I always ended up adding way too little water to my batter. I thought the batter need to be thick which is not the case at all. The batter should have a nice flowing consistency (it should not be runny though). Add enough water to grind the batter and don’t be scared to add water like I was! For 1/2 cup dal, I usually add around 1/2 to 3/4 cup water to grind. For 2 cups rice, I usually add around 3/4 to 1 cup water to grind. The amount of water will depend on the type of rice/dal you use. To add salt before or after fermentation There are conflicting thoughts on this. My personal experience is to add the salt before fermentation. Maybe, it’s because I live in a cold place. I have never made this batter in India but if I was, I probably won’t add salt before fermentation. But here in Seattle, I always do as I feel it helps in fermentation. And I always use Sendha Namak (Rock Salt). The regular salt with iodine might interfere with fermentation process and hence better to use a non-iodized salt. Mixing the batter with clean hands Once you have ground the dal and rice, you mix them together with clean hands. I usually mix using my hands for good 2 minutes. Trust me, it makes a difference. Mixing with hands helps in the fermentation process so don’t skip this step.
Which blender to use to grind the dal and rice Wet grinder is traditionally used. However, I just use my Blendtec. Any high speed blender will do. On my blendtec, I usually press the smoothie button or the soup button. How to ferment the batter The batter needs warm place in order to ferment. If you live in a warm place, you can leave the batter on the counter and it will ferment. However, if you live in a cold place like I do. You either place the batter in the oven with the oven lights on. Or use your Instant Pot! Ever since I have got my Instant Pot, I always use it to ferment my batter. It gives consistent results. So, I just place the batter in the pot, cover with a glass lid and press the yogurt button. How long it takes for the batter to ferment? Now, that would depend on where you live. Warm places, it might ferment in 6 to 8 hours. Usually here in Seattle, it takes around 12 to 13 hours to ferment. Why not soak dal rice together? So, when I posted the Instagram stories, I had several people ask why not soak the dal and rice together? I mean it will be just more convenient right? Well the reason is that rice and dal have different texture. You want the dal to have a fluffy texture which is important for idlis. And you can’t achieve that if you soak and grind the dal together with the rice. For this reason, it needs to be grind separately. However, if you are only going to make dosa, then you may soak and grind them together.
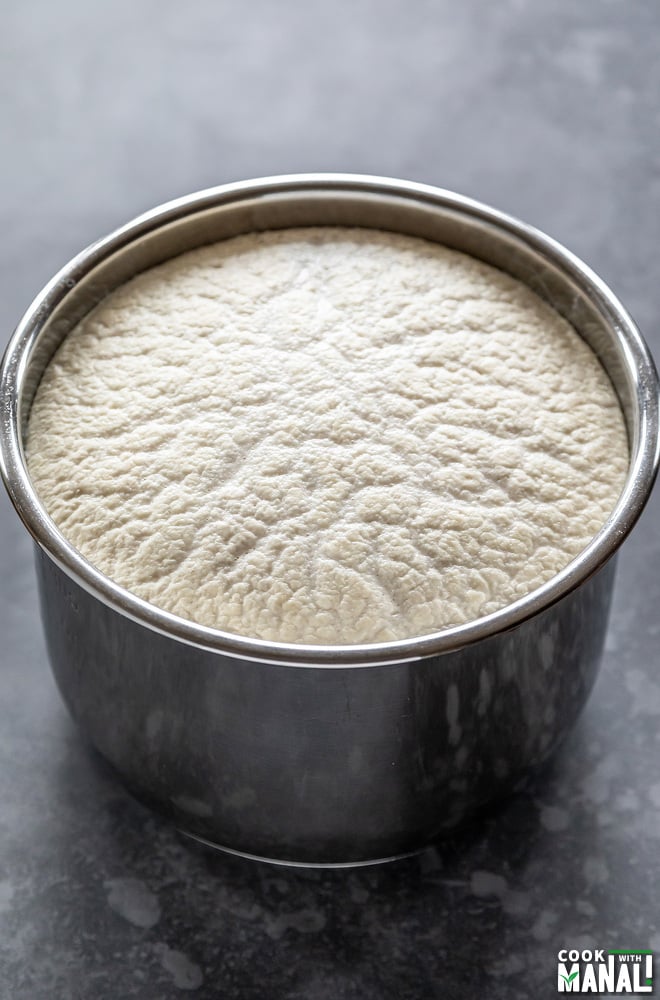
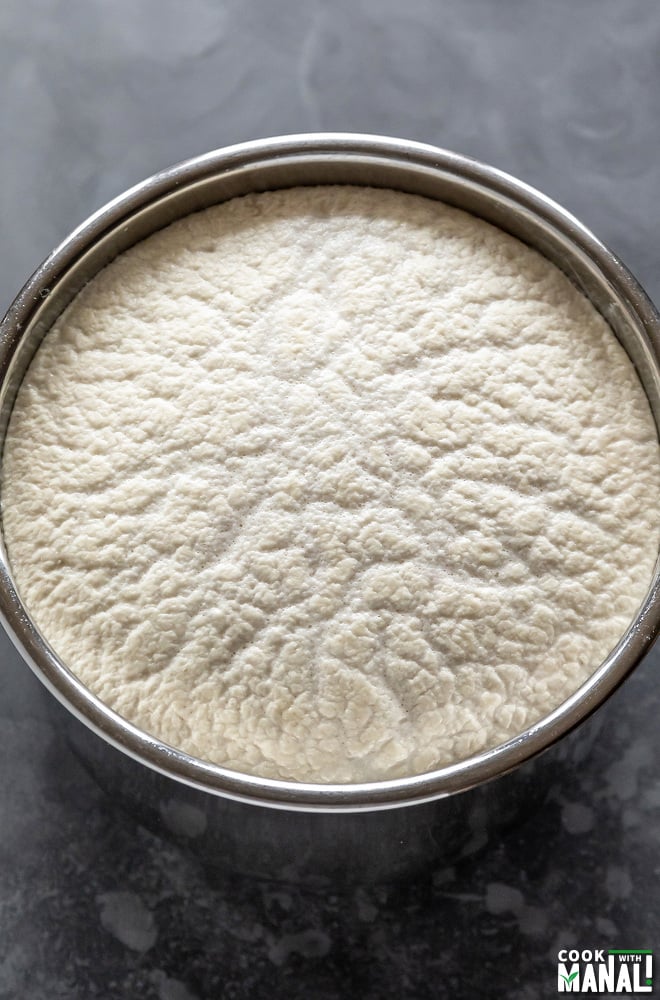
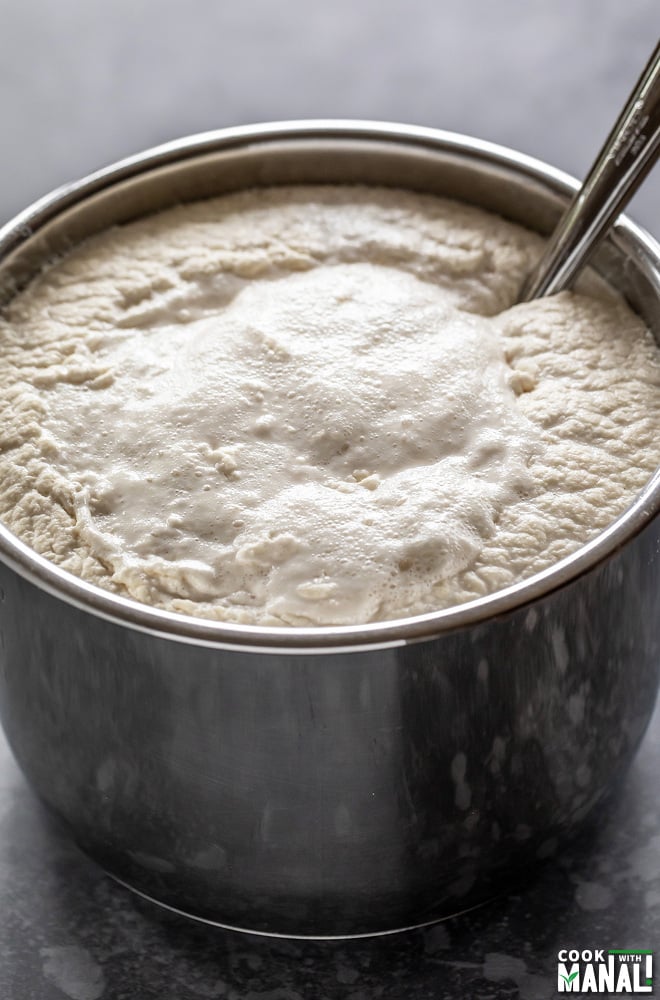
How to know if batter has fermented? The batter will obviously increase in volume. You would see bubbles on top and it will be all frothy. Another great way to check- take water in a bowl and then drop some batter into it. The batter should float, which means its light, airy and fermented and ready to make idlis! If it hasn’t fermented, let it ferment for some more time. Okay guys, I hope that was helpful. I have tried to cover everything I could think of. If there are any more questions, please leave them in the comments section below and I will try to get back as soon as possible.
Method
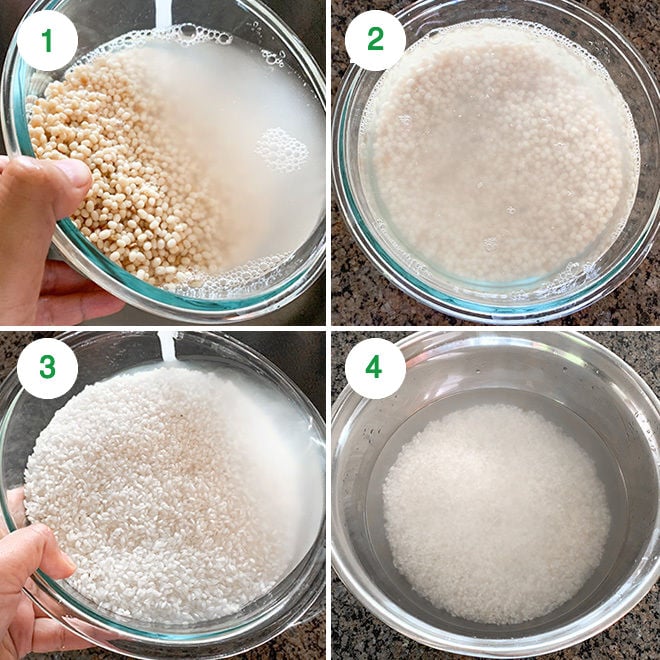
1- Rinse the dal under running water. 2- Then soak the dal in enough water (2-3 cups) for around 5 to 6 hours. Add 1 teaspoon methi seeds to the dal while it’s soaking. 3- Rinse the rice under running water until water turns clear. 4- Then soak the rice in enough water for around 5 to 6 hours, same time as the dal.
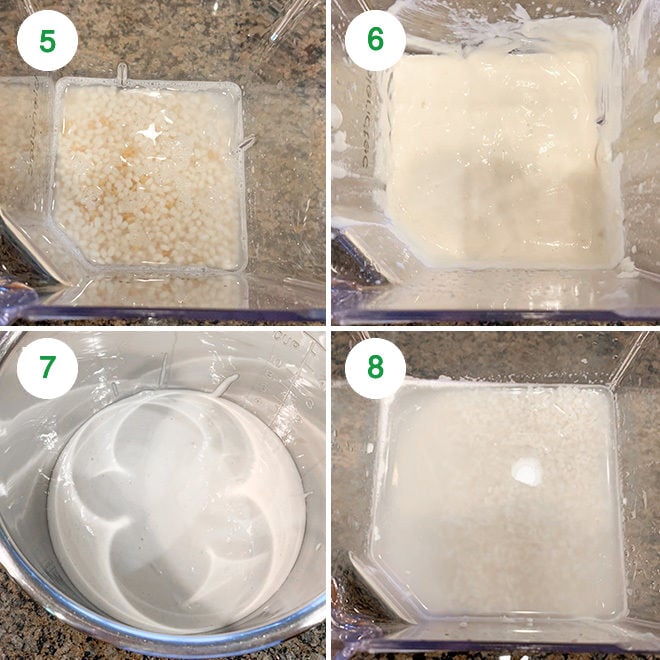
5- After 5 to 6 hours have passed, drain the water from the dal. Transfer the dal to the blender (or any grinder that you use). 6- Add 1.25 (10 oz) to 1.5 (12 oz) cups ice cold water and grind the dal to a fine paste. I use my blendtec and press the smoothie or soup button usually. 7- Transfer the ground dal to the steel pot of your Instant Pot (if using IP to ferment the batter) or to any other large container. 8- Now drain the rice and add it to the same blender along with 1.5 (12 oz) to 2 cups (16 oz) ice cold water. The amount of water will depend on the type of rice/dal you use. So, start with lesser amount and add more water as needed.
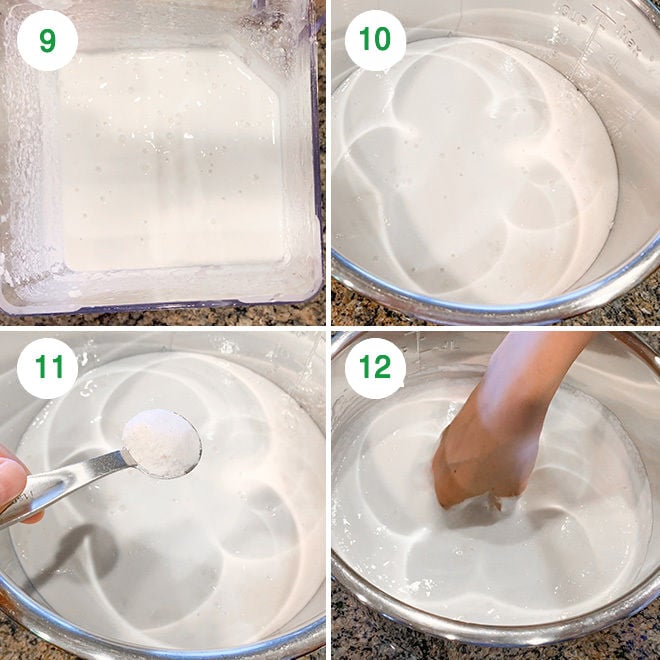
9- Grind rice to a smooth paste. 10- Now, transfer the ground rice to the same pot as the dal. 11- Add sendha namak (rock salt) to the rice and dal mixture. 12- Now, start using your hands and mix the salt and the batter together for 1-2 minutes using your hands. Mixing by hands help in fermentation process.
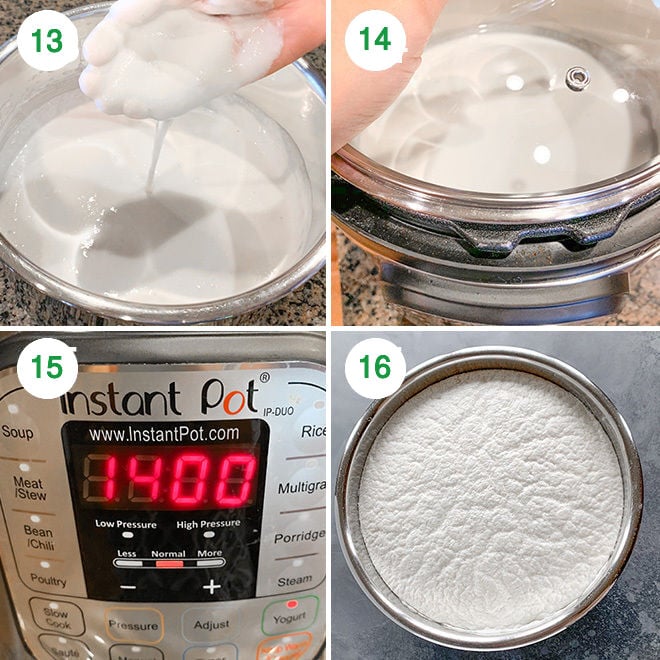
13- The consistency of the batter should be free flowing, but it shouldn’t be runny. 14- Now cover the pot with a glass lid (if using Instant Pot) or with any other lid if using regular container. The reason I use glass lid for fermenting the batter in Instant Pot and not it’s regular lid is because the batter may overflow and that can lock the lid. So it’s better to use a glass lid. 15- If using Instant Pot for fermentation, now press the Yogurt button. Increase the time to 12-14 hours. The time will depend on where you live. Here it takes around 12-14 hours for the batter to ferment. If not using an Instant Pot, cover the container and place in an oven with lights on (especially if you live in a cold place). If you live in a very warm place, then simply keep the batter on the counter to ferment. 16- After 14 hours, my batter was well fermented and ready to make idlis! It had increased in volume and was frothy and bubbly. To check you can also drop a small drop of batter in a bowl with clean water. The batter should float which means it’s fermented. If not then it needs more time for fermentation.
Now the idli dosa batter is ready to make Idli and Dosa!
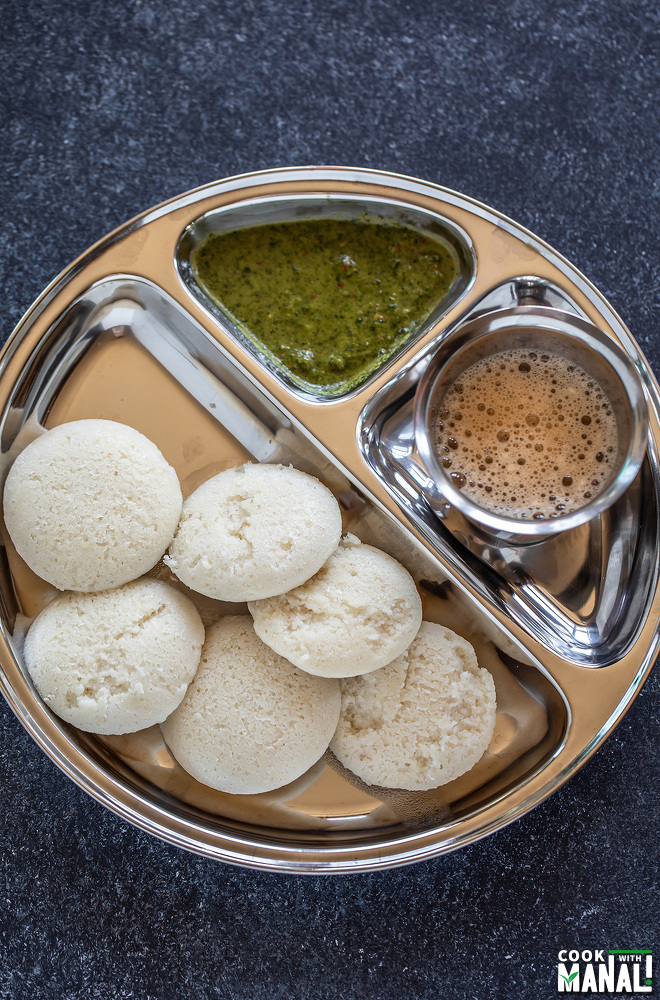
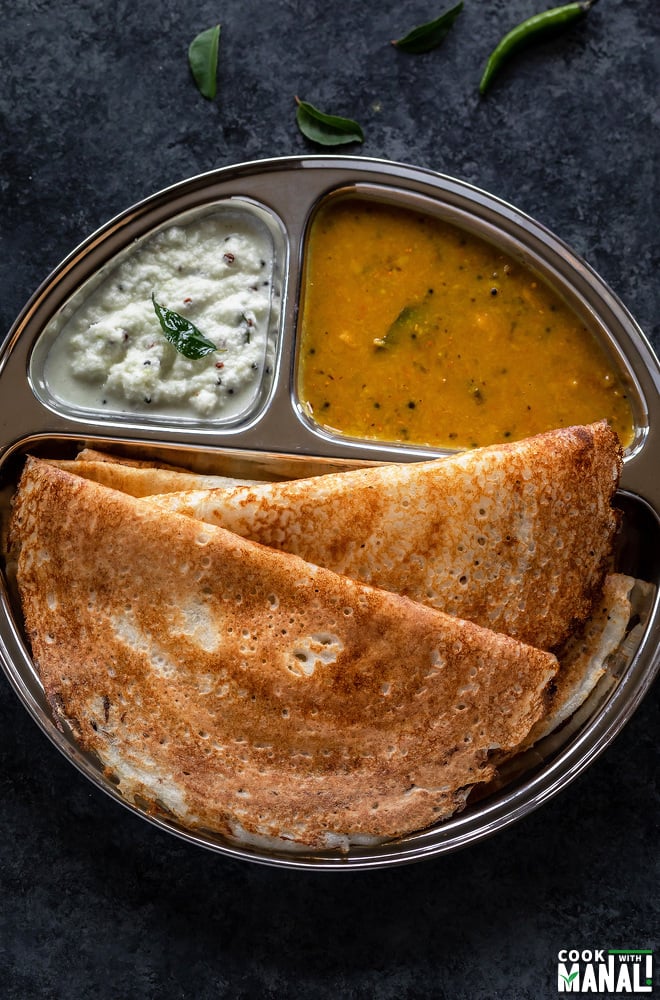
To make idli: grease idli plates and then fill them with the batter. Steam in a steamer for 10 to 12 minutes on high heat or in an Instant Pot for 13 mins with pressure valve in venting position (with 1 cup water in the pot to generate steam). Please note that when IP is in venting position, it doesn’t display the time, so use an external timer. Cool for a minute or two and take idlis out of plates. Serve with sambar and coconut chutney. Also make crisp dosa with the same batter! If you’ve tried this Idli Dosa Batter Recipe then don’t forget to rate the recipe! You can also follow me on Facebook, Instagram to see what’s latest in my kitchen!
title: “My Go To Idli Dosa Batter " ShowToc: true date: “2024-10-02” author: “Odessa Clardy”
Sep 19, 2019, Updated Jan 15, 2020 The batter is made in a high speed blender like blendtec and fermented in the Instant Pot.
I have been meaning to share this post for so long, like really long. Few weeks back, I shared the entire process of making Idli Dosa batter on my Instagram stories and it received an overwhelming response. I got so many requests to write a blog post about it and well here I am. Sorry for the delay but better late than never I guess? This is my go to Idli Dosa Batter and I make it all the time. I grew up in north India where Idli and Dosa are not a everyday thing. Indian food is very versatile and what people in the north eat is very different from what people in south eat which is again very different from what people in east eat. You get the drift? In the western world, Indian food = curry + naan. That’s so far from reality. Like really really far. Anyway, so because I grew up in north India, my mom did not make idli and dosa at home. For those who don’t know, idli is a steamed cake made with a rice and lentil fermented batter. The same batter is also used to make a crepe called dosa which is often filled with spicy potato filling among many other things. For us, eating South Indian food was mostly restricted to restaurants. And once in a while when dosa was made at a home, it was always from store bought batter. I don’t ever remember mom making the batter at home. Of course this is not to say that every North Indian house must be same. But I would say it would hold true for majority. So when I started cooking, I had zero knowledge about south Indian cooking. At least I had seen mom make all the parathas and dals etc. all the time. But I had no clue how idli and dosa were made. After reading so many tutorials online, I started experimenting. And this was around 3 to 4 years ago. I can’t tell you the number of times I failed. I would follow the recipe to the “T” but my batter won’t ferment. Because I failed so much, I learnt a lot too. Isn’t that’s how it always is? You always learn from your failures. Slowly, I started getting a hang of it and also realized the mistakes that I was making. And once I started using my Instant Pot to ferment the batter, there was no looking back!
How to Make the Perfect Idli Dosa Batter
I am going to share with you guys all that I have learnt through trials and errors all these years in getting my Idli Dosa batter right. And I will also try and answer all the frequently asked questions! So let’s go! Ratio of Dal to Rice Ahh, the most important question. What should be the ratio of dal to rice for making idlis and dosa. I have tried a lot. I have done 1:2, 1:1, 1:3 (dal to rice) but the one that works the best for me is 1:4! So, for every 1 cup of dal, I use 4 cups of rice. This ratio works for both idli and dosa.
Which Rice to use I highly recommend using Idli Rice here, which is a variety of short-grain parboiled rice. You can find it at any Indian grocery store. Short to medium grain rice work best for this recipe. I wouldn’t recommend using long grain basmati rice for this recipe. You can use par boiled sona masoori or ponni rice too. Which Dal to use Black gram or urad dal is what is used in making this batter. Dehusked Whole urad dal works best here (urad dal gota). You can also use split urad dal (urad dal dhuli). Adding fenugreek (methi) I always add some fenugreek seeds (methi seeds) to the batter. It helps in fermentation. And it also helps in giving the dosa a nice brown color. How much water to use to grind the batter? Okay, when I didn’t know how to make the batter, I read several recipes online and a lot of them asked to add little water while grinding. The result was that I always ended up adding way too little water to my batter. I thought the batter need to be thick which is not the case at all. The batter should have a nice flowing consistency (it should not be runny though). Add enough water to grind the batter and don’t be scared to add water like I was! For 1/2 cup dal, I usually add around 1/2 to 3/4 cup water to grind. For 2 cups rice, I usually add around 3/4 to 1 cup water to grind. The amount of water will depend on the type of rice/dal you use. To add salt before or after fermentation There are conflicting thoughts on this. My personal experience is to add the salt before fermentation. Maybe, it’s because I live in a cold place. I have never made this batter in India but if I was, I probably won’t add salt before fermentation. But here in Seattle, I always do as I feel it helps in fermentation. And I always use Sendha Namak (Rock Salt). The regular salt with iodine might interfere with fermentation process and hence better to use a non-iodized salt. Mixing the batter with clean hands Once you have ground the dal and rice, you mix them together with clean hands. I usually mix using my hands for good 2 minutes. Trust me, it makes a difference. Mixing with hands helps in the fermentation process so don’t skip this step.
Which blender to use to grind the dal and rice Wet grinder is traditionally used. However, I just use my Blendtec. Any high speed blender will do. On my blendtec, I usually press the smoothie button or the soup button. How to ferment the batter The batter needs warm place in order to ferment. If you live in a warm place, you can leave the batter on the counter and it will ferment. However, if you live in a cold place like I do. You either place the batter in the oven with the oven lights on. Or use your Instant Pot! Ever since I have got my Instant Pot, I always use it to ferment my batter. It gives consistent results. So, I just place the batter in the pot, cover with a glass lid and press the yogurt button. How long it takes for the batter to ferment? Now, that would depend on where you live. Warm places, it might ferment in 6 to 8 hours. Usually here in Seattle, it takes around 12 to 13 hours to ferment. Why not soak dal rice together? So, when I posted the Instagram stories, I had several people ask why not soak the dal and rice together? I mean it will be just more convenient right? Well the reason is that rice and dal have different texture. You want the dal to have a fluffy texture which is important for idlis. And you can’t achieve that if you soak and grind the dal together with the rice. For this reason, it needs to be grind separately. However, if you are only going to make dosa, then you may soak and grind them together.
How to know if batter has fermented? The batter will obviously increase in volume. You would see bubbles on top and it will be all frothy. Another great way to check- take water in a bowl and then drop some batter into it. The batter should float, which means its light, airy and fermented and ready to make idlis! If it hasn’t fermented, let it ferment for some more time. Okay guys, I hope that was helpful. I have tried to cover everything I could think of. If there are any more questions, please leave them in the comments section below and I will try to get back as soon as possible.
Method
1- Rinse the dal under running water. 2- Then soak the dal in enough water (2-3 cups) for around 5 to 6 hours. Add 1 teaspoon methi seeds to the dal while it’s soaking. 3- Rinse the rice under running water until water turns clear. 4- Then soak the rice in enough water for around 5 to 6 hours, same time as the dal.
5- After 5 to 6 hours have passed, drain the water from the dal. Transfer the dal to the blender (or any grinder that you use). 6- Add 1.25 (10 oz) to 1.5 (12 oz) cups ice cold water and grind the dal to a fine paste. I use my blendtec and press the smoothie or soup button usually. 7- Transfer the ground dal to the steel pot of your Instant Pot (if using IP to ferment the batter) or to any other large container. 8- Now drain the rice and add it to the same blender along with 1.5 (12 oz) to 2 cups (16 oz) ice cold water. The amount of water will depend on the type of rice/dal you use. So, start with lesser amount and add more water as needed.
9- Grind rice to a smooth paste. 10- Now, transfer the ground rice to the same pot as the dal. 11- Add sendha namak (rock salt) to the rice and dal mixture. 12- Now, start using your hands and mix the salt and the batter together for 1-2 minutes using your hands. Mixing by hands help in fermentation process.
13- The consistency of the batter should be free flowing, but it shouldn’t be runny. 14- Now cover the pot with a glass lid (if using Instant Pot) or with any other lid if using regular container. The reason I use glass lid for fermenting the batter in Instant Pot and not it’s regular lid is because the batter may overflow and that can lock the lid. So it’s better to use a glass lid. 15- If using Instant Pot for fermentation, now press the Yogurt button. Increase the time to 12-14 hours. The time will depend on where you live. Here it takes around 12-14 hours for the batter to ferment. If not using an Instant Pot, cover the container and place in an oven with lights on (especially if you live in a cold place). If you live in a very warm place, then simply keep the batter on the counter to ferment. 16- After 14 hours, my batter was well fermented and ready to make idlis! It had increased in volume and was frothy and bubbly. To check you can also drop a small drop of batter in a bowl with clean water. The batter should float which means it’s fermented. If not then it needs more time for fermentation.
Now the idli dosa batter is ready to make Idli and Dosa!
To make idli: grease idli plates and then fill them with the batter. Steam in a steamer for 10 to 12 minutes on high heat or in an Instant Pot for 13 mins with pressure valve in venting position (with 1 cup water in the pot to generate steam). Please note that when IP is in venting position, it doesn’t display the time, so use an external timer. Cool for a minute or two and take idlis out of plates. Serve with sambar and coconut chutney. Also make crisp dosa with the same batter! If you’ve tried this Idli Dosa Batter Recipe then don’t forget to rate the recipe! You can also follow me on Facebook, Instagram to see what’s latest in my kitchen!


