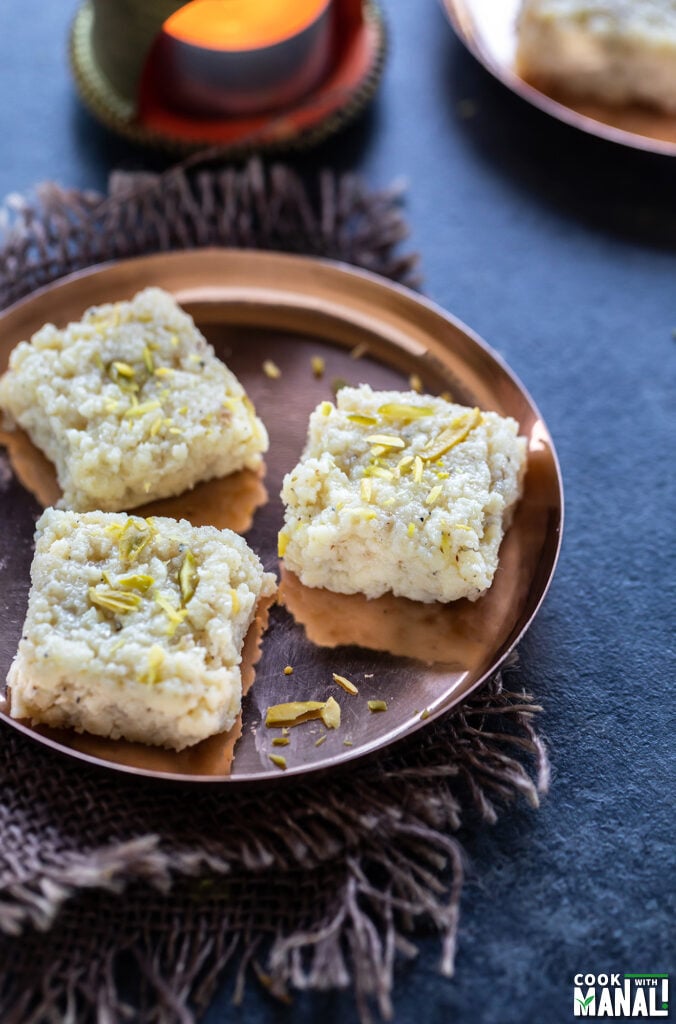
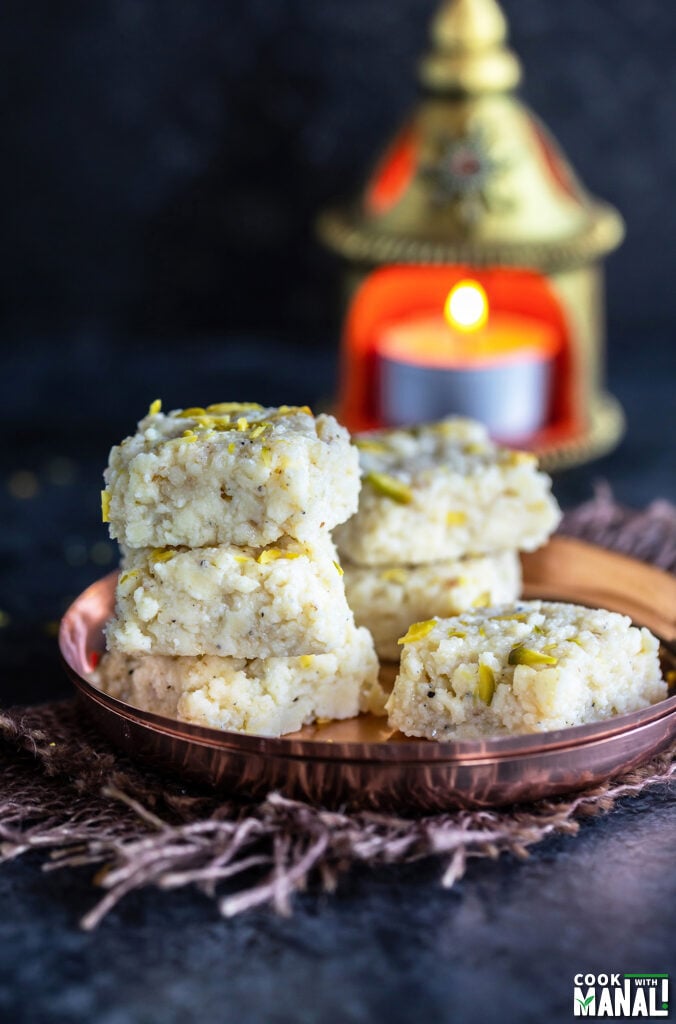
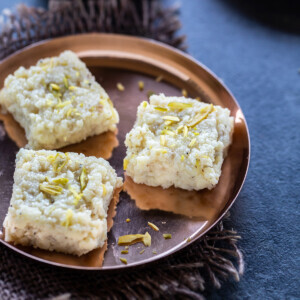
Aug 07, 2022 When I started making Indian sweet at home, it was probably because I missed home so much and making and eating the sweets, I grew up eating made me feel close to home (well, as close as one can feel). But over the years, I actually started enjoying making Indian sweets. I have to confess, making mithai is one of those things that I enjoy the most, along with baking. It gives me immense satisfaction when my mithais turn out perfect. And I am always looking for ways and techniques to make them better and share with you guys. Indian sweets are often very simple on paper but not that easy to make. One of the first Indian sweets that I learnt to make was Kalakand. It’s a simple fudge made with milk. The traditional method involves curdling the milk to make chena and then cooking that chena with more reduced milk until it all comes together. However, now I prefer the method using condensed milk. It really cuts down the time and yet the results are similar.
Ingredients
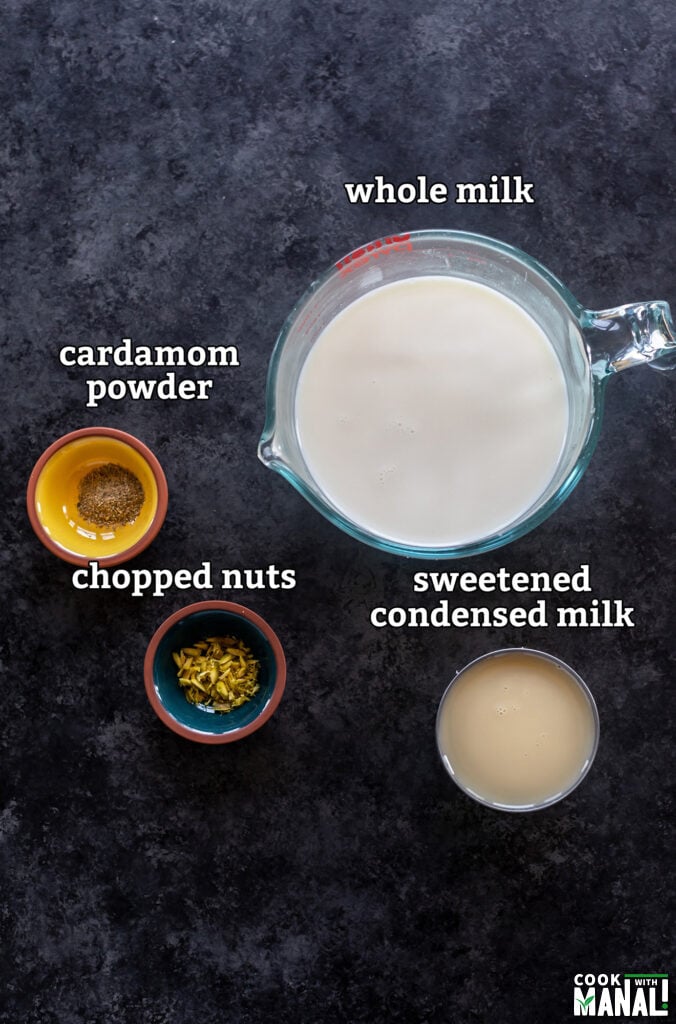
Whole milk: I recommend using whole milk for this kalakand recipe. It results is more chena, fat-free milk will not give you this much chena. If you live in the US, try using milk from local dairy, that gives the best results. Lemon juice: you can use either lemon juice or yogurt to curdle the milk. I would not recommend using vinegar here. In my experience, vinegar results in a firmer/harder chena. So I use it when making paneer but for making chena for sweets, I always use either lemon juice or yogurt to curdle the milk. Condensed milk: the sweetened condensed milk cannot be replaced in this recipe. If you wish to use sugar, you use make kalakand the traditional way (see below). Flavorings: the kalakand is flavored with cardamom powder and little bit of rose water. I definitely recommend using cardamom powder, you can skip the rose water if you like. You can even flavor this with some saffron strands.
Step by Step Instructions
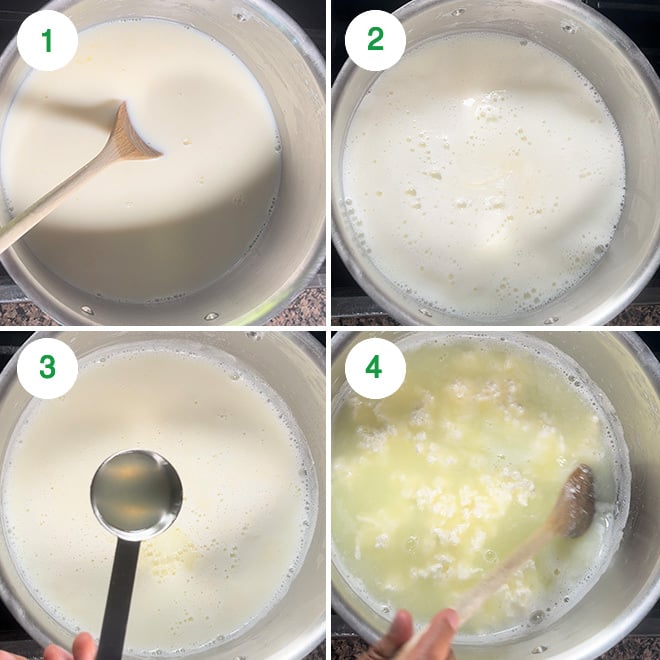
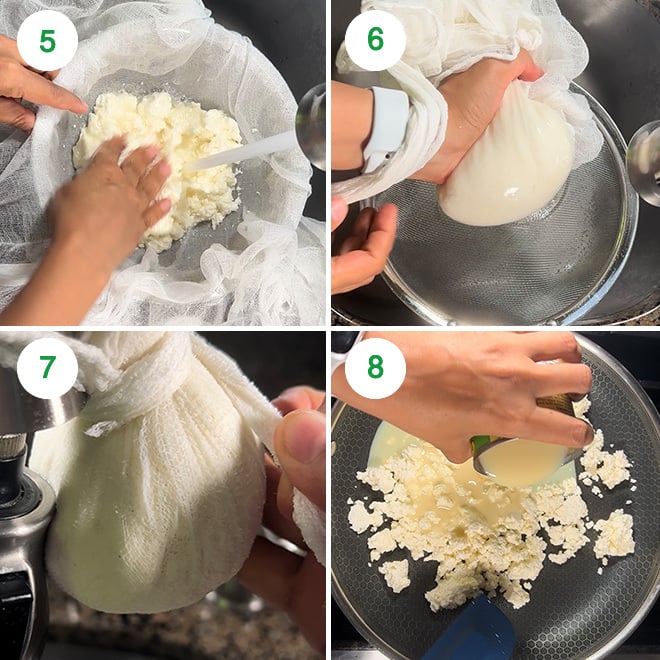
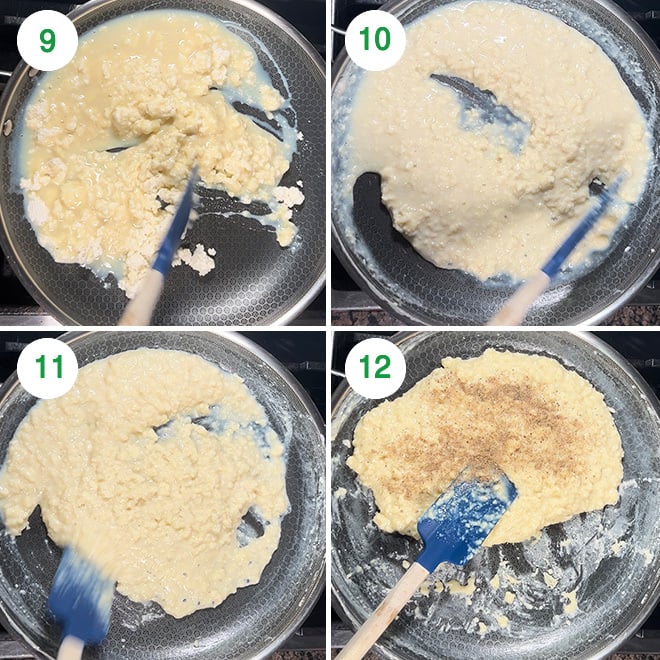
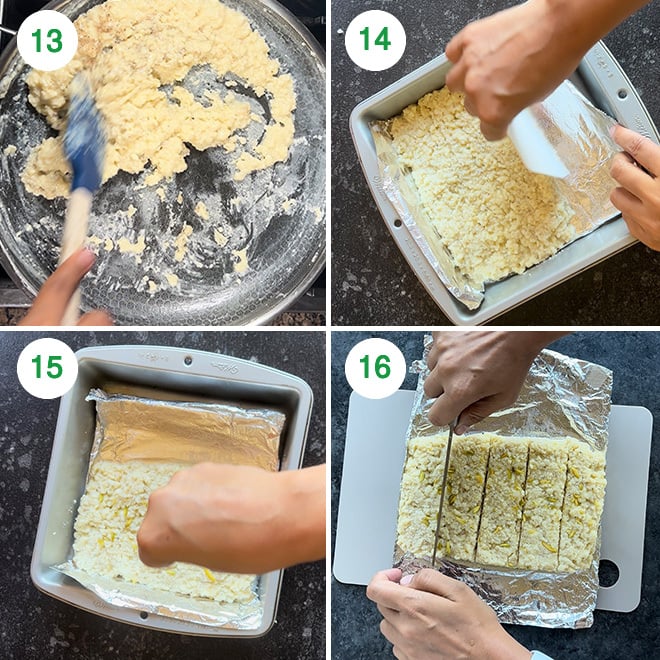
1- To a heavy bottom pan, add 6 cups (1.4 liters) of whole milk. Set heat to medium-high. 2- Stir often and let the milk come to a boil. Then turn off the heat. 3- Now, start adding lemon juice, 1 tablespoon at a time stirring gently after each addition. 4- At one point, the milk will curdle completely and whey will separate. I used a total of 2 tablespoons + 1 teaspoon lemon juice to make the milk curdle completely. The quantity of lemon juice can vary depending on the quality of milk you are using. 5- Line a strainer with muslin cloth and pour the curdled milk over it. Wash the fresh chena that you just prepared under running water. This is important to get rid of that lemon flavor. 6- Bring the ends of the muslin cloth together and tie them in the center. Squeeze water from the chena. You need to squeeze the water well, however do not squeeze the heck out of it. You do need some moistness in the chena, that’s important for a moist and soft kalakand. I measured the chena at this point and it resulted in 225 grams of fresh chena. 7- Tie the muslin cloth to your sink tap (or anywhere else where it can hang) and let it hang for 10 minutes. 8- To a pan now, add the prepared chena. To that add 3/4th of a 14 oz. can of condensed milk. You can use the entire can for a sweeter kalakand. Adjust sweetness level to taste. 9- Mix the chena and sweetened condensed milk together well using a spatula. Set heat to low. 10- Start cooking the mixture on low heat, stirring often. At first the mixture will be very thin. 11- But as you keep cooking, the mixture will start to thicken and start leaving the sides of the pan. 12- After around 10 to 12 minutes of cooking on low heat, it will come together, thicken quite a bit and leave the sides. At this point add 1 teaspoon rose water and 3/4 teaspoon cardamom powder. Mix well. 13- It took me 12 minutes on low heat to reach this stage where it was thick enough and was leaving the sides of the pan but was still not dry. It can take you more or less time depending on the thickness of the pan and intensity of the heat. Remember to not over-cook, it should not dry out but still be juicy else the kalakand will turn chewy. Immediately, remove pan from heat. 14- Transfer mixture to a greased pan or a pan lined with aluminum foil or parchment paper. I used an 8 inch square pan but spread the mixture on only half of the pan as I wanted thick kalakand pieces. Smooth out the mixture using a spatula. 15- Sprinkle chopped nuts on top, I sprinkled some pistachios. Let it set for 2 to 3 hours at room temperature. 16- Once set, cut kalakand into pieces. I got 16 pieces of kalakand from this mixture. Keep it refrigerated.
Storage
Since, kalakand is a milk based sweet, it should be kept refrigerated. It tastes best when freshly consumed. I would recommend consuming homemade kalakand within 3 days for best results.
Traditional Kalakand (without condensed milk)
Traditionally, kalakand is made only with milk and sugar. If you want to make it the traditional way, here’s what you need to do. You would need 2 liters of whole milk and this process will take much longer. Start by boiling and curdling 1 liter of whole milk. You would need around 1 & 1/2 to 2 tablespoons of lemon juice to curdle the milk. Then wash the chena and follow the same process as mentioned above. Then in a pan take the remaining 1 liter of milk and start cooking it. Let it come to a boil and then lower the heat to low-medium. Keep cooking the milk (stir often), until it reduces for around 20 minutes. At this point add the prepared chena to the pan. Cook this for around 10 minutes, keep stirring on low heat. The mixture will thicken a lot. Add 3/4 cup of powdered sugar (icing sugar/confectioners sugar) and continue to cook. After you have added sugar, the mixture will loosen a bit but keep stirring and it will start thickening again. Add 3/4 teaspoon cardamom powder, 1 teaspoon rose water and mix and cook until mixture thickens and leaves the sides of the pan. Transfer to a greased pan, smooth it out, sprinkle with nuts and let it set for 2 to 3 hours, then cut into pieces. The cooking time here would be around 40 to 45 minutes compared to the 12 minutes cooking when using condensed milk.
Tips to Make Soft Kalakand
One of the problems that you may face while making kalakand at home is that the kalakand turns hard or chewy. Here are few tips and things to keep in mind that will ensure that your kalakand stays soft. Add water to milk after it has curdled and before adding lemon juice: I don’t always do this step when making kalakand but I always do it when making rasmalai. It results in a softer chena. I have noticed that it doesn’t make a drastic difference in kalakand but it’s something you can do to make the kalakand softer. Once milk comes to a boil, turn off the heat and add a cup or two of water. Then add lemon juice to curdle the milk. Don’t squeeze too much water from the chena: after you have washed the chena and tied it in a muslin cloth, you have to squeeze excess moisture from chena. However, do not squeeze it super hard and make it dry. The chena should have some moistness in it, this will result in soft kalakand. Don’t over-cook the kalakand: once the mixture becomes thick and leaves the sides of the pan, you should not cook it further. The mixture should look juicy and not completely dry before you set it. Over-cooking will result in a chewy kalakand. It took me 12 minutes on low heat to reach this stage but this can take you more or less time depending on the pan thickness and intensity of heat.
Making Kalakand from Store-bought Paneer
Can you make this recipe with store bought paneer? Honestly speaking, kalakand tastes best when made from fresh chena. If you have access to soft, fresh paneer then you can definitely make this recipe with that. You will need 225 grams of fresh paneer. However, most paneer that we get in stores here are dry and hard and they will not work well here. If still you want to make this recipe with store-bought paneer, I would recommend soaking the paneer in warm water for 20 minutes. Then grate it. You will need 225 grams of paneer. Transfer grated paneer to a bowl and then add 2 tablespoons of warm milk to it. Let it sit for 5 minutes and then use in the recipe.
Tips & Notes
I have used 3/4th of a 14 oz. can of condensed milk. For a sweeter kalakand, you can use the entire can of condensed milk. You can definitely make this recipe with ricotta cheese. You would need around 15 oz. of ricotta cheese. However, cooking time will increase a little since ricotta cheese has much more moisture than chena. So, it would probably take 20 to 25 minutes to reach the desired kalakand consistency. The process and steps will remain same. You can flavor this kalakand with saffron too. Warm 1 to 2 tablespoons of milk and crush some saffron strands and add it to the milk. Let it rest 5 minutes and then add that saffron milk to the pan along with the condensed milk.
If you’ve tried this Recipe then don’t forget to rate the recipe! You can also follow me on Facebook, Instagram to see what’s latest in my kitchen and on YouTube to watch my latest videos. This post has been updated from the recipe archives, first published in January 2014.
title: “Kalakand " ShowToc: true date: “2024-10-22” author: “Melanie Moreland”
Aug 07, 2022 When I started making Indian sweet at home, it was probably because I missed home so much and making and eating the sweets, I grew up eating made me feel close to home (well, as close as one can feel). But over the years, I actually started enjoying making Indian sweets. I have to confess, making mithai is one of those things that I enjoy the most, along with baking. It gives me immense satisfaction when my mithais turn out perfect. And I am always looking for ways and techniques to make them better and share with you guys. Indian sweets are often very simple on paper but not that easy to make. One of the first Indian sweets that I learnt to make was Kalakand. It’s a simple fudge made with milk. The traditional method involves curdling the milk to make chena and then cooking that chena with more reduced milk until it all comes together. However, now I prefer the method using condensed milk. It really cuts down the time and yet the results are similar.
Ingredients
Whole milk: I recommend using whole milk for this kalakand recipe. It results is more chena, fat-free milk will not give you this much chena. If you live in the US, try using milk from local dairy, that gives the best results. Lemon juice: you can use either lemon juice or yogurt to curdle the milk. I would not recommend using vinegar here. In my experience, vinegar results in a firmer/harder chena. So I use it when making paneer but for making chena for sweets, I always use either lemon juice or yogurt to curdle the milk. Condensed milk: the sweetened condensed milk cannot be replaced in this recipe. If you wish to use sugar, you use make kalakand the traditional way (see below). Flavorings: the kalakand is flavored with cardamom powder and little bit of rose water. I definitely recommend using cardamom powder, you can skip the rose water if you like. You can even flavor this with some saffron strands.
Step by Step Instructions
1- To a heavy bottom pan, add 6 cups (1.4 liters) of whole milk. Set heat to medium-high. 2- Stir often and let the milk come to a boil. Then turn off the heat. 3- Now, start adding lemon juice, 1 tablespoon at a time stirring gently after each addition. 4- At one point, the milk will curdle completely and whey will separate. I used a total of 2 tablespoons + 1 teaspoon lemon juice to make the milk curdle completely. The quantity of lemon juice can vary depending on the quality of milk you are using. 5- Line a strainer with muslin cloth and pour the curdled milk over it. Wash the fresh chena that you just prepared under running water. This is important to get rid of that lemon flavor. 6- Bring the ends of the muslin cloth together and tie them in the center. Squeeze water from the chena. You need to squeeze the water well, however do not squeeze the heck out of it. You do need some moistness in the chena, that’s important for a moist and soft kalakand. I measured the chena at this point and it resulted in 225 grams of fresh chena. 7- Tie the muslin cloth to your sink tap (or anywhere else where it can hang) and let it hang for 10 minutes. 8- To a pan now, add the prepared chena. To that add 3/4th of a 14 oz. can of condensed milk. You can use the entire can for a sweeter kalakand. Adjust sweetness level to taste. 9- Mix the chena and sweetened condensed milk together well using a spatula. Set heat to low. 10- Start cooking the mixture on low heat, stirring often. At first the mixture will be very thin. 11- But as you keep cooking, the mixture will start to thicken and start leaving the sides of the pan. 12- After around 10 to 12 minutes of cooking on low heat, it will come together, thicken quite a bit and leave the sides. At this point add 1 teaspoon rose water and 3/4 teaspoon cardamom powder. Mix well. 13- It took me 12 minutes on low heat to reach this stage where it was thick enough and was leaving the sides of the pan but was still not dry. It can take you more or less time depending on the thickness of the pan and intensity of the heat. Remember to not over-cook, it should not dry out but still be juicy else the kalakand will turn chewy. Immediately, remove pan from heat. 14- Transfer mixture to a greased pan or a pan lined with aluminum foil or parchment paper. I used an 8 inch square pan but spread the mixture on only half of the pan as I wanted thick kalakand pieces. Smooth out the mixture using a spatula. 15- Sprinkle chopped nuts on top, I sprinkled some pistachios. Let it set for 2 to 3 hours at room temperature. 16- Once set, cut kalakand into pieces. I got 16 pieces of kalakand from this mixture. Keep it refrigerated.
Storage
Since, kalakand is a milk based sweet, it should be kept refrigerated. It tastes best when freshly consumed. I would recommend consuming homemade kalakand within 3 days for best results.
Traditional Kalakand (without condensed milk)
Traditionally, kalakand is made only with milk and sugar. If you want to make it the traditional way, here’s what you need to do. You would need 2 liters of whole milk and this process will take much longer. Start by boiling and curdling 1 liter of whole milk. You would need around 1 & 1/2 to 2 tablespoons of lemon juice to curdle the milk. Then wash the chena and follow the same process as mentioned above. Then in a pan take the remaining 1 liter of milk and start cooking it. Let it come to a boil and then lower the heat to low-medium. Keep cooking the milk (stir often), until it reduces for around 20 minutes. At this point add the prepared chena to the pan. Cook this for around 10 minutes, keep stirring on low heat. The mixture will thicken a lot. Add 3/4 cup of powdered sugar (icing sugar/confectioners sugar) and continue to cook. After you have added sugar, the mixture will loosen a bit but keep stirring and it will start thickening again. Add 3/4 teaspoon cardamom powder, 1 teaspoon rose water and mix and cook until mixture thickens and leaves the sides of the pan. Transfer to a greased pan, smooth it out, sprinkle with nuts and let it set for 2 to 3 hours, then cut into pieces. The cooking time here would be around 40 to 45 minutes compared to the 12 minutes cooking when using condensed milk.
Tips to Make Soft Kalakand
One of the problems that you may face while making kalakand at home is that the kalakand turns hard or chewy. Here are few tips and things to keep in mind that will ensure that your kalakand stays soft. Add water to milk after it has curdled and before adding lemon juice: I don’t always do this step when making kalakand but I always do it when making rasmalai. It results in a softer chena. I have noticed that it doesn’t make a drastic difference in kalakand but it’s something you can do to make the kalakand softer. Once milk comes to a boil, turn off the heat and add a cup or two of water. Then add lemon juice to curdle the milk. Don’t squeeze too much water from the chena: after you have washed the chena and tied it in a muslin cloth, you have to squeeze excess moisture from chena. However, do not squeeze it super hard and make it dry. The chena should have some moistness in it, this will result in soft kalakand. Don’t over-cook the kalakand: once the mixture becomes thick and leaves the sides of the pan, you should not cook it further. The mixture should look juicy and not completely dry before you set it. Over-cooking will result in a chewy kalakand. It took me 12 minutes on low heat to reach this stage but this can take you more or less time depending on the pan thickness and intensity of heat.
Making Kalakand from Store-bought Paneer
Can you make this recipe with store bought paneer? Honestly speaking, kalakand tastes best when made from fresh chena. If you have access to soft, fresh paneer then you can definitely make this recipe with that. You will need 225 grams of fresh paneer. However, most paneer that we get in stores here are dry and hard and they will not work well here. If still you want to make this recipe with store-bought paneer, I would recommend soaking the paneer in warm water for 20 minutes. Then grate it. You will need 225 grams of paneer. Transfer grated paneer to a bowl and then add 2 tablespoons of warm milk to it. Let it sit for 5 minutes and then use in the recipe.
Tips & Notes
I have used 3/4th of a 14 oz. can of condensed milk. For a sweeter kalakand, you can use the entire can of condensed milk. You can definitely make this recipe with ricotta cheese. You would need around 15 oz. of ricotta cheese. However, cooking time will increase a little since ricotta cheese has much more moisture than chena. So, it would probably take 20 to 25 minutes to reach the desired kalakand consistency. The process and steps will remain same. You can flavor this kalakand with saffron too. Warm 1 to 2 tablespoons of milk and crush some saffron strands and add it to the milk. Let it rest 5 minutes and then add that saffron milk to the pan along with the condensed milk.
If you’ve tried this Recipe then don’t forget to rate the recipe! You can also follow me on Facebook, Instagram to see what’s latest in my kitchen and on YouTube to watch my latest videos. This post has been updated from the recipe archives, first published in January 2014.


