Sep 03, 2019, Updated Oct 21, 2019 It’s one of the most popular Indian sweets and probably the most gifted one during Diwali!
Me and kaju katli have had a love-hate relationship. As a child, I never liked it. I mean it was my least favorite sweet and everyone I knew just adored it. Basically it used to be that expensive sweet that everyone was crazy about and I never cared enough for it. For me simple homemade besan ladoo were million times better than kaju katli. But things have changed now. Our food preferences really change with time, isn’t it? and now I love kaju katli! And I am sure my husband will be really glad to read this. He absolutely loves this sweet and he can’t be more pleased that now I make it at home.
What is Kaju Katli
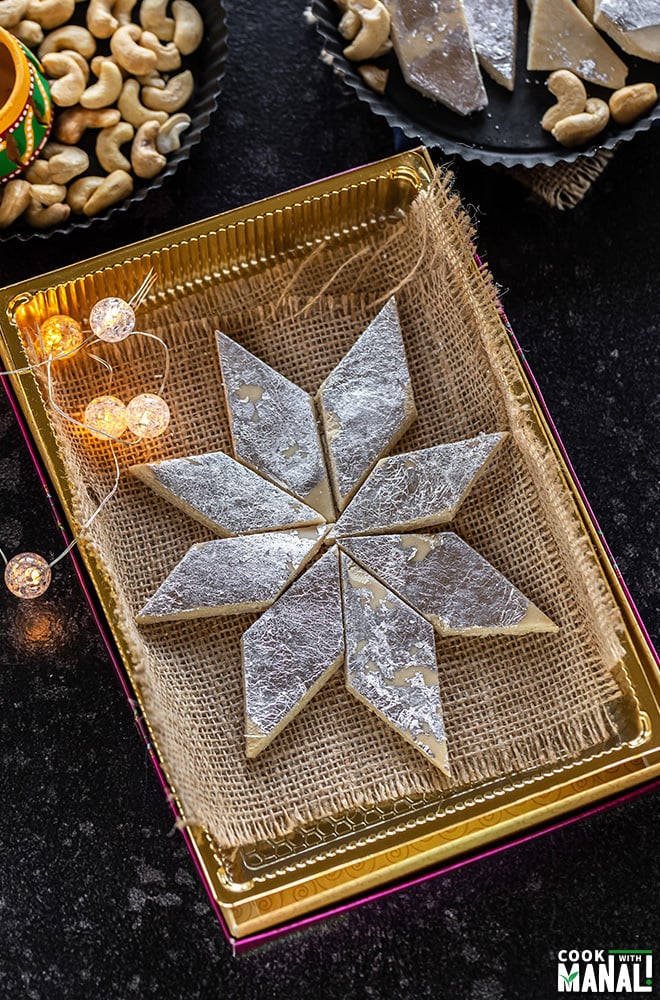
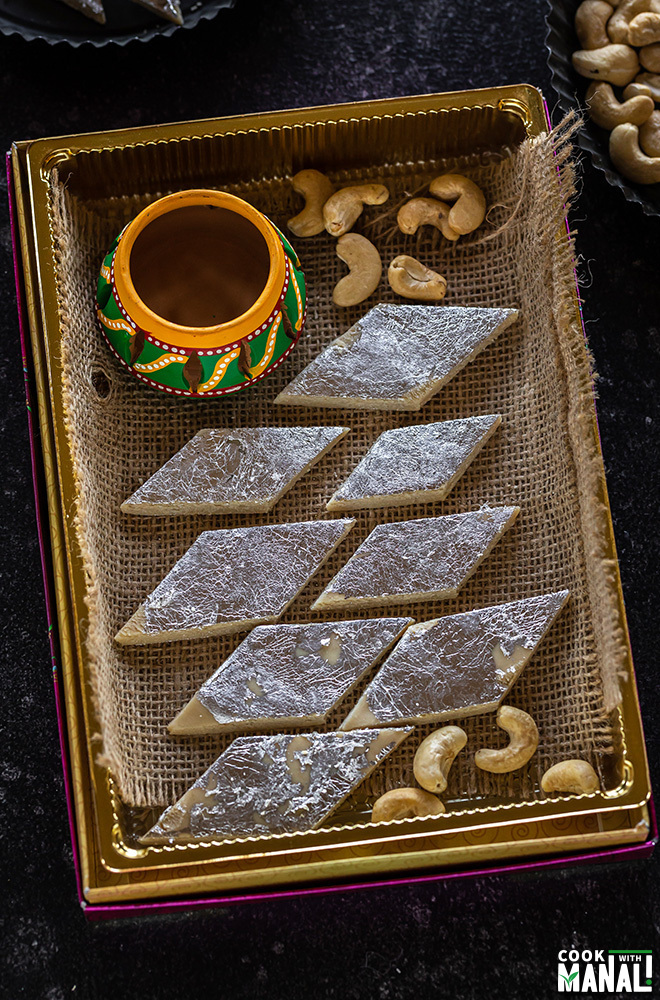
Kaju= Cashews Katli= Fudge So it’s a fudge made with powdered cashews. The recipe needs only 3 basic ingredients- cashews, water and sugar. Adding ghee is optional but recommended. I also add little bit of rose water but that’s optional too. Kaju Katli is also known as Kaju Burfi. It’s the same thing and it is one of the most popular Indian sweets. We used to get so many boxes of kaju katli during Diwali, it’s one of the most gifted sweets in India for sure during the festive season.
Tips to Make Perfect Kaju Kalti at Home
The basic process of making kaju katli is simple, however like with most Indian sweets it takes some practice to get them right. Don’t be disheartened if you don’t get it right on the first go. Practice will make you perfect! Here are few things to keep in mind while making kaju katli Don’t over-grind the cashews: if you do that, cashews will release oil and you will get cashew butter and you don’t want that. Use a spice grinder for getting fine cashew powder: a spice grinder works really well for grinding cashews. You can use a food processor, but then remember to sieve the mixture to get rid of any coarse cashew pieces. When I use a spice grinder, I don’t sieve the mixture. It’s quite fine already. Keep the heat low while constantly stirring the cashew mixture: while cooking the cashew-sugar mixture remember to keep the heat low at all time. Also you have to keep stirring at all times. Add a little ghee to make it smooth: adding ghee is optional but recommended. It makes the mixture smooth and also adds to the flavor. Cook until the mixture leaves the sides of the pan completely: the most important thing here is to cook the cashew mixture until it leaves the sides of the pan. If you under cook it, the katli will not set. It takes around 10 to 11 minutes on low heat to get to this point. To test if you have cooked it to the right stage- take a small piece from the dough and let it cool down a bit. Then roll it between your thumb and index finger. You should be able to form a non-sticky ball. If it’s sticking and you can’t form a ball, transfer batter back into the pan and cook for few more minutes.
Use parchment paper to roll the dough, will make your life so much easier: the cashew mixture is really stick once you remove it from the pan. You can grease a plate and transfer it to that plate. But it’s best to use a parchment paper. Nothing sticks and it’s easy to knead and roll the dough using it. Knead the dough while it’s still warm: you have to knead the dough while it’s still warm. Be very careful though and do not try to knead it while it’s hot. You will burn your fingers (been there done that!). So wait for few minutes until the dough is okay to touch and then knead. But make sure you don’t let it cool down. If the dough looks very dry while kneading, you may sprinkle some water or milk on top and knead. Roll the dough immediately after kneading it while it’s warm: and roll between two sheets or parchment paper. It will be difficult to roll once the dough cools down.
Method
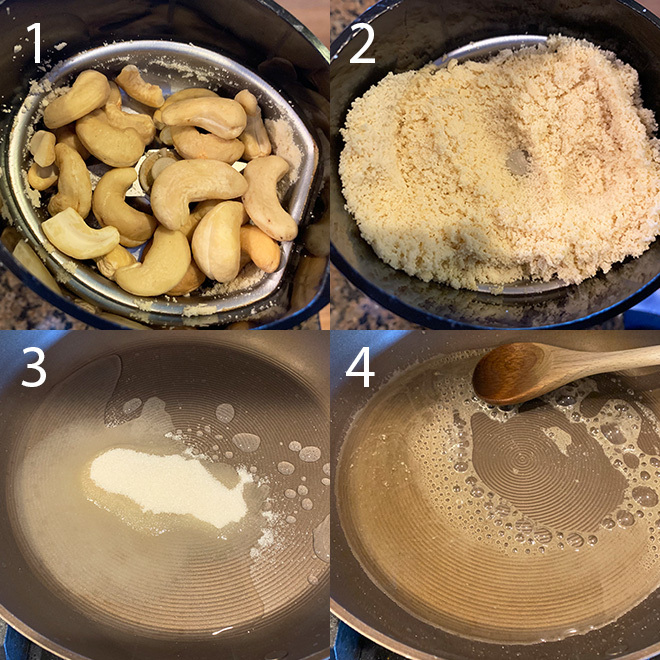
1- Place cashews in a spice grinder. I prefer using my spice grinder (this is the one I have) to grind nuts. You can also use a food processor or any other blender you have. 2- Grind to a smooth powder. However don’t over grind it else cashews will release oil, you don’t want cashew butter! 🙂 You can sieve if there are coarse pieces of cashew. The spice grinder does a really fine job, so I did not sieve the mixture. Set it aside. 3- Add sugar and water in a pan on medium heat. You can also add rose water (optional) at this point. Stir to combine. 4- Let the sugar melt and then once the sugar melts, let the mixture boil for 1 minute.
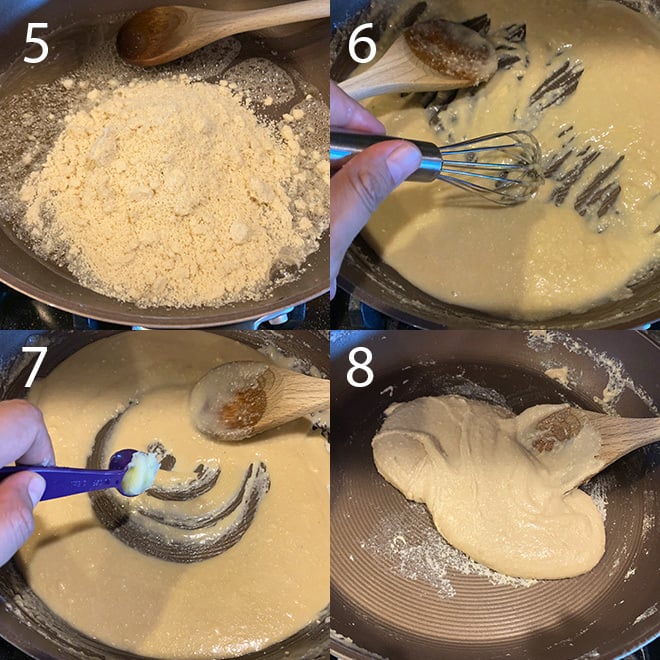
5- Then lower the heat and add in the powdered cashews. Stir to combine. 6- You can use a whisk at this point to get rid of lumps. 7- Keep stirring the mixture on low heat. Add a teaspoon of ghee and stir. Ghee makes the mixture smooth and also adds some shine to the katli. 8- Keep stirring, after around 10 minutes on low heat, the dough will leave the sides of the pan. This is the stage when you want to remove pan from heat. You can check if the dough is done or not by taking a small piece from mixture, let it cool down a little and then roll it between your thumb and index finger. You should be able to make a non-sticky ball out of it. It means your dough is done. If not, you need to cook it further. It will be done around 10-11 minutes on low heat though.
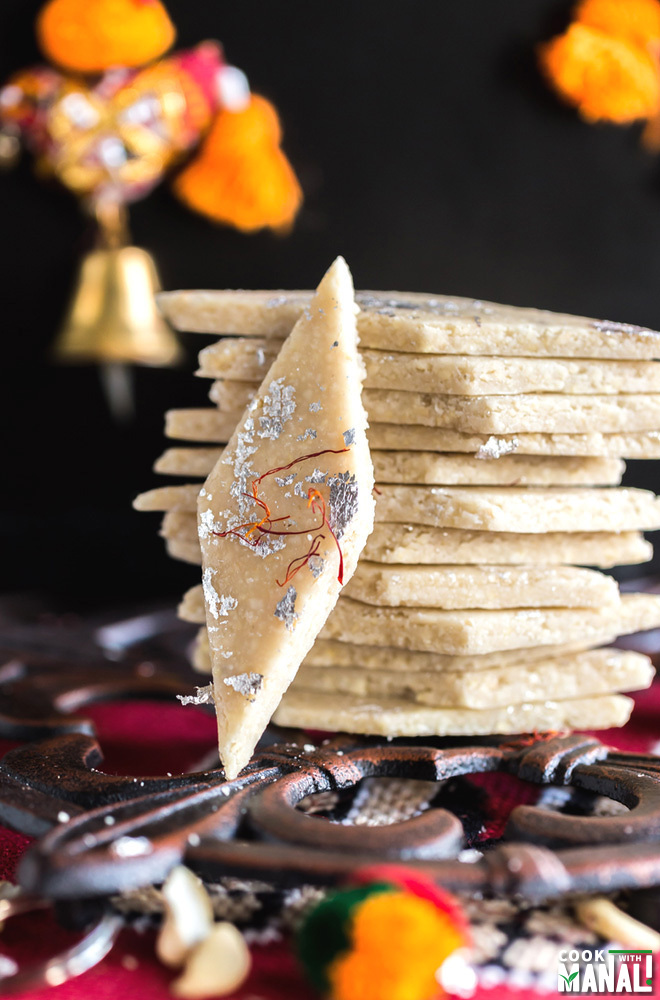
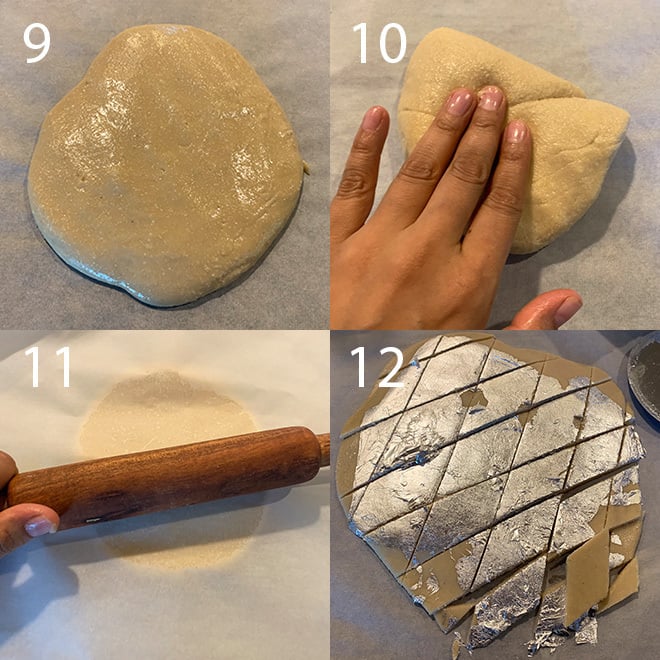
9- Once the dough is done, transfer it to a sheet of parchment paper. 10- Wait for 3 to 4 minutes for the dough to cool down a bit. Then knead the dough with your hands to make it smooth. You have to knead the dough while its warm. But be careful to not burn your fingers. Let it cool down a little and only then attempt to knead. Also if the dough looks very dry while kneading, you can sprinkle some water or milk to make it smooth. 11- Then place another sheet of parchment paper on top of the dough. Roll to 1/4 to 1/2 inch thick using a rolling pin applying equal pressure on all sides. 12- Once rolled, apply chandi vark if using. Cut the dough into diamond shape by first cutting the dough vertically and then horizontally.
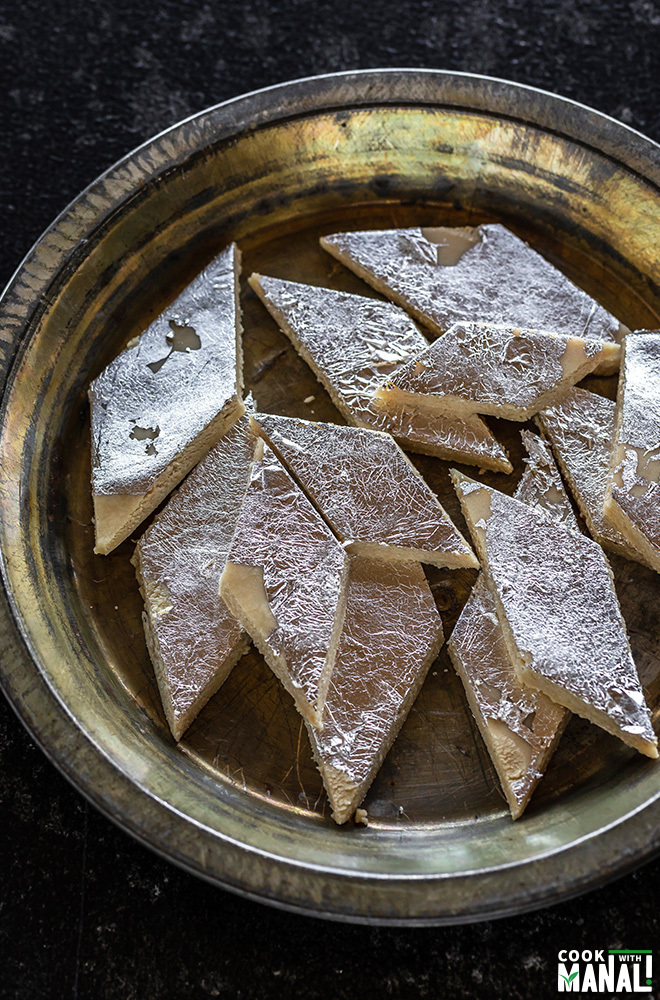
Separate the kaju katil and enjoy! You can store the kaju katli in the refrigerator for up to a week.
If you’ve tried this Kaju Katli Recipe then don’t forget to rate the recipe! You can also follow me on Facebook and Instagram to see what’s latest in my kitchen! This post has been updated from the recipe archives, first published in November 2015.
title: “Kaju Katli " ShowToc: true date: “2024-09-15” author: “Monica Rash”
Sep 03, 2019, Updated Oct 21, 2019 It’s one of the most popular Indian sweets and probably the most gifted one during Diwali!
Me and kaju katli have had a love-hate relationship. As a child, I never liked it. I mean it was my least favorite sweet and everyone I knew just adored it. Basically it used to be that expensive sweet that everyone was crazy about and I never cared enough for it. For me simple homemade besan ladoo were million times better than kaju katli. But things have changed now. Our food preferences really change with time, isn’t it? and now I love kaju katli! And I am sure my husband will be really glad to read this. He absolutely loves this sweet and he can’t be more pleased that now I make it at home.
What is Kaju Katli
Kaju= Cashews Katli= Fudge So it’s a fudge made with powdered cashews. The recipe needs only 3 basic ingredients- cashews, water and sugar. Adding ghee is optional but recommended. I also add little bit of rose water but that’s optional too. Kaju Katli is also known as Kaju Burfi. It’s the same thing and it is one of the most popular Indian sweets. We used to get so many boxes of kaju katli during Diwali, it’s one of the most gifted sweets in India for sure during the festive season.
Tips to Make Perfect Kaju Kalti at Home
The basic process of making kaju katli is simple, however like with most Indian sweets it takes some practice to get them right. Don’t be disheartened if you don’t get it right on the first go. Practice will make you perfect! Here are few things to keep in mind while making kaju katli Don’t over-grind the cashews: if you do that, cashews will release oil and you will get cashew butter and you don’t want that. Use a spice grinder for getting fine cashew powder: a spice grinder works really well for grinding cashews. You can use a food processor, but then remember to sieve the mixture to get rid of any coarse cashew pieces. When I use a spice grinder, I don’t sieve the mixture. It’s quite fine already. Keep the heat low while constantly stirring the cashew mixture: while cooking the cashew-sugar mixture remember to keep the heat low at all time. Also you have to keep stirring at all times. Add a little ghee to make it smooth: adding ghee is optional but recommended. It makes the mixture smooth and also adds to the flavor. Cook until the mixture leaves the sides of the pan completely: the most important thing here is to cook the cashew mixture until it leaves the sides of the pan. If you under cook it, the katli will not set. It takes around 10 to 11 minutes on low heat to get to this point. To test if you have cooked it to the right stage- take a small piece from the dough and let it cool down a bit. Then roll it between your thumb and index finger. You should be able to form a non-sticky ball. If it’s sticking and you can’t form a ball, transfer batter back into the pan and cook for few more minutes.
Use parchment paper to roll the dough, will make your life so much easier: the cashew mixture is really stick once you remove it from the pan. You can grease a plate and transfer it to that plate. But it’s best to use a parchment paper. Nothing sticks and it’s easy to knead and roll the dough using it. Knead the dough while it’s still warm: you have to knead the dough while it’s still warm. Be very careful though and do not try to knead it while it’s hot. You will burn your fingers (been there done that!). So wait for few minutes until the dough is okay to touch and then knead. But make sure you don’t let it cool down. If the dough looks very dry while kneading, you may sprinkle some water or milk on top and knead. Roll the dough immediately after kneading it while it’s warm: and roll between two sheets or parchment paper. It will be difficult to roll once the dough cools down.
Method
1- Place cashews in a spice grinder. I prefer using my spice grinder (this is the one I have) to grind nuts. You can also use a food processor or any other blender you have. 2- Grind to a smooth powder. However don’t over grind it else cashews will release oil, you don’t want cashew butter! 🙂 You can sieve if there are coarse pieces of cashew. The spice grinder does a really fine job, so I did not sieve the mixture. Set it aside. 3- Add sugar and water in a pan on medium heat. You can also add rose water (optional) at this point. Stir to combine. 4- Let the sugar melt and then once the sugar melts, let the mixture boil for 1 minute.
5- Then lower the heat and add in the powdered cashews. Stir to combine. 6- You can use a whisk at this point to get rid of lumps. 7- Keep stirring the mixture on low heat. Add a teaspoon of ghee and stir. Ghee makes the mixture smooth and also adds some shine to the katli. 8- Keep stirring, after around 10 minutes on low heat, the dough will leave the sides of the pan. This is the stage when you want to remove pan from heat. You can check if the dough is done or not by taking a small piece from mixture, let it cool down a little and then roll it between your thumb and index finger. You should be able to make a non-sticky ball out of it. It means your dough is done. If not, you need to cook it further. It will be done around 10-11 minutes on low heat though.
9- Once the dough is done, transfer it to a sheet of parchment paper. 10- Wait for 3 to 4 minutes for the dough to cool down a bit. Then knead the dough with your hands to make it smooth. You have to knead the dough while its warm. But be careful to not burn your fingers. Let it cool down a little and only then attempt to knead. Also if the dough looks very dry while kneading, you can sprinkle some water or milk to make it smooth. 11- Then place another sheet of parchment paper on top of the dough. Roll to 1/4 to 1/2 inch thick using a rolling pin applying equal pressure on all sides. 12- Once rolled, apply chandi vark if using. Cut the dough into diamond shape by first cutting the dough vertically and then horizontally.
Separate the kaju katil and enjoy! You can store the kaju katli in the refrigerator for up to a week.
If you’ve tried this Kaju Katli Recipe then don’t forget to rate the recipe! You can also follow me on Facebook and Instagram to see what’s latest in my kitchen! This post has been updated from the recipe archives, first published in November 2015.


