Feb 07, 2024 If you are struggling to make good Idlis in your kitchen, then this Idli recipe might just be what you need. Enjoy hot idlis with sambar, coconut chutney and a side of filter coffee! Idlis in most south Indian homes are made using a wet grinder. I do not have a wet grinder so my recipe is adapted using a high speed blender. If you have a high speed blender in your kitchen (like a Vitamix or Blendtec) then that’s all that you need to grind the soaked rice and dal.
Some Important Points
We know that Idli is made from rice and dal (lentil) but there are so many parts to the Idli recipe that need attention from using the right rice and dal to getting the fermentation right. Here are a few important pointers to keep in mind before we jump onto the idli recipe.
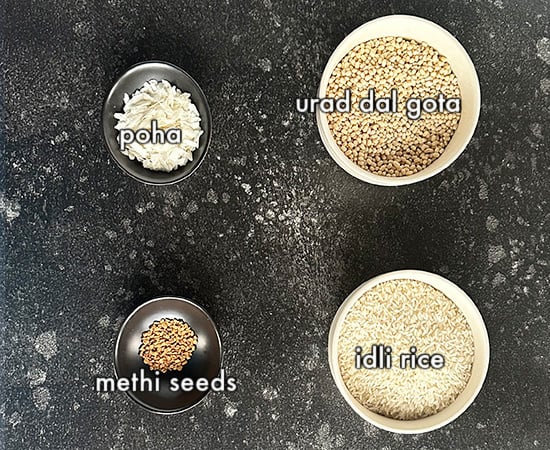
Type of Rice & Dal: I like using Idli rice which is parboiled small grain rice for making idlis. Sona masoori also works well. But parboiled rice works best in my experience in making soft idlis. As far as the dal is concerned, there are different varieties of Urad dal that can be used for making idlis. I have made idlis with dhuli urad dal (split and dehusked black gram lentil) and while it works fine, I have always gotten the best results with urad dal gota (whole dehusked black gram). I highly recommend using idli rice and urad dal gota for making idlis.
Rice and Dal Ratio: Everyone has a ratio that they think work best for making idli, through my experiments over many years, I have come to the conclusion that ratio of 4:1 of rice to dal works best in giving soft and fluffy idlis.
Hours to ferment: The time it takes for the batter to ferment depends on where you live. If you live in a warm place like Delhi during summers this batter would probably ferment in 6 hours or less just on the countertop. However if you live in Canada, during winters, the same batter might take 14 to 16 hours to ferment.
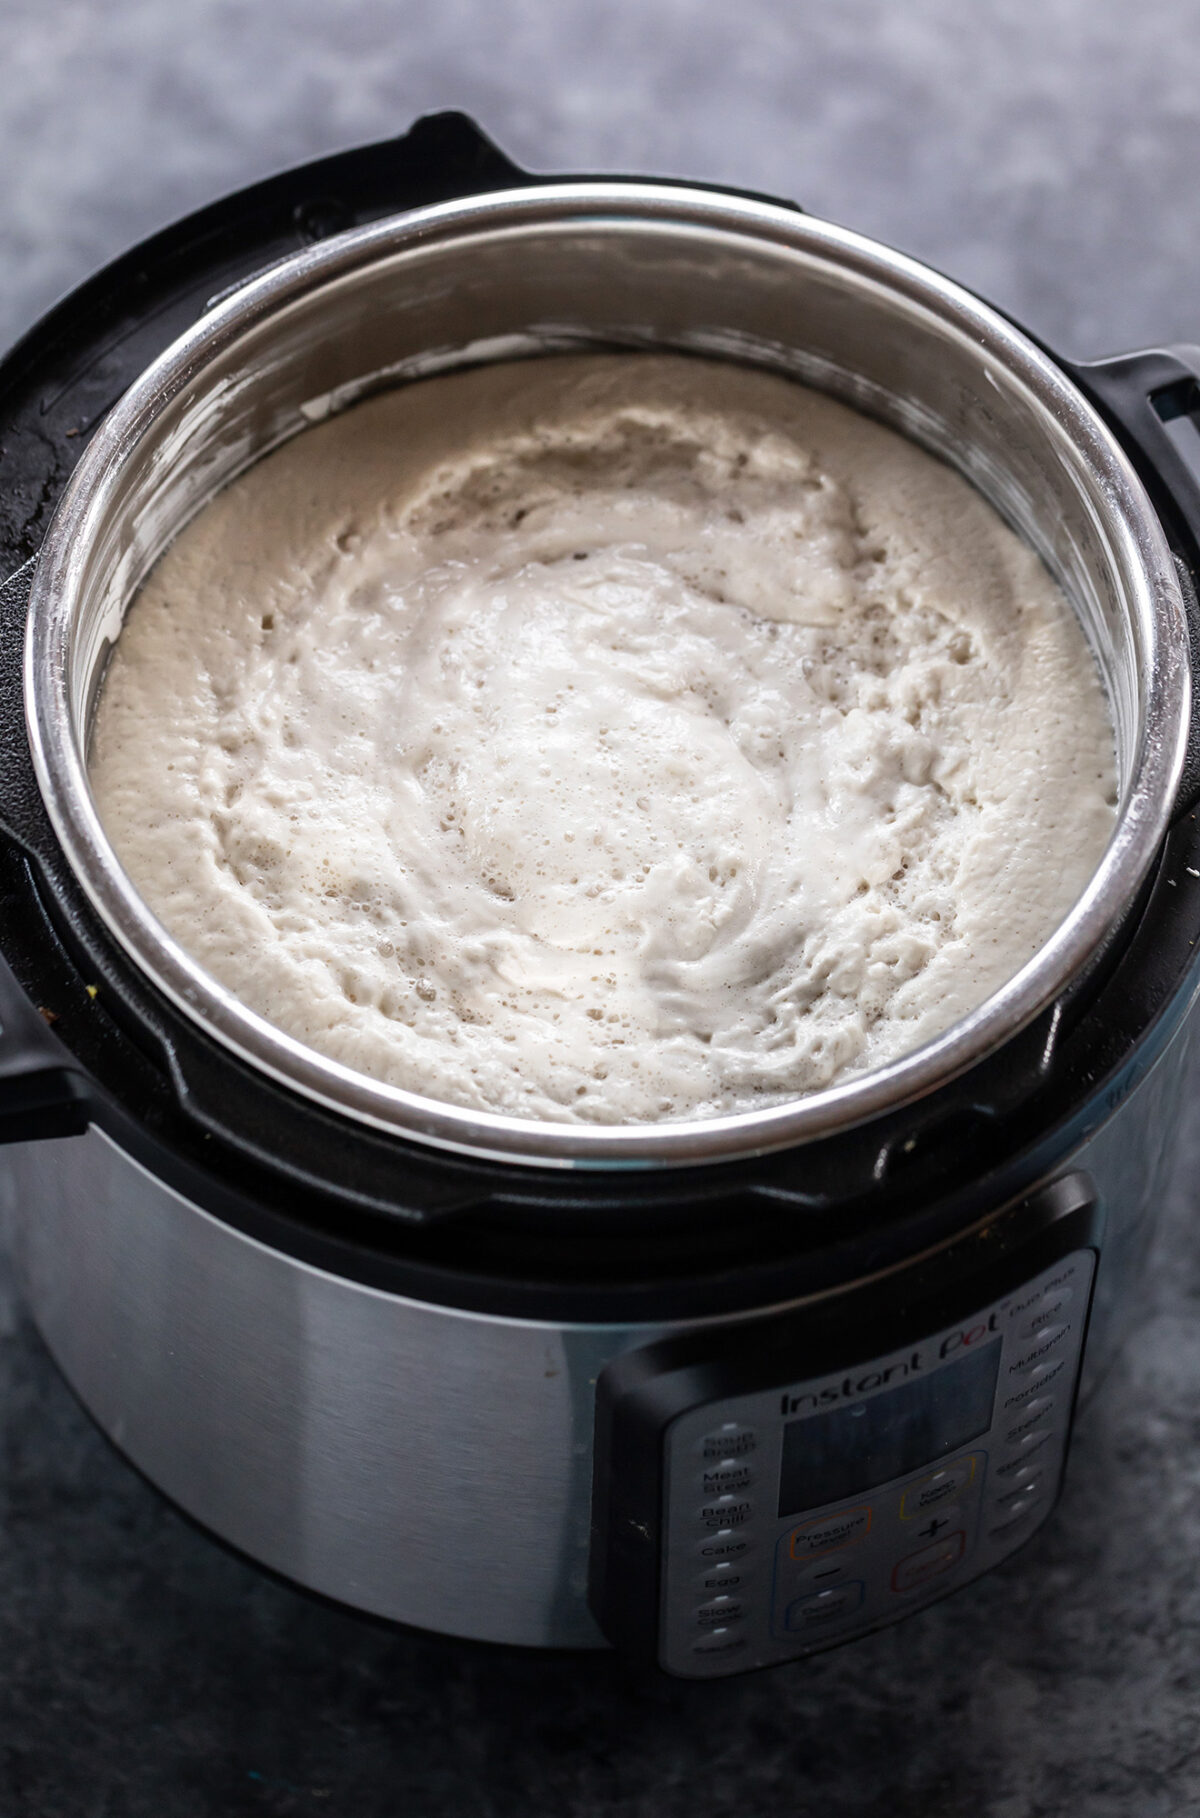
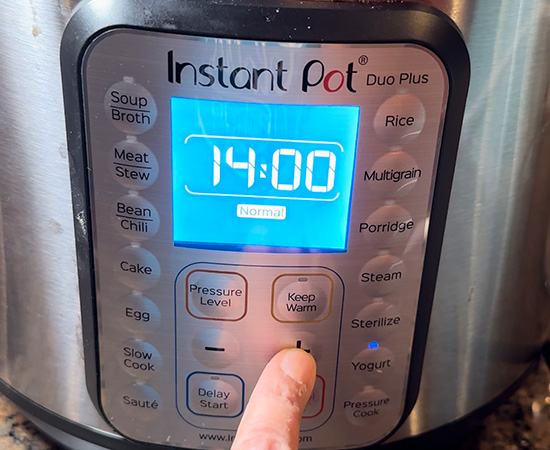
Where to ferment the batter: As I mentioned above, this depends on the weather. If it’s hot where you live, just place the batter on the kitchen counter and it will ferment. For cold places, you can place the batter inside the oven with oven lights on (and oven off) or you can place the batter in the Instant pot and use the yogurt button to ferment the batter. You can also preheat your oven to 200 F for 10 minutes and then turn off the oven (please don’t let the oven be “on” else the heat will kill the yeast). Wait for 10 minutes for the temperature to come down a little and then place the batter inside the oven to ferment. Personally, I always stick to the Instant pot and it gives me consistent results.
Adding salt: Adding salt before fermentation or after fermentation is often a topic of debate. The iodine in the salt is said to inhibit fermentation and that’s why so many experts say that you should add salt later once the batter is fermented. However, I always add salt (and I use sendha namak which doesn’t have iodine) before fermentation and mixing it with the ground rice and dal (using my hands) seems to help in the fermentation process in colder places. You have to see what works for you. Adding salt before fermentation is what works for me. Make sure to always add non-iodized salt to the batter if you are adding it before the fermentation.
How to Make Idli -Step by Step Tutorial
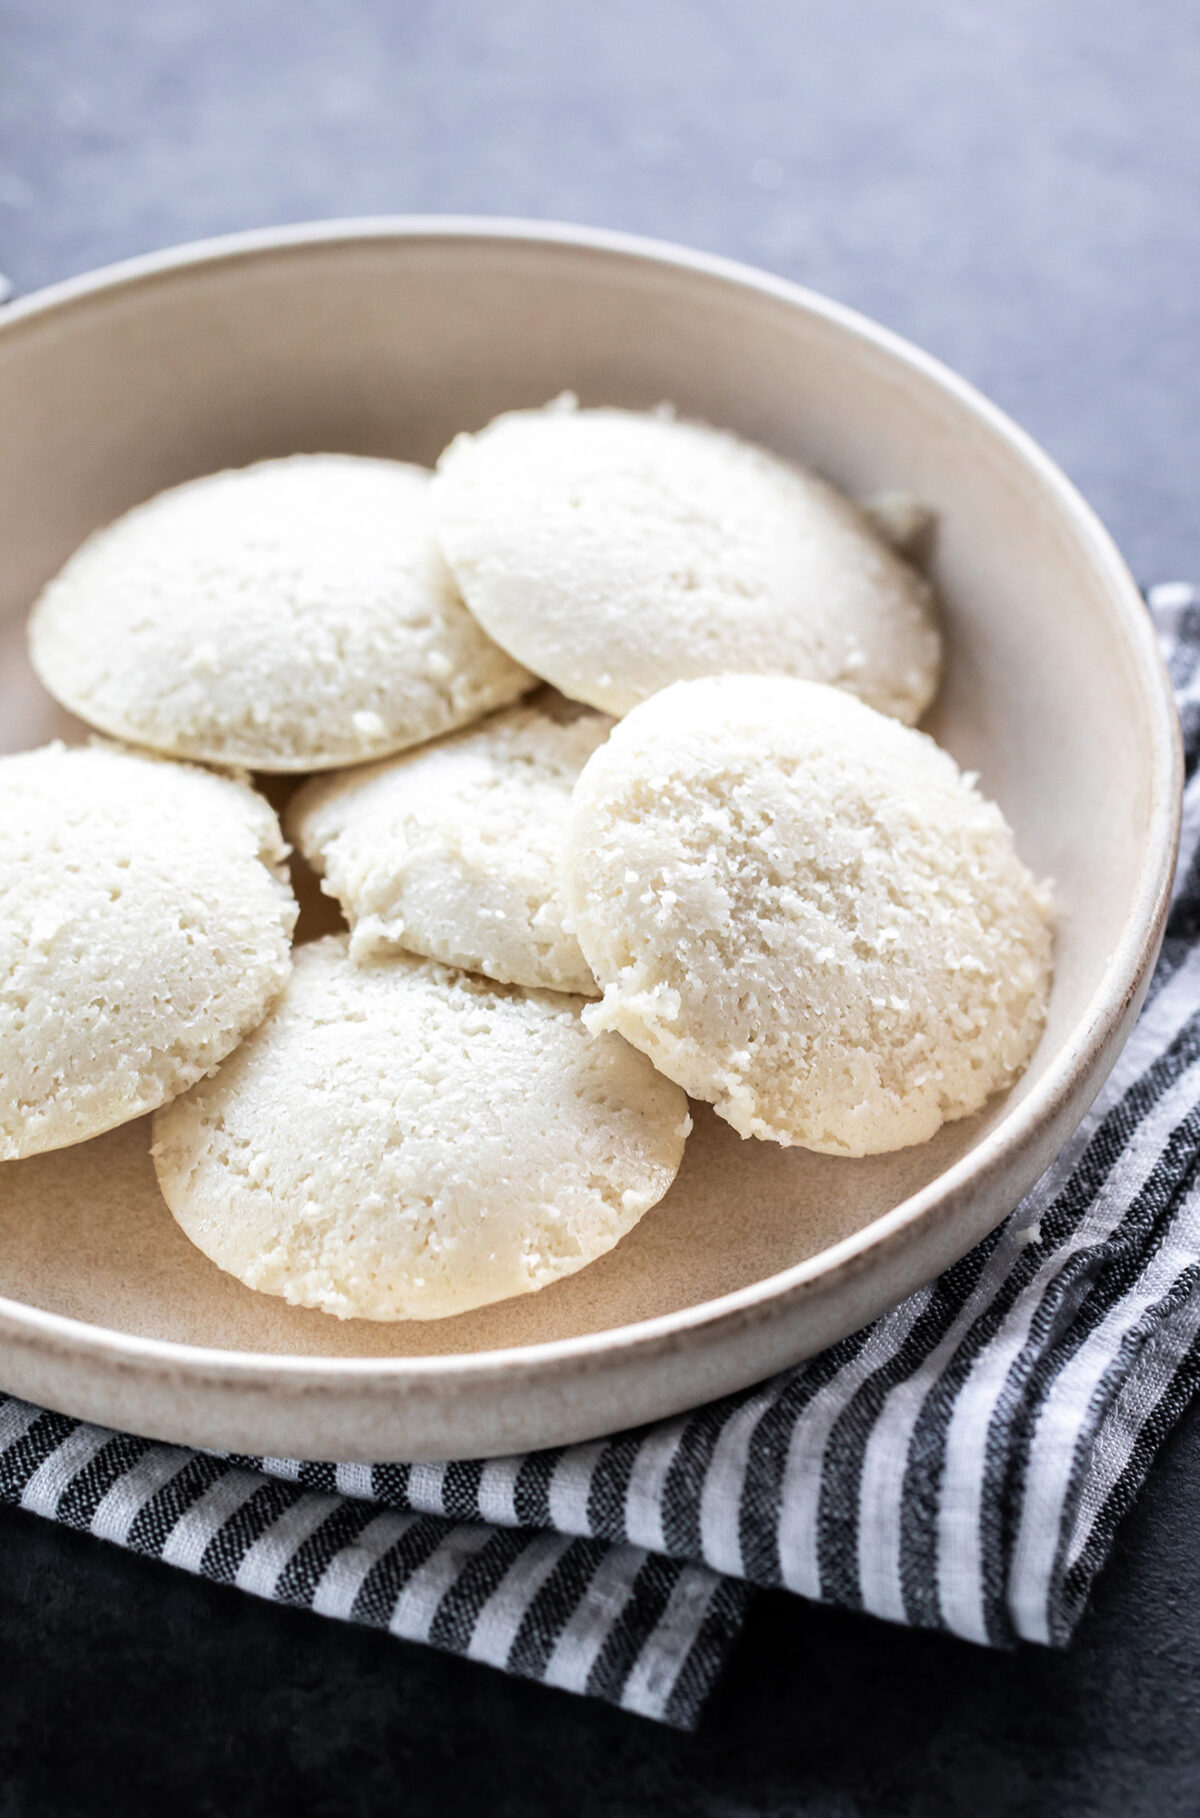
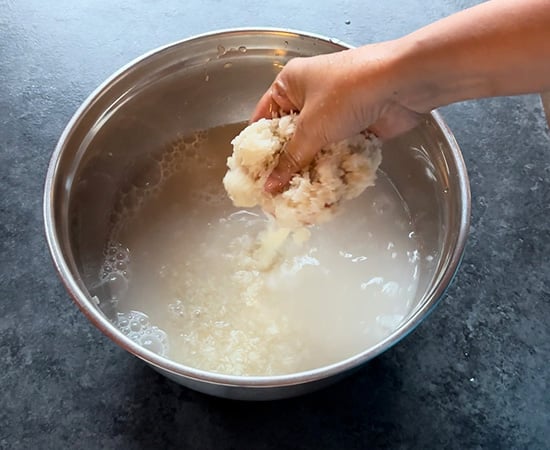
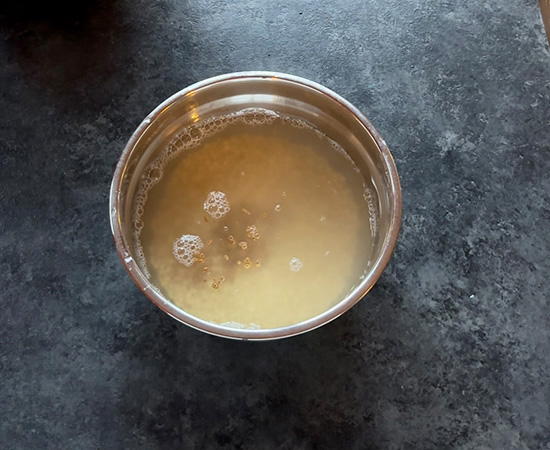
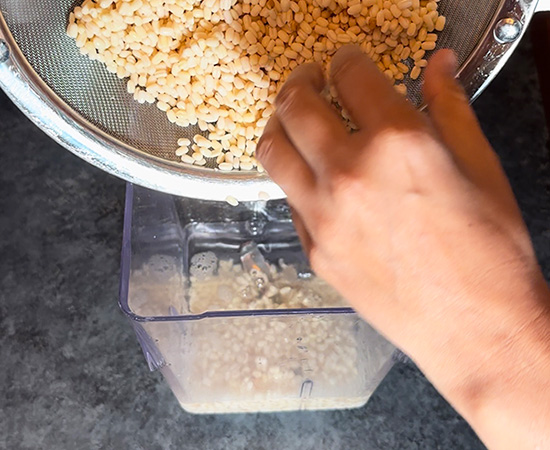
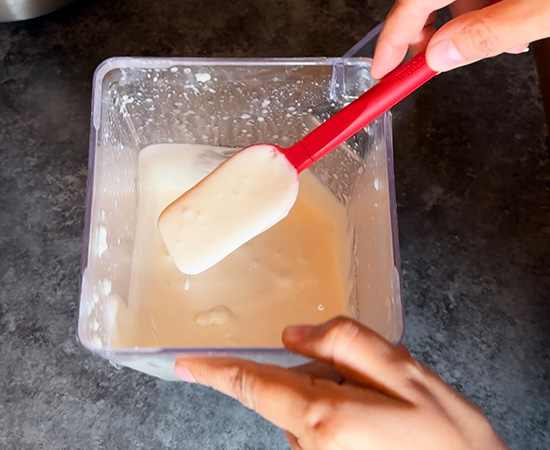
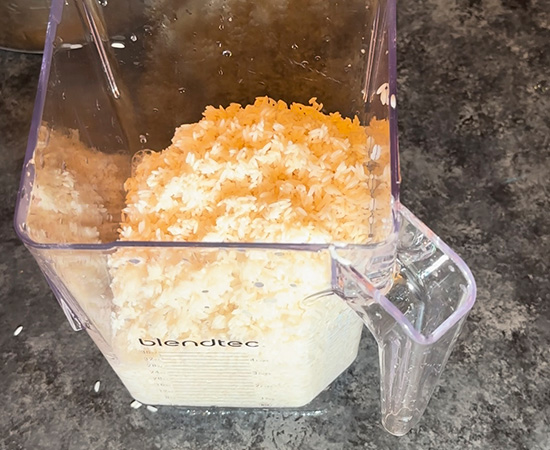
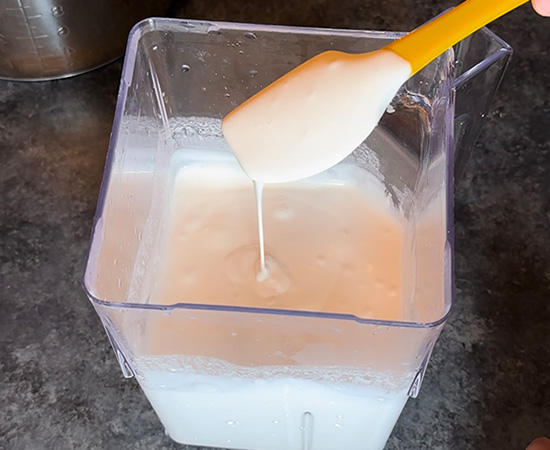
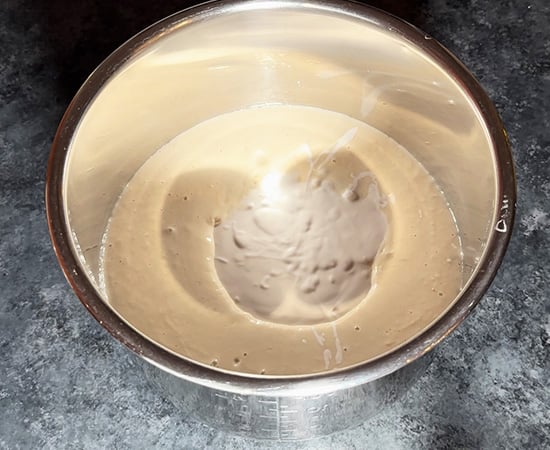
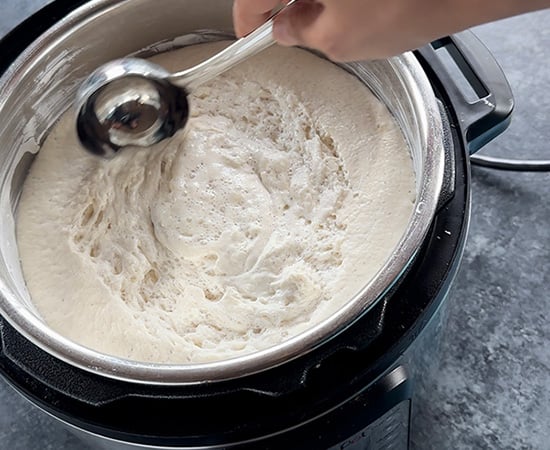
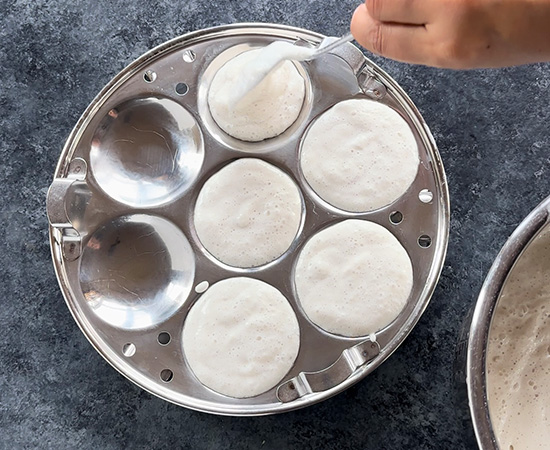
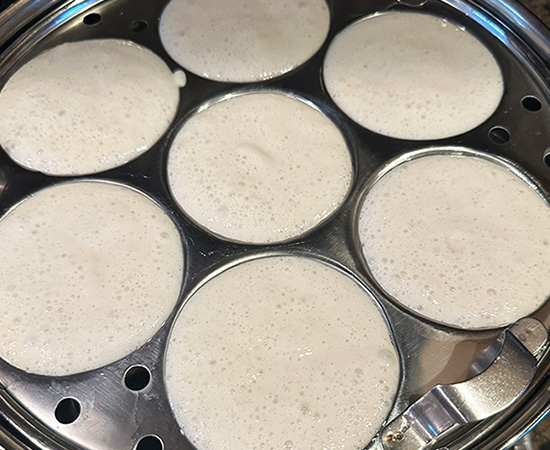
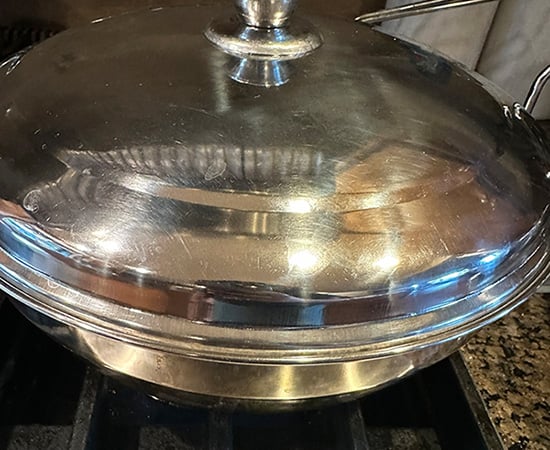
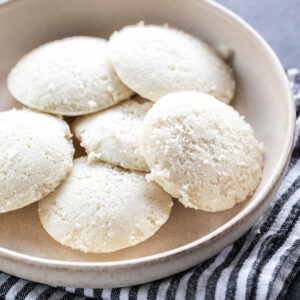
Gather all the ingredients- idli rice, urad dal, methi (fenugreek) seeds and poha. Take 4 cups (800 grams) of idli rice and rinse it under running water until the water turns clear. Transfer the rice to a large bowl, add enough water around 6-7 cups to cover it. Cover the bowl with a lid and let it soak for 5 to 6 hours as well. Now, take 1 cup (200 grams) of urad dal gota and rinse it under running water and then transfer it to a medium size bowl. Now, add 2 to 3 cups of water to the dal, also add 1/2 teaspoon of fenugreek seeds (methi). Cover and soak the dal for 5 to 6 hours. 30 minutes before grinding the dal and rice (so if you are soaking them for 6 hours, do this when 5& 1/2 hours have passed away), soak 1/4 cup poha in some water. The poha needs to be soaked only for 30 minutes. Once 6 hours are up, drain the water from the dal and fenugreek seeds using a strainer. Now add around 1 (8 oz) to 1 & 1/4 cups (10 oz) cold water to a blender (I used my Blendtec) and then add the drained dal and fenugreek seeds to the blender. Start with 1 cup of water and add more as needed. Grind the dal to a fine paste. On Blendtec, you can use the smoothie function which grinds for 60 seconds. Transfer the ground dal to the steel pot of the instant pot (if you are using the instant pot to ferment the batter) or you any large container otherwise. Now, drain the water from the rice using a strainer. Also, drain water from the soaked poha. Add around 1 & 1/2 cups (12 oz) ice cold water to the same blender and add the drained rice along with drained poha to it. PS: start with 1 & 1/4 cups of water and add the remaining 1/4 if needed. Grind the rice similarly to a smooth paste. The rice usually will have a slight coarse texture compared to the dal. Now, transfer the ground rice to the same pot with the dal. Add 2 teaspoons of sendha namak and start mixing the ground rice and dal with the salt using your hands. Do not add salt before if you live in a warm place. I live in a cold place so adding the salt before helps in starting the fermentation process. Mix everything using your hands for 2 to 3 minutes, this helps in starting the fermentation process. The consistency of the batter should be thick but pouring. It should not be runny. If using an Instant pot, place the steel pot back into the instant pot and cover it with a glass lid. I recommend using a glass lid rather than the instant pot lid since the batter might ferment and lock the lid so the glass lid works better. Press the yogurt button and set the time to 14 hours. The position of the valve does not matter on the yogurt setting. I live in a cold place so it takes around 14 hours for the batter to ferment in the Instant Pot. If you live in a warm place, this can happen in 6 to 8 hours or even earlier in summers. If you don’t have an instant pot, cover the bowl with a plate and place it on the countertop if it’s hot where you live. If it’s cold where you live, place the bowl inside the oven with oven lights on (and oven off obviously). The timing the batter will take to ferment will vary greatly depending on the weather. After 14 hours, my batter was well fermented. It had lots of bubbles on top, it had nicely risen and was bubbly at the top. You will also notice that the batter becomes a little runnier/thinner after fermentation. You can drop some batter in a bowl filled with water if you are not sure if your batter has fermented or not. If well fermented, the batter will float in water else it will sink to the bottom of the bowl. To make idli, grease the idli molds with little oil. Add water to your steamer and let the water come to a boil on medium heat. Fill the molds with the idli batter. Don’t overfill them. Once the water in the steamer starts boiling, place the idli stant with the insert in the steamer. Cover the steamer and steam for around 8 to 10 minutes only on medium high heat. Do not steam for a long period as that leads to rubbery, dry and chewy idlis. Remove the steamer from heat, let it sit like that for 2 minutes. Then open the steamer, carefully remove the idli molds from the steamer. Let the idlis sit for 5 minutes and then remove them carefully from the molds using a flat spatula or knife. If you try to remove them immediately, they might break or stick. Enjoy the idlis hot with sambar and coconut chutney or peanut chutney.
Storing the Idli Batter In Fridge
My idli batter usually stays well in the fridge for 3 to 4 days. I just bring it to room temperature before making the idli. If you have steamed the idlis already, and can’t consume them all, you can place the leftover idlis in the fridge and reheat them in the microwave. Put the idlis on a plate and put a damp paper towel on top and microwave for 1 to 2 minutes. They should be soft and nice again. You can also reheat idlis in a steamer.
Add some poha in the batter: To make soft idlis, definitely add some poha to the batter. Anywhere around 1/4 to 1/2 cup of poha will be good in this recipe. The poha only needs to be soaked for 20 to 30 minutes. It can either be thin poha or thick poha, it doesn’t matter. I have used thick poha in this recipe.
Do not add too much water while grinding the batter: This is an important point and you have to be careful about this. I have given a rough estimate on how much water should be added, but it will vary on the variety of rice and dal being used. Runny batter will lead to flat idlis so make sure that you do not add excess water while grinding the rice and dal. You must remember that the batter also thins out a little once it is fermented so don’t add too much water while grinding.
Do not use old rice and dal: One of the things which I have noticed that does make a difference to the final texture of the idli is how old is the rice and dal that you have used to make the idli. Sometimes, we use dal and rice which has been sitting in the pantry for too long and that doesn’t give the desired result.
Steaming for a longer time results in hard idli: The idlis need to be steamed for just the right amount of time. If you steam them longer, they might dry out. 8 to 10 minutes is my sweet spot.
Freezing the Idlis
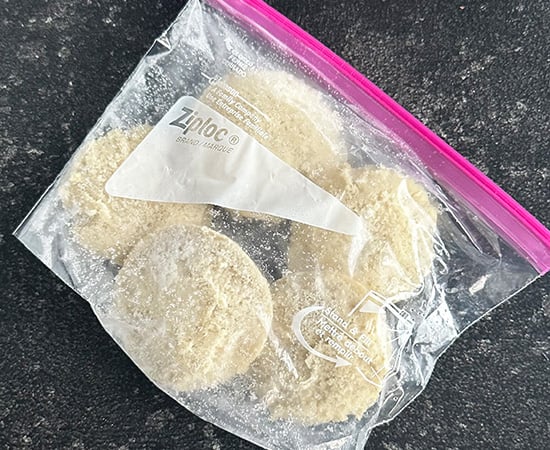
Sometimes, I make a big batch of Idlis and freeze them. Idlis actually freeze beautifully. Steam them as usual and then allow them to cool down. You don’t need to let them cool down all the way (locking some moisture helps in the idlis staying soft once reheated), just let them come to room temperature and then freeze in ziplock bags. I usually freeze 4 to 5 idlis in a single bag. They will be good for up to 2 months in the freezer. Reheating the frozen idli: when you want to eat the idlis, you can reheat them in the microwave or stovetop. My preferred way to reheat frozen idlis is on the stovetop using a steamer. Heat water in a steamer, once the water comes to a boil, place the idlis into the steamer and steam for 6 to 7 minutes on medium heat. They will be soft and nice once again. And you can enjoy them with sambar. If you want to reheat them using a microwave, cover the idli with a damp paper towel, then place in a plate and microwave in 1 minute increments until it is soft.
How To Make Idli In Instant Pot
To steam the idlis in an Instant pot, add around 1 & 1/2 cups of water to the steel pot of the Instant Pot and let it come to a boil. Fill the idli molds with the batter. Once the water starts boiling, place the idli stand in the instant pot and close the lid. Press the steam button and steam on high for around 10 to 12 minutes. Turn the pressure valve to the venting position since we don’t want to pressure cook the idli. Note: on venting position, you will have to calculate the cooking time externally as the instant pot will not display any timer.


title: “Idli Recipe Idli Batter Recipe With Tips For Soft Idli " ShowToc: true date: “2024-11-01” author: “Jason Baugh”
Feb 07, 2024 If you are struggling to make good Idlis in your kitchen, then this Idli recipe might just be what you need. Enjoy hot idlis with sambar, coconut chutney and a side of filter coffee! Idlis in most south Indian homes are made using a wet grinder. I do not have a wet grinder so my recipe is adapted using a high speed blender. If you have a high speed blender in your kitchen (like a Vitamix or Blendtec) then that’s all that you need to grind the soaked rice and dal.
Some Important Points
We know that Idli is made from rice and dal (lentil) but there are so many parts to the Idli recipe that need attention from using the right rice and dal to getting the fermentation right. Here are a few important pointers to keep in mind before we jump onto the idli recipe.
Type of Rice & Dal: I like using Idli rice which is parboiled small grain rice for making idlis. Sona masoori also works well. But parboiled rice works best in my experience in making soft idlis. As far as the dal is concerned, there are different varieties of Urad dal that can be used for making idlis. I have made idlis with dhuli urad dal (split and dehusked black gram lentil) and while it works fine, I have always gotten the best results with urad dal gota (whole dehusked black gram). I highly recommend using idli rice and urad dal gota for making idlis.
Rice and Dal Ratio: Everyone has a ratio that they think work best for making idli, through my experiments over many years, I have come to the conclusion that ratio of 4:1 of rice to dal works best in giving soft and fluffy idlis.
Hours to ferment: The time it takes for the batter to ferment depends on where you live. If you live in a warm place like Delhi during summers this batter would probably ferment in 6 hours or less just on the countertop. However if you live in Canada, during winters, the same batter might take 14 to 16 hours to ferment.
Where to ferment the batter: As I mentioned above, this depends on the weather. If it’s hot where you live, just place the batter on the kitchen counter and it will ferment. For cold places, you can place the batter inside the oven with oven lights on (and oven off) or you can place the batter in the Instant pot and use the yogurt button to ferment the batter. You can also preheat your oven to 200 F for 10 minutes and then turn off the oven (please don’t let the oven be “on” else the heat will kill the yeast). Wait for 10 minutes for the temperature to come down a little and then place the batter inside the oven to ferment. Personally, I always stick to the Instant pot and it gives me consistent results.
Adding salt: Adding salt before fermentation or after fermentation is often a topic of debate. The iodine in the salt is said to inhibit fermentation and that’s why so many experts say that you should add salt later once the batter is fermented. However, I always add salt (and I use sendha namak which doesn’t have iodine) before fermentation and mixing it with the ground rice and dal (using my hands) seems to help in the fermentation process in colder places. You have to see what works for you. Adding salt before fermentation is what works for me. Make sure to always add non-iodized salt to the batter if you are adding it before the fermentation.
How to Make Idli -Step by Step Tutorial
Gather all the ingredients- idli rice, urad dal, methi (fenugreek) seeds and poha. Take 4 cups (800 grams) of idli rice and rinse it under running water until the water turns clear. Transfer the rice to a large bowl, add enough water around 6-7 cups to cover it. Cover the bowl with a lid and let it soak for 5 to 6 hours as well. Now, take 1 cup (200 grams) of urad dal gota and rinse it under running water and then transfer it to a medium size bowl. Now, add 2 to 3 cups of water to the dal, also add 1/2 teaspoon of fenugreek seeds (methi). Cover and soak the dal for 5 to 6 hours. 30 minutes before grinding the dal and rice (so if you are soaking them for 6 hours, do this when 5& 1/2 hours have passed away), soak 1/4 cup poha in some water. The poha needs to be soaked only for 30 minutes. Once 6 hours are up, drain the water from the dal and fenugreek seeds using a strainer. Now add around 1 (8 oz) to 1 & 1/4 cups (10 oz) cold water to a blender (I used my Blendtec) and then add the drained dal and fenugreek seeds to the blender. Start with 1 cup of water and add more as needed. Grind the dal to a fine paste. On Blendtec, you can use the smoothie function which grinds for 60 seconds. Transfer the ground dal to the steel pot of the instant pot (if you are using the instant pot to ferment the batter) or you any large container otherwise. Now, drain the water from the rice using a strainer. Also, drain water from the soaked poha. Add around 1 & 1/2 cups (12 oz) ice cold water to the same blender and add the drained rice along with drained poha to it. PS: start with 1 & 1/4 cups of water and add the remaining 1/4 if needed. Grind the rice similarly to a smooth paste. The rice usually will have a slight coarse texture compared to the dal. Now, transfer the ground rice to the same pot with the dal. Add 2 teaspoons of sendha namak and start mixing the ground rice and dal with the salt using your hands. Do not add salt before if you live in a warm place. I live in a cold place so adding the salt before helps in starting the fermentation process. Mix everything using your hands for 2 to 3 minutes, this helps in starting the fermentation process. The consistency of the batter should be thick but pouring. It should not be runny. If using an Instant pot, place the steel pot back into the instant pot and cover it with a glass lid. I recommend using a glass lid rather than the instant pot lid since the batter might ferment and lock the lid so the glass lid works better. Press the yogurt button and set the time to 14 hours. The position of the valve does not matter on the yogurt setting. I live in a cold place so it takes around 14 hours for the batter to ferment in the Instant Pot. If you live in a warm place, this can happen in 6 to 8 hours or even earlier in summers. If you don’t have an instant pot, cover the bowl with a plate and place it on the countertop if it’s hot where you live. If it’s cold where you live, place the bowl inside the oven with oven lights on (and oven off obviously). The timing the batter will take to ferment will vary greatly depending on the weather. After 14 hours, my batter was well fermented. It had lots of bubbles on top, it had nicely risen and was bubbly at the top. You will also notice that the batter becomes a little runnier/thinner after fermentation. You can drop some batter in a bowl filled with water if you are not sure if your batter has fermented or not. If well fermented, the batter will float in water else it will sink to the bottom of the bowl. To make idli, grease the idli molds with little oil. Add water to your steamer and let the water come to a boil on medium heat. Fill the molds with the idli batter. Don’t overfill them. Once the water in the steamer starts boiling, place the idli stant with the insert in the steamer. Cover the steamer and steam for around 8 to 10 minutes only on medium high heat. Do not steam for a long period as that leads to rubbery, dry and chewy idlis. Remove the steamer from heat, let it sit like that for 2 minutes. Then open the steamer, carefully remove the idli molds from the steamer. Let the idlis sit for 5 minutes and then remove them carefully from the molds using a flat spatula or knife. If you try to remove them immediately, they might break or stick. Enjoy the idlis hot with sambar and coconut chutney or peanut chutney.
Storing the Idli Batter In Fridge
My idli batter usually stays well in the fridge for 3 to 4 days. I just bring it to room temperature before making the idli. If you have steamed the idlis already, and can’t consume them all, you can place the leftover idlis in the fridge and reheat them in the microwave. Put the idlis on a plate and put a damp paper towel on top and microwave for 1 to 2 minutes. They should be soft and nice again. You can also reheat idlis in a steamer.
Add some poha in the batter: To make soft idlis, definitely add some poha to the batter. Anywhere around 1/4 to 1/2 cup of poha will be good in this recipe. The poha only needs to be soaked for 20 to 30 minutes. It can either be thin poha or thick poha, it doesn’t matter. I have used thick poha in this recipe.
Do not add too much water while grinding the batter: This is an important point and you have to be careful about this. I have given a rough estimate on how much water should be added, but it will vary on the variety of rice and dal being used. Runny batter will lead to flat idlis so make sure that you do not add excess water while grinding the rice and dal. You must remember that the batter also thins out a little once it is fermented so don’t add too much water while grinding.
Do not use old rice and dal: One of the things which I have noticed that does make a difference to the final texture of the idli is how old is the rice and dal that you have used to make the idli. Sometimes, we use dal and rice which has been sitting in the pantry for too long and that doesn’t give the desired result.
Steaming for a longer time results in hard idli: The idlis need to be steamed for just the right amount of time. If you steam them longer, they might dry out. 8 to 10 minutes is my sweet spot.
Freezing the Idlis
Sometimes, I make a big batch of Idlis and freeze them. Idlis actually freeze beautifully. Steam them as usual and then allow them to cool down. You don’t need to let them cool down all the way (locking some moisture helps in the idlis staying soft once reheated), just let them come to room temperature and then freeze in ziplock bags. I usually freeze 4 to 5 idlis in a single bag. They will be good for up to 2 months in the freezer. Reheating the frozen idli: when you want to eat the idlis, you can reheat them in the microwave or stovetop. My preferred way to reheat frozen idlis is on the stovetop using a steamer. Heat water in a steamer, once the water comes to a boil, place the idlis into the steamer and steam for 6 to 7 minutes on medium heat. They will be soft and nice once again. And you can enjoy them with sambar. If you want to reheat them using a microwave, cover the idli with a damp paper towel, then place in a plate and microwave in 1 minute increments until it is soft.
How To Make Idli In Instant Pot
To steam the idlis in an Instant pot, add around 1 & 1/2 cups of water to the steel pot of the Instant Pot and let it come to a boil. Fill the idli molds with the batter. Once the water starts boiling, place the idli stand in the instant pot and close the lid. Press the steam button and steam on high for around 10 to 12 minutes. Turn the pressure valve to the venting position since we don’t want to pressure cook the idli. Note: on venting position, you will have to calculate the cooking time externally as the instant pot will not display any timer.
