Watch blackberry jam video tutorial
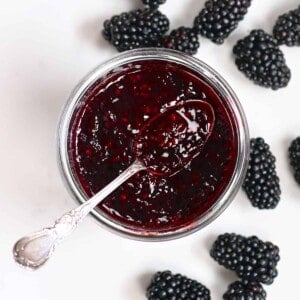
See the recipe card for full information on ingredients and quantities. Every time I eat blackberry jam, it reminds me of blackberry picking on warm summer evenings. That’s why I’ve developed this easy homemade blackberry jam recipe – it allows you to preserve the summer’s bounty and enjoy luscious, tasty jam year long. For this recipe, you need only four ingredients: blackberries, lemon juice, sugar, and pectin. Working with a small batch like my recipe allows you to make the jam in under 20 minutes. Prepare this along with homemade strawberry jam and easy raspberry jam (no-pectin), and you are ready for your summer garden party or Sunday brunch! You can also serve it alongside homemade fig jam to complement a cheese board!
How to make blackberry jam
Jar the jam
Place the jars on a heatproof surface and fill them with the jam to about ¼ inches (0.5 cm) from the top. This process is easier with a canning funnel. Wipe away any spillage on the outside of the jar with a damp cloth, and then seal the jars. If you’re planning to can the jam, prepare the canner by adding the trivet/rack to the bottom and filling it with enough water to submerge the jars by 2 inches. Bring to a boil over medium heat and boil the sterilized jars for 10 minutes. Then, keep them in the water so they stay warm until ready to fill. Then add all the sugar and bring the mixture to a full rolling boil. Stir constantly to allow the sugar to dissolve. Once you have a full rolling boil, let the jam boil for 1 minute. Finally, remove the pan from the heat and skim off any excess foam from the surface of the jam. Continue with the jarring steps below. Cook the jam: Transfer the crushed blackberries to a medium heavy-based pan and add the sugar and lemon juice. Bring to a rolling boil over high heat and stir constantly to help dissolve the sugar. Add the liquid pectin and stir to incorporate. Keep the rolling boil for 1 minute and stir constantly. Finally, remove the pan from the heat and skim off any excess foam from the surface of the jam. Continue with jarring the jam. As the jam cools, it will set into a thicker consistency. The jam is now ready to enjoy or store short-term in the fridge or freezer. If you try this homemade blackberry jam recipe, let me know how it goes in the comments below. I’d appreciate a recipe card rating and would love to see your recipe recreations – tag me on Instagram @Alphafoodie! Bring to a boil and process the jars with the canner lid on for around 10 minutes (this can change depending on your altitude). Then, remove the lid and let the jars rest for 5 minutes in the canner. Finally, remove the jars from the water and leave them to cool on a wooden or another heatproof surface. You’ll know that the lids are sealed properly when they are concave and won’t wiggle when pressed. If you have one that hasn’t been sealed properly, then place it in the fridge to use first. Voila, your homemade blackberry jam is ready to store in your pantry or cupboard!
Spread it on toast: Of course, it tastes amazing, spread over warm toast, homemade bagels, or even homemade croissants. It’s also a great topping for pancakes and waffles. Fill desserts: You can fill pastries, cakes, tarts, and cookies (blackberry jam makes a great combo with these pistachio thumbprint cookies). Top yogurt and oatmeal: It’s a great way to add a fruity and sweet boost to your morning breakfast bowls. Swirl into ice creams: Mix some jam into this instant vanilla ice cream or add a few spoonfuls to these vegan magnum ice creams. Glaze for meats: Mix the jam with vinegar, soy sauce, or mustard; this creates a sweet and savory glaze that enhances the meat’s flavor (try it for chicken, duck, or pork).