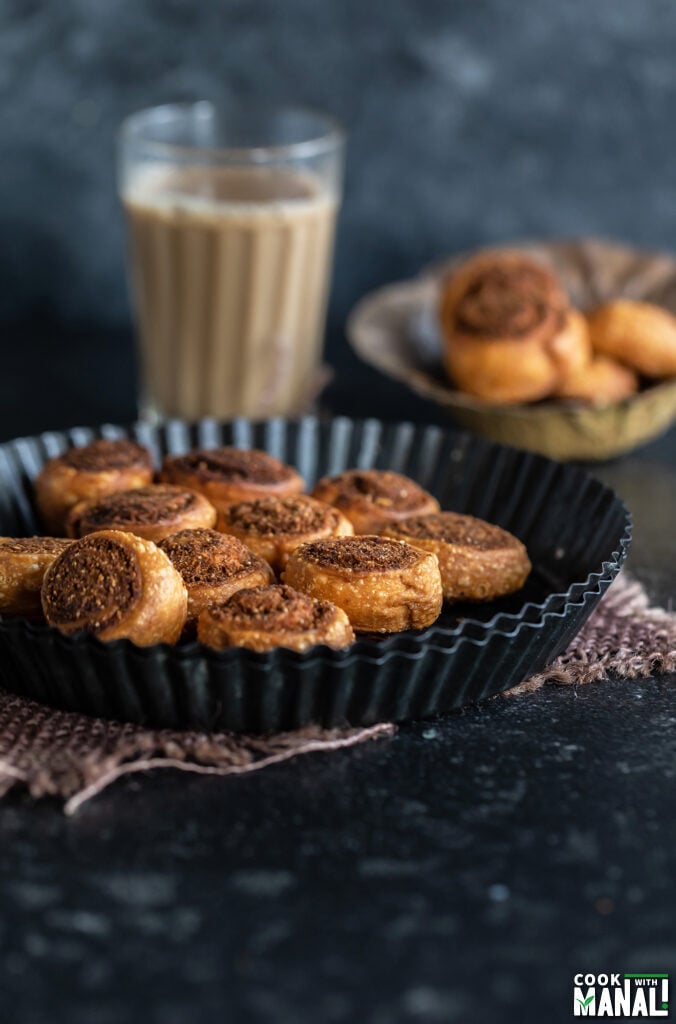
Oct 07, 2022 I love all things crispy and crunchy with my chai like mathri, samosa etc. Most chai time Indian snacks are deep fried and crispy and I am low key addicted to them. I have zero self control when it comes to Indian snacks, I just cannot resist them and often end up eating the whole packet in one go. Bhakarwadi is another favorite of mine which is crispy, fried and full of flavor. This snack is popular in western states of Maharashtra and Gujarat. There are different variations of bhakarwadi depending on the region. Some use besan in the dough while some don’t. Some versions also use sev in the stuffing while others do not. The version that I am sharing here isn’t too spicy and is filled with coconut, sesame seeds. I made it both the traditional way by deep frying and also by air frying.
Ingredients
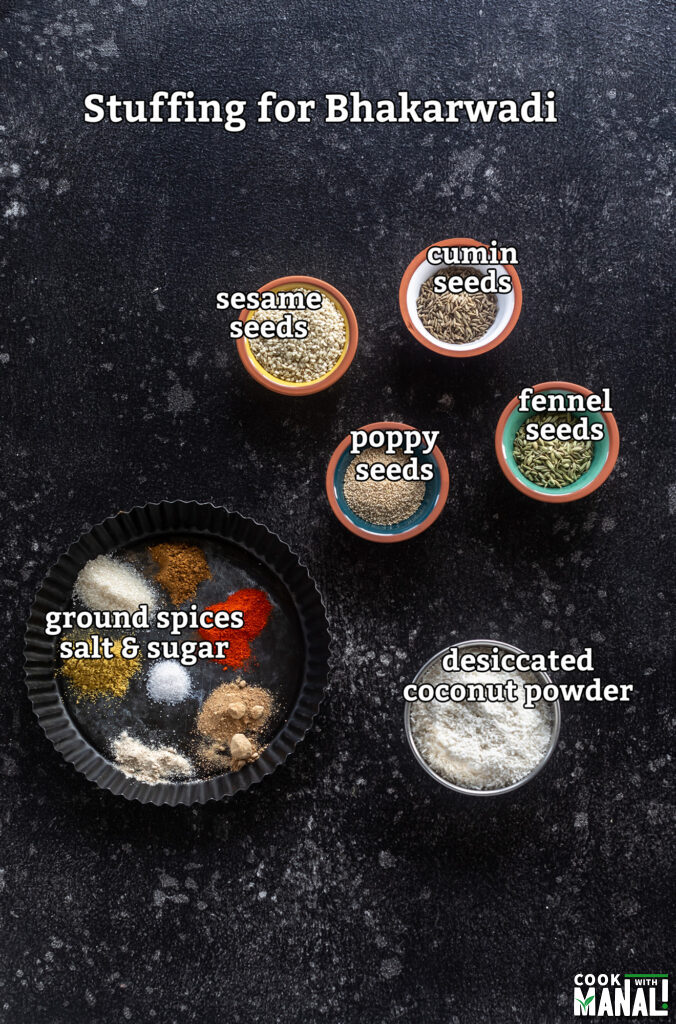
For the dough Plain Flour: also known as maida or all purpose flour in the main ingredients for the dough. If you want to use whole wheat flour, I would recommend replacing 50% of plain flour with whole wheat. Besan: adds flavor to the dough although you can skip it and make the dough with plain flour only. For the stuffing The stuffing is made with desiccated coconut, sesame seeds, poppy seeds and a bunch of other spices. It has a spicy, tangy and sweet taste. Although my filling isn’t that spicy. If you wish to make the filling spicy, you can replace the Kashmiri red chili powder with regular chili powder.
Important Tips To Make Perfect Bhakarwadi
Rub the oil nicely with the flour until it is well incorporated. This makes the snack flaky, so make sure to do this step well.Resting the dough is important, you are able to roll the dough and work with it easily when it has rested. Do not forget to brush the rolled dough with water before adding the filling. This will make sure that the filling sticks to the dough.Wetting the dough slightly is also important for the same reason as above. Roll the pinwheels tightly else the pinwheel will open up and the filling will seep out.Cover all the prepared bhakarwadi covered with a damp paper towel as you roll and shape the remaining ones. If you don’t cover them, they will dry out.
Step by Step Pictures
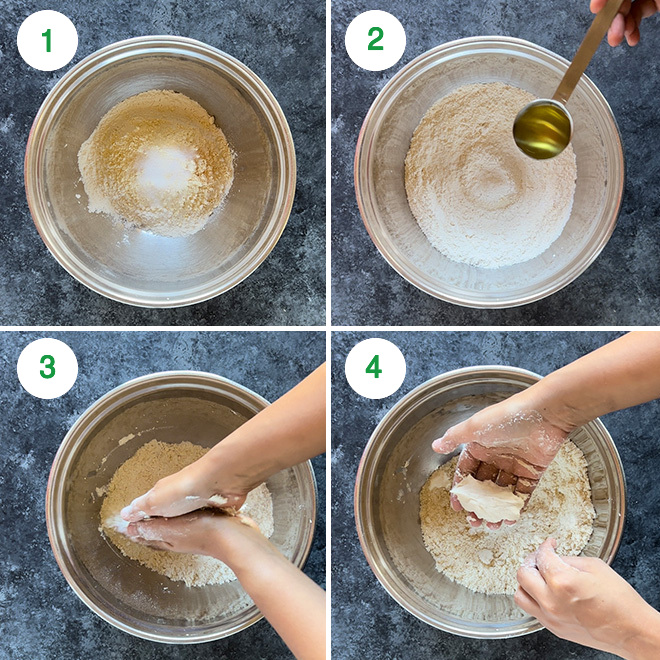
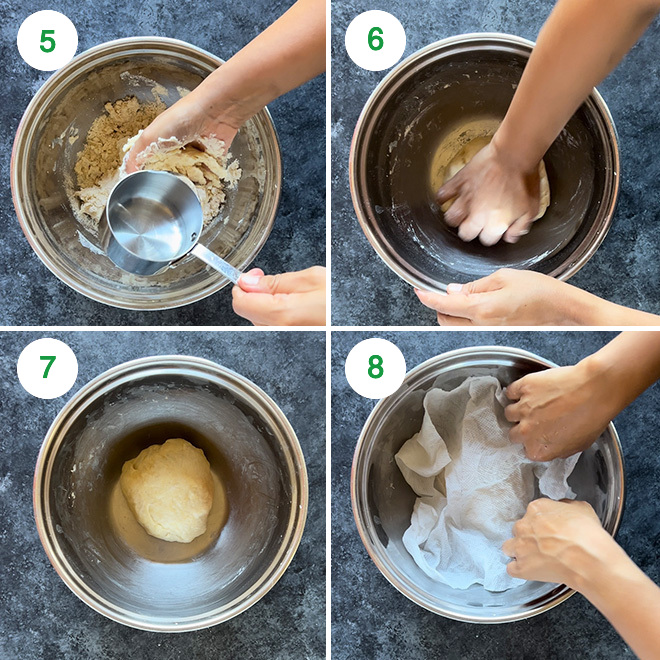
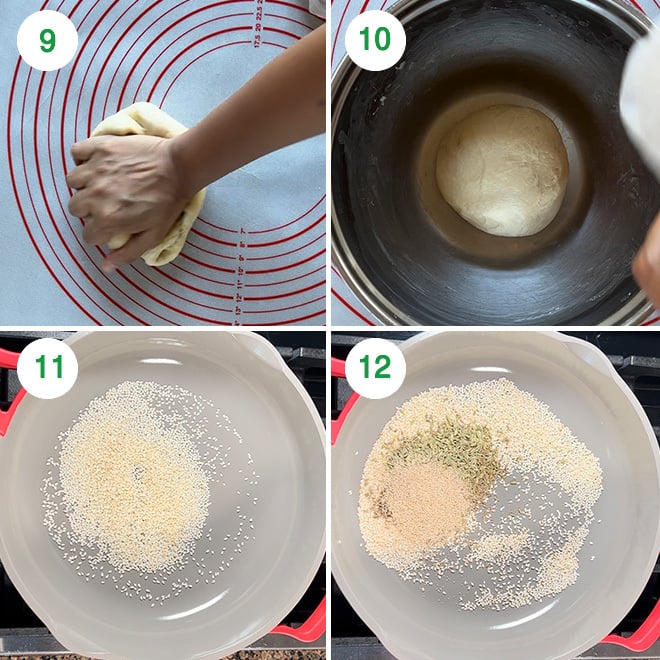
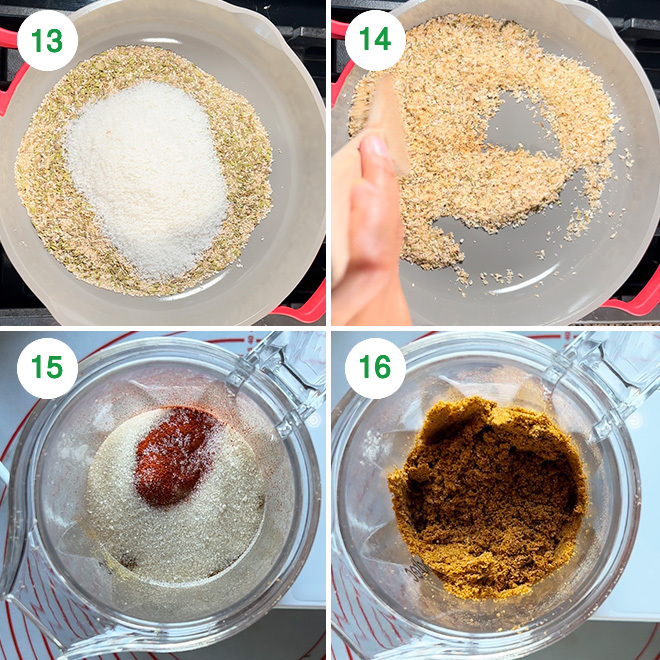
1- To a bowl add 1 & 1/2 cups of all purpose flour (195 grams), 3 tablespoons of besan (27 grams), and 3/4 teaspoon salt. Whisk to combine using a wire whisk. 2- Now add around 2 & 1/2 tablespoons of oil (I used avocado oil, you can use any oil of choice). 3- Using your fingers, mix the oil with the flour. Rub it between your palms to incorporate the oil with the flour. 4- Press the flour mix between your palm, if it holds its shape, it means the oil is enough and was well incorporated. 5- Now, start adding water little by little to bring the dough together. 6- Knead to a smooth dough, you would need around 1/3 to 1/2 cup water but this amount may vary depending on the quality of flour being used. 7- Make a soft dough (but not too soft) and transfer it to a bowl. 8- Cover it with a damp cloth or paper towel for 10 minutes. 9- After the dough has rested for 10 minutes, remove it from the bowl and knead it for 5 minutes. This helps in rolling the dough easily later on, so don’t skip this step. 10- Transfer the dough back to the bowl again, cover with a damp cloth and let it rest for 20 minutes. 11- Meanwhile work on the filling. To a pan on medium heat add 2 tablespoons of white sesame seeds. 12- Roast for around 3 minutes, stirring often. Then add 1 & 1/2 teaspoon cumin seeds, 1 & 1/2 teaspoon fennel seeds and 2 teaspoons poppy seeds. Roast for around 1 minute. 13- Add 3/4 cup to 1 cup of desiccated coconut powder. 14- Roast for around 2 to 3 minutes, stirring often until the coconut turns light golden brown in color. At this point, remove the pan from heat and transfer everything to a plate and let it cool down. 15- Once the mixture has cooled down, transfer it to a blender. Then add the following:
1 teaspoon coriander powder3/4 teaspoon garam masala1 teaspoon Kashmiri red chili powder (or add more to taste)1 teaspoon amchurpinch of hing3/4 teaspoon salt or to taste2 tablespoons sugar (adjust this to taste)
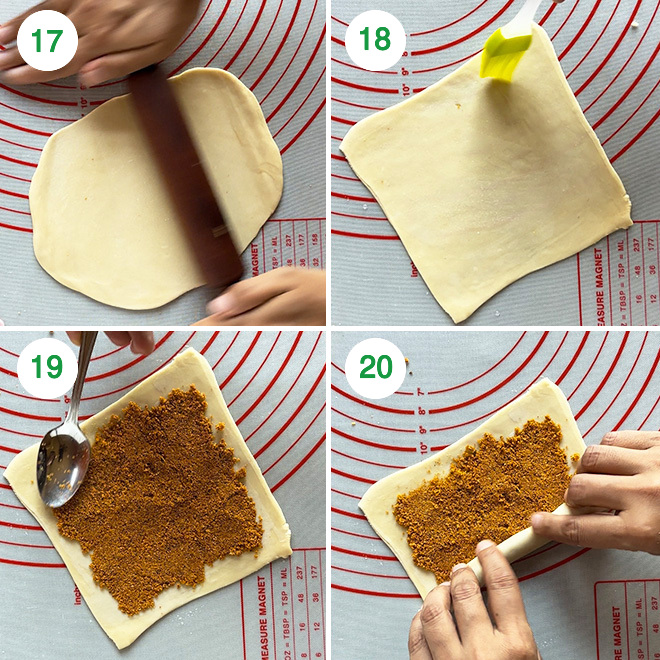
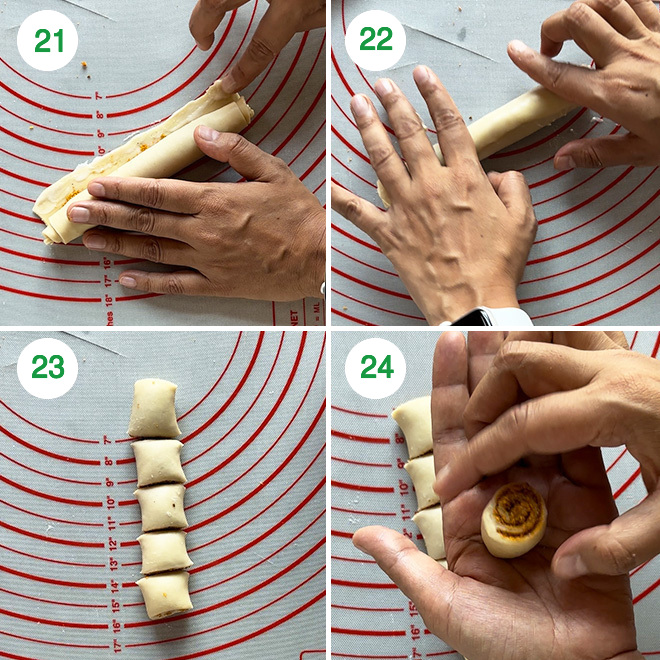
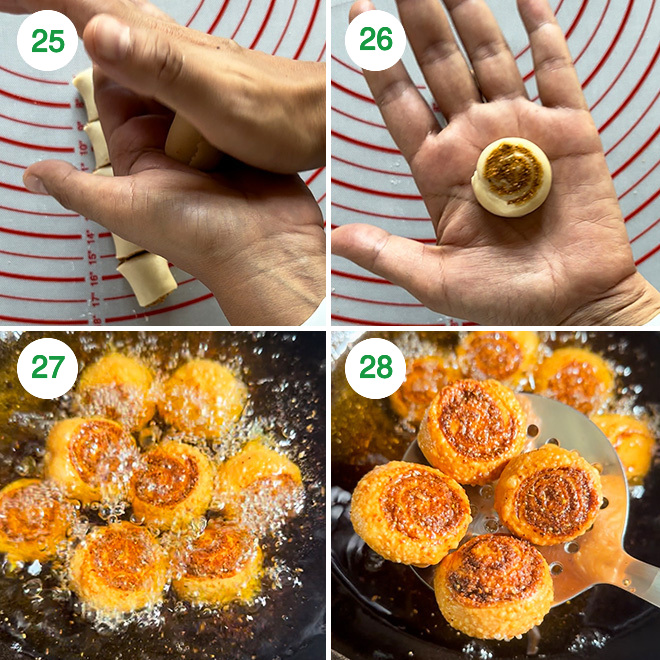
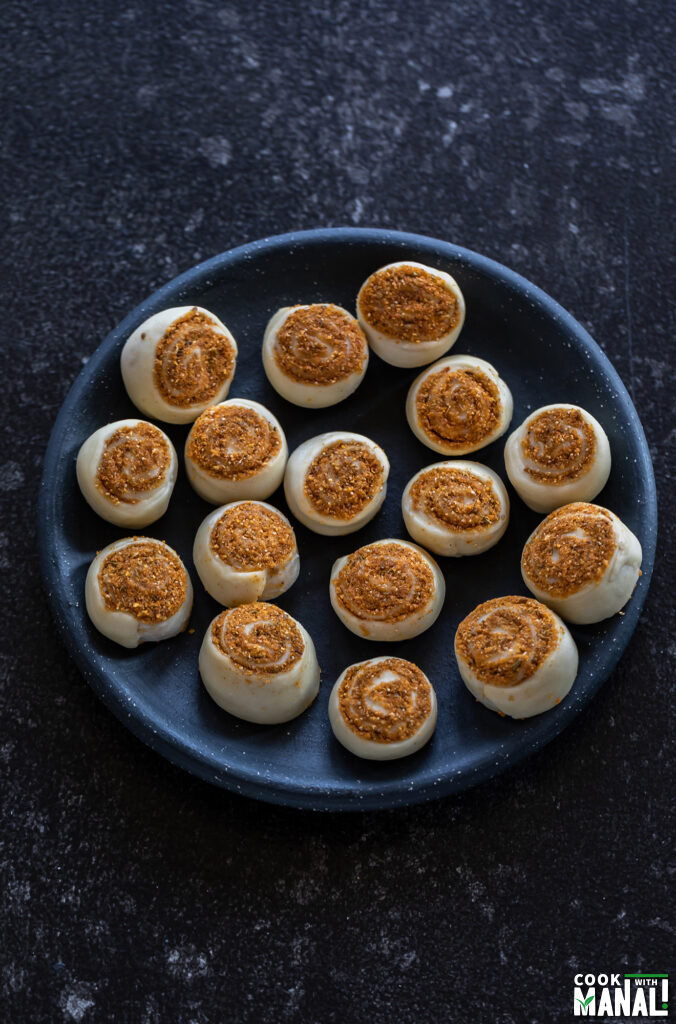
16- Blend everything until combined. Remember to not over-blend here else coconut will release oil and the entire stuffing will become wet. We don’t want that. Transfer stuffing to a plate and add 1 to 2 tablespoons of water and mix. You want to make the stuffing a little wet so that it’s easy to fill and roll it. But do not make it super wet. 17- Now, divide the dough into 5 equal parts, around 80 to 90 grams each. Take one of the dough balls, roll it between your palms to make it round (keep the remaining dough covered with a damp paper towel). Then start rolling it using a rolling pin. Roll it into approximately 1/32 inch thickness. 18- Trim the edges to make a square or rectangle, around 7-inches long. Brush the dough lightly with water. 19- Now add the filling, leaving an-inch from all the sides. Press the filling with the back of your spoon so that it sticks. Since we moistened the filling a little and also brushed the dough with water, it will stick. Do not overfill. 20- Now, start rolling from one end. 21- Roll tightly as you move towards the opposite end. It’s important to roll tightly else the filling will come out when you fry. Apply paste of water and flour (2 tablespoons flour mixed with 4 tablespoons water) at the other end. This will help in sealing the roll well. Also, thin out the ends by pressing with your fingers as you apply the flour-water paste. 22- Bring the ends together and seal. Gently roll the log using both your hands. 23- You will have a log around 6 to 7 inches in length. Cut pieces of around 1 inches using a knife. 24- Take one of the cut pieces, rotate it using your fingers and give it a round shape. 25- Then press from the top to flatten it and seal the filling. 26- Make all bhakarwadi similarly. Keep the ones that are ready under a damp cloth at all times while you work with the rest of the dough else they will dry out. Roll, fill and cut until you have used all the dough. 27- Now heat around an inch of oil in a kadai on low-medium heat. Oil temperature has to be medium-low. If it’s too high it will not turn crispy, and if it’s too low, the bhakarwadi will absorb too much oil. So, you want it low-medium (around 140-150 C/285-300 F). 28- Drop a few pieces of bhakarwadi and fry until they turn golden-brown, turning them in between. It takes around 8 to 10 minutes for each batch to fry. If the temperature becomes too high in between batches, then wait for the oil to cool down a little and then fry the next batch. Fry all bhakarwadi similarly and place them on a tissue paper to drain excess oil. Once they have cooled down, store in an airtight container.
Air Fryer Bhakarwadi
To air fry bhakarwadi, preheat your air fryer according to instructions on your air fryer. Air fry at 340 F degrees for around 17 to 18 minutes, shaking them once in between. You might need more or less time depending on the air fryer you are using since every air fryer is different. For air frying, I would suggest keeping bhakarwadi to no bigger than an inch. I would also suggest rolling the dough even thinner than what you would do for regular bhakarwadi. The reason is that we fold and roll the dough and the layer in the center becomes quite thick and it might not get as crispy in the air fryer in the same amount of time if it’s too thick. Also flatten the bhakarwadi more when air frying. So keep these things in mind if you are going to air fry them.
Important Tips About Frying
The correct temperature of oil is essential. Use low-medium temperature for frying the bhakarwadi. If you fry them at high heat, they will not crisp up and if the temperature is too low, then they will absorb a lot of oil.Apply water on the dough before adding the filling and also wet the filling by adding some water to it. This way the filling will stick to the dough. Also roll the dough tightly. If the filling doesn’t stick well and the dough isn’t rolled tightly, then the filling will come out when you fry them in oil.Do use the flour-water waste to seal the bhakarwadi else the pinwheels can open in the oil.
Storage
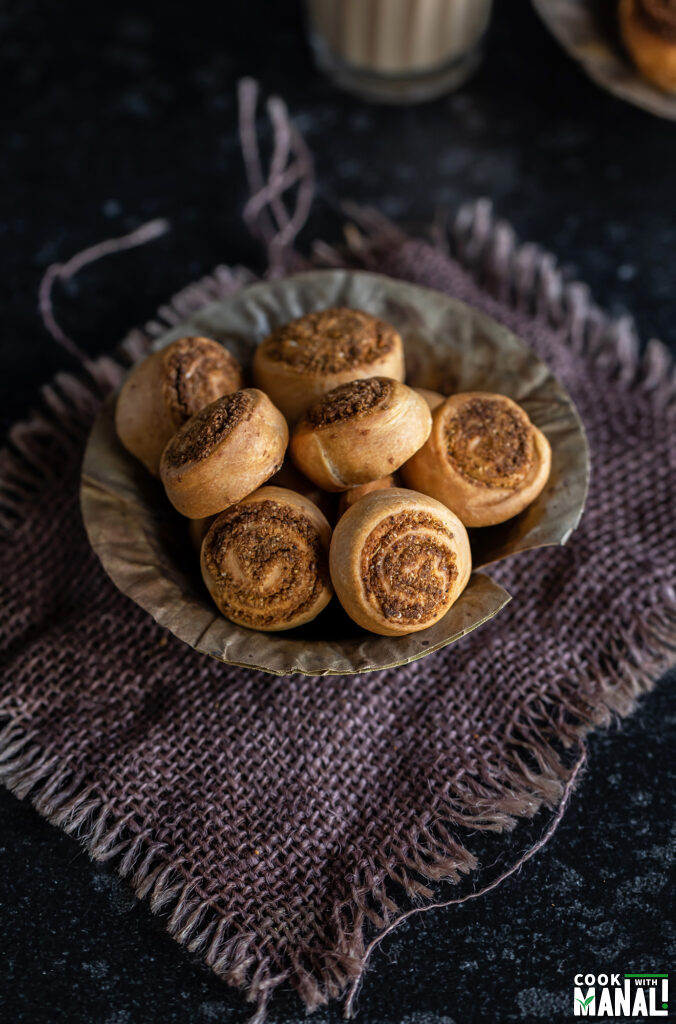
Store fried bhakarwadi in an airtight container for 2 to 3 weeks easily and enjoy with a cup of chai. They make a great chai time snack. If you’ve tried this Recipe then don’t forget to rate the recipe! You can also follow me on Facebook, Instagram to see what’s latest in my kitchen and on YouTube to watch my latest videos.

title: “Bhakarwadi Recipe " ShowToc: true date: “2024-09-29” author: “Jody Speer”
Oct 07, 2022 I love all things crispy and crunchy with my chai like mathri, samosa etc. Most chai time Indian snacks are deep fried and crispy and I am low key addicted to them. I have zero self control when it comes to Indian snacks, I just cannot resist them and often end up eating the whole packet in one go. Bhakarwadi is another favorite of mine which is crispy, fried and full of flavor. This snack is popular in western states of Maharashtra and Gujarat. There are different variations of bhakarwadi depending on the region. Some use besan in the dough while some don’t. Some versions also use sev in the stuffing while others do not. The version that I am sharing here isn’t too spicy and is filled with coconut, sesame seeds. I made it both the traditional way by deep frying and also by air frying.
Ingredients
For the dough Plain Flour: also known as maida or all purpose flour in the main ingredients for the dough. If you want to use whole wheat flour, I would recommend replacing 50% of plain flour with whole wheat. Besan: adds flavor to the dough although you can skip it and make the dough with plain flour only. For the stuffing The stuffing is made with desiccated coconut, sesame seeds, poppy seeds and a bunch of other spices. It has a spicy, tangy and sweet taste. Although my filling isn’t that spicy. If you wish to make the filling spicy, you can replace the Kashmiri red chili powder with regular chili powder.
Important Tips To Make Perfect Bhakarwadi
Rub the oil nicely with the flour until it is well incorporated. This makes the snack flaky, so make sure to do this step well.Resting the dough is important, you are able to roll the dough and work with it easily when it has rested. Do not forget to brush the rolled dough with water before adding the filling. This will make sure that the filling sticks to the dough.Wetting the dough slightly is also important for the same reason as above. Roll the pinwheels tightly else the pinwheel will open up and the filling will seep out.Cover all the prepared bhakarwadi covered with a damp paper towel as you roll and shape the remaining ones. If you don’t cover them, they will dry out.
Step by Step Pictures
1- To a bowl add 1 & 1/2 cups of all purpose flour (195 grams), 3 tablespoons of besan (27 grams), and 3/4 teaspoon salt. Whisk to combine using a wire whisk. 2- Now add around 2 & 1/2 tablespoons of oil (I used avocado oil, you can use any oil of choice). 3- Using your fingers, mix the oil with the flour. Rub it between your palms to incorporate the oil with the flour. 4- Press the flour mix between your palm, if it holds its shape, it means the oil is enough and was well incorporated. 5- Now, start adding water little by little to bring the dough together. 6- Knead to a smooth dough, you would need around 1/3 to 1/2 cup water but this amount may vary depending on the quality of flour being used. 7- Make a soft dough (but not too soft) and transfer it to a bowl. 8- Cover it with a damp cloth or paper towel for 10 minutes. 9- After the dough has rested for 10 minutes, remove it from the bowl and knead it for 5 minutes. This helps in rolling the dough easily later on, so don’t skip this step. 10- Transfer the dough back to the bowl again, cover with a damp cloth and let it rest for 20 minutes. 11- Meanwhile work on the filling. To a pan on medium heat add 2 tablespoons of white sesame seeds. 12- Roast for around 3 minutes, stirring often. Then add 1 & 1/2 teaspoon cumin seeds, 1 & 1/2 teaspoon fennel seeds and 2 teaspoons poppy seeds. Roast for around 1 minute. 13- Add 3/4 cup to 1 cup of desiccated coconut powder. 14- Roast for around 2 to 3 minutes, stirring often until the coconut turns light golden brown in color. At this point, remove the pan from heat and transfer everything to a plate and let it cool down. 15- Once the mixture has cooled down, transfer it to a blender. Then add the following:
1 teaspoon coriander powder3/4 teaspoon garam masala1 teaspoon Kashmiri red chili powder (or add more to taste)1 teaspoon amchurpinch of hing3/4 teaspoon salt or to taste2 tablespoons sugar (adjust this to taste)
16- Blend everything until combined. Remember to not over-blend here else coconut will release oil and the entire stuffing will become wet. We don’t want that. Transfer stuffing to a plate and add 1 to 2 tablespoons of water and mix. You want to make the stuffing a little wet so that it’s easy to fill and roll it. But do not make it super wet. 17- Now, divide the dough into 5 equal parts, around 80 to 90 grams each. Take one of the dough balls, roll it between your palms to make it round (keep the remaining dough covered with a damp paper towel). Then start rolling it using a rolling pin. Roll it into approximately 1/32 inch thickness. 18- Trim the edges to make a square or rectangle, around 7-inches long. Brush the dough lightly with water. 19- Now add the filling, leaving an-inch from all the sides. Press the filling with the back of your spoon so that it sticks. Since we moistened the filling a little and also brushed the dough with water, it will stick. Do not overfill. 20- Now, start rolling from one end. 21- Roll tightly as you move towards the opposite end. It’s important to roll tightly else the filling will come out when you fry. Apply paste of water and flour (2 tablespoons flour mixed with 4 tablespoons water) at the other end. This will help in sealing the roll well. Also, thin out the ends by pressing with your fingers as you apply the flour-water paste. 22- Bring the ends together and seal. Gently roll the log using both your hands. 23- You will have a log around 6 to 7 inches in length. Cut pieces of around 1 inches using a knife. 24- Take one of the cut pieces, rotate it using your fingers and give it a round shape. 25- Then press from the top to flatten it and seal the filling. 26- Make all bhakarwadi similarly. Keep the ones that are ready under a damp cloth at all times while you work with the rest of the dough else they will dry out. Roll, fill and cut until you have used all the dough. 27- Now heat around an inch of oil in a kadai on low-medium heat. Oil temperature has to be medium-low. If it’s too high it will not turn crispy, and if it’s too low, the bhakarwadi will absorb too much oil. So, you want it low-medium (around 140-150 C/285-300 F). 28- Drop a few pieces of bhakarwadi and fry until they turn golden-brown, turning them in between. It takes around 8 to 10 minutes for each batch to fry. If the temperature becomes too high in between batches, then wait for the oil to cool down a little and then fry the next batch. Fry all bhakarwadi similarly and place them on a tissue paper to drain excess oil. Once they have cooled down, store in an airtight container.
Air Fryer Bhakarwadi
To air fry bhakarwadi, preheat your air fryer according to instructions on your air fryer. Air fry at 340 F degrees for around 17 to 18 minutes, shaking them once in between. You might need more or less time depending on the air fryer you are using since every air fryer is different. For air frying, I would suggest keeping bhakarwadi to no bigger than an inch. I would also suggest rolling the dough even thinner than what you would do for regular bhakarwadi. The reason is that we fold and roll the dough and the layer in the center becomes quite thick and it might not get as crispy in the air fryer in the same amount of time if it’s too thick. Also flatten the bhakarwadi more when air frying. So keep these things in mind if you are going to air fry them.
Important Tips About Frying
The correct temperature of oil is essential. Use low-medium temperature for frying the bhakarwadi. If you fry them at high heat, they will not crisp up and if the temperature is too low, then they will absorb a lot of oil.Apply water on the dough before adding the filling and also wet the filling by adding some water to it. This way the filling will stick to the dough. Also roll the dough tightly. If the filling doesn’t stick well and the dough isn’t rolled tightly, then the filling will come out when you fry them in oil.Do use the flour-water waste to seal the bhakarwadi else the pinwheels can open in the oil.
Storage
Store fried bhakarwadi in an airtight container for 2 to 3 weeks easily and enjoy with a cup of chai. They make a great chai time snack. If you’ve tried this Recipe then don’t forget to rate the recipe! You can also follow me on Facebook, Instagram to see what’s latest in my kitchen and on YouTube to watch my latest videos.
